Download the scenes, texture maps, and objets
here!
First thing first: We want to keep it simple. So no functions, no complicated building. Choose some good textures... And start.
STEP 1:For this one, we will use a plan with 120 by 120 size. So, no need of: planet, atmo, heightfield, compute terrain, or base colors.
We just have: A texture group, connected to a surface shader (child), connected to the plan. We have also 2 power fractal shader (with displacement) connected to the surface shader (input). That will be the general displacement of the scene.

The texture group is constitued (top to bottom) of: an image map shader (with the b&w bump map texture), a colour adjust shader (to adjust the bumpmap, if it's not perfect), a displacement shader (to give the relief), an image map shader (the texture), and a colour adjust shader.
You can also add, if needed, a transform shader in last position, to translate the texture and put a textured part exactly at the right place. No need here.
When this build is done you just need to adjust the scale of the images (same in the two image map shader), the bump (displacement shader), and eventually tweak the color of the texture (colour adjust shader).
 STEP 2:
We have a nice sand texture. Let's add an other: We add a second texture group. It's built exactly the same way. The only change is the texture map & bump map. Choose a texture, tweak the parameters (scale, bump, color)... When it's done we need to mix them.

To do that I used a merge shader, a power fractal shader (mix controller), and a colour adjust shader (used if needed, to tweak the color of the mixed texture). You can replace the power fractal shader by whatever you want. All the settings will be on your mix controller.
Hint: You can give some relief to one of the two textures by activating the "apply displacement" in the image map shader, and give a positive value to the "displacement offset" (see "map 2 (image)" shader in "Texture 2" group).
 STEP 3:
Here we add three more textures. The building method is exactly the same. Texture 3 & 4 groups are rocks texture. Texture 5 group is a lichen / foam texture. Texture groups are set one by one. After that, we adjust settings of the mixer controllers.

We add also some micro-displacements to the rocks, using two power fractal shader (connected on input of the group bump displace).
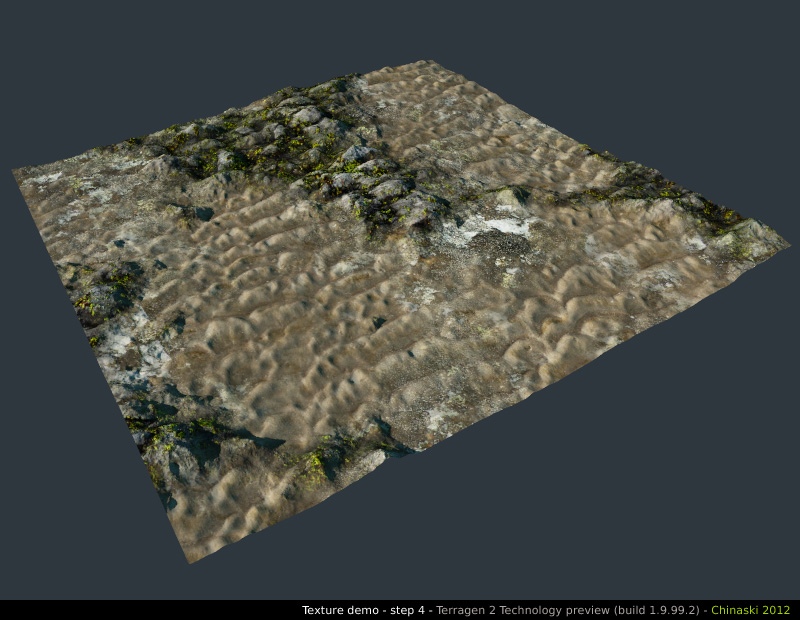
 STEP 4:
Here we add the last mix node. All the texture groups are now connected to the surface layer. It's time to run some tests (random seeds on all the mixers controllers) and improve the different settings.
Hint: You can increase a little the displacement value (displacement shader) for all the textures.
 STEP 5:
Now it's the hard part. We going to add several stones shader. The first one is for little stones ("Stones - very small" shader). No big problem here: It's going below the surface shader, and I'll use one of my "Texture 2" group to texturise it. I just need to remove the displacement (it doesn't need so much displace).
To do that I used two shaders: A transform shader (to lower the scale, and translate the texture) connected to a defaut shader via the colour function input. No more bump, problem solved.
Hint: If you want you can add some micro-displacement to your micro-stones, by connecting the two "micro-displacements" shader to the input of the defaut shader. Here it was not necessary.

Now I add two big stones shader. I want them to have a complex rock texture (Merge Mix texture 3-4-5) but with a different scale, and an additional displacement.
First I add a surface layer ("Stones surfaces", on the left, in purple group named "Cracked Rocks"). On input of this one, I put a new micro-displacements power fractal shader ("micro-displacements stones"). This way I have a specific micro-diplacement for the stones.
For big displacement I use the famous "Cracked Rocks" functions clipfile (I don't remember who done it, but thanks to him, it's just perfect). This function group is connect to the displacement function input of my Stones surfaces layer. Settings of the thing is in the three "Voronoi Scale" and in the displacement multiplier of the Stones surface layer.
At this step I must do the same thing that for the small stones, ie recover my texture, and put it in the child input of my stones surface layer. So I'll use the same method: transform shader -> default shader -> surface. Easily done for the color (Merge Mix texture 3-4-5 -> Transform -> defaut color function -> Surface). For the displacement (I want it, this time), I must copy the merge / mix shader and the merge / mix controller, and connect the two copy to the bumpmap instead of the colormap.
This way I have color and displacements (than I can set) on my default shader. After calibration of scales and various displacements, stones part is over.
 FINAL STEP:
Last step, we going to add some vegetation. For this exemple I choosed to put some grass in the low parts of my rock texture.

So I do some blending to build a mask (same technic, again), and I use a white image map to restrict my plant population. Rendering... Et voilà !

We can try to random some seeds (mixer controllers, stones, transform shader) to see if it's working...


[attachurl=1]
[attachurl=2]
[attachurl=3]
[attachurl=4]
[attachurl=5]
[attachurl=6]
[attachurl=7]
[attachurl=8]
[attachurl=9]
[attachurl=10]
[attachurl=11]
[attachurl=12]
[attachurl=13]
[attachurl=14]
[attachurl=15]