Difference between revisions of "Alpine Fractal Shader v2"
(Added descriptions and example images, conformed to new layout.) |
|||
| Line 1: | Line 1: | ||
| − | [[ | + | [[File:Alpine_00_GUI.png|470px|Alpine Fractal Shader]] |
| − | |||
| − | + | __TOC__ | |
| + | == Overview == | ||
| + | The Alpine Fractal Shader is an alternative terrain shape shader that creates a more natural, eroded-looking mountainous terrain shape than the basic Power Fractal. Unlike a heightfield erosion effect, the Alpine Fractal Shader is procedural so it retains the detail benefits of procedural terrains, as well as the ability for global coverage. This shader is more demanding to render than the Power Fractal. | ||
| + | Version 2 of the Alpine Shader includes bug fixes and adjustments that changed the output, and therefore should be used for all new projects, but Version 1 is maintained for backwards compatibility with older projects. | ||
| + | '''Settings:''' | ||
| + | <ul> | ||
| + | *'''Name:''' This setting allows you to apply a descriptive name to the node, which can be helpful when using multiple Alpine Fractal shader nodes in a project. | ||
| + | *'''Enable:''' When checked, the node is active and the settings below will affect the surface of the terrain. When unchecked, the node is ignored. | ||
| − | ''' | + | *'''Seed:''' This setting controls the fractal pattern used by the node to generate the terrain. This allows you to easily create variations of the terrain based on the node’s other settings. For example, you can define the “Feature scale” for the terrain and then explore variations on this theme by clicking on the “Random Seed” button which will change the Seed value. Using the same Seed value in multiple Alpine Fractal shader nodes will generate the same pattern. |
| + | *'''Random Seed: '''Clicking this button will randomly choose a new value for the “Seed” setting. | ||
| + | |||
| + | *'''Mask by shader:''' When checked and shader or function nodes are assigned to this setting, their values mask the Alpine fractal shader. Where the masking value is “1” no masking will occur and where the value is “0” that part of the Alpine fractal shader will be masked completely. | ||
| + | <ul> | ||
| + | [[File:Alpine_12_MaskByShader.jpg|none|800px|Mask by shader]] | ||
| + | </ul> | ||
| + | |||
| + | *'''Invert mask:''' When checked, the inverse of the shader or function nodes assigned as the mask is used as the mask. | ||
| + | </ul> | ||
| + | == Scale / Displacement Tab == | ||
| + | [[File:Alpine_01_ScaleDisplacementTab.png|none|470px|Scale / Displacement Tab]] | ||
| + | |||
| + | The settings under this section control the complexity and size of the fractal pattern that displaces the terrain. Understanding how these settings work with the Scale step value, found under the Setting tab, is critical in determining the final scale of the pattern. | ||
| + | |||
| + | In the illustration below, the deposition and warp settings have been disabled in order to focus on the fractal pattern. The Feature scale is set to the default 4000 metres. As the Lead-in octaves increase, additional noise layers are added to the fractal pattern. Each noise layer is larger than its predecessor. How much larger is determined by the Scale step value. | ||
| + | |||
| + | [[File:Alpine_19_OverviewLeadInScale.jpg|none|800px|Comparison of Alpine fractal pattern as Lead-in scale is increased.]] | ||
| + | |||
| + | |||
| + | <ul> | ||
| + | *'''Feature scale:''' This setting controls the average “cell” size of the fractal pattern used to generate the terrain in metres. Increasing the value results in larger features, while decreasing the value will create small features. | ||
| + | <ul> | ||
| + | [[File:Alpine_03_FeatureScale.jpg|none|800px|Increasing the Feature scale value creates larger mountain ranges.]] | ||
| + | </ul> | ||
| + | |||
| + | |||
| + | *'''Lead-in octaves:''' This setting controls the number of noise layers within the fractal pattern. When the value is “0” no additional noise patterns are added to the fractal pattern and the largest feature of the fractal pattern will be the same as the Feature scale setting. This leads to displacements that are relatively uniform in scale and shape. As this setting increases, additional noise layers, or octaves, are added to the pattern. Each noise layer is larger than the previous layer, and its maximum size is influenced by the Scale step setting under the Settings tab. As the number of noise layers increases the longer it will take to calculate and render. | ||
| + | <ul> | ||
| + | [[File:Alpine_04_LeadInOctaves.jpg|none|800px|Increasing the Lead-in octaves value creates more complexity to the fractal pattern.]] | ||
| + | </ul> | ||
| + | |||
| + | |||
| + | *'''Smallest scale: '''Terragen automatically updates this setting as other scale parameters are modified and attempts to create a balanced ratio between the largest and smallest noise patterns that define the Alpine fractal. This setting defines the cut off point at which Terragen will no longer calculate small details. You can manually set a value, but note that it may be changed by Terragen if other scale settings, such as Scale step, are modified afterwards. | ||
| + | <ul> | ||
| + | [[File:Alpine_05_SmallestScale.jpg|none|800px|The Smallest scale value limits the amount of detail Terragen will calculate.]] | ||
| + | </ul> | ||
| + | |||
| + | |||
| + | *'''Noise octaves: '''Terragen automatically updates this setting as other scale parameters are modified and attempts to create a balanced ratio between the number of octaves used to define the Alpine fractal. This setting defines the maximum number of octaves for the Alpine fractal. You can manually set a value, but note that it may be changed by Terragen if other scale settings, such as Scale step, are modified afterwards. Higher values mean more octaves which can increase detail and render time. | ||
| + | <ul> | ||
| + | [[File:Alpine_06_NoiseOctaves.jpg|none|800px|Increasing the Noise octaves value adds detail to the fractal pattern.]] | ||
| + | </ul> | ||
| + | |||
| + | |||
| + | *'''Apply displacement:''' When checked, the settings below will displace the surface of the terrain. | ||
| + | |||
| + | |||
| + | *'''Displacement amplitude:''' This setting controls the amplitude, or height, of the noise pattern used to displace the terrain. A value of “0” results in a flat curve, therefore no height or displacement occurs. As the value is raised, the higher and more pronounced the displacements become. The displacement of the terrain in meters is approximately half the value, assuming no other displacements are applied to the terrain and a Displacement offset of 0 is used. | ||
| + | <ul> | ||
| + | [[File:Alpine_09_DisplacementAmplitude.jpg|none|800px|Displacment amplitude controls the amount of displacement on the terrain.]] | ||
| + | </ul> | ||
| + | |||
| + | |||
| + | *'''Displacement offset: '''This setting offsets the displacement in metres. Positive values raise the terrain, while negative values lower the terrain. | ||
| + | <ul> | ||
| + | [[File:Alpine_08_DisplacementOffset.jpg|none|800px|The Displacement offset value raises or lowers the terrain displacement by a specific amount.]] | ||
| + | </ul> | ||
| + | |||
| + | |||
| + | *'''Displacement roughness:''' This setting increases the amount of small detail within the noise pattern resulting in additional and smaller details as the value is increased. | ||
| + | <ul> | ||
| + | [[File:Alpine_11_DisplacementRoughness.jpg|none|800px|Displacement roughness adds small detail to the noise pattern.]] | ||
| + | </ul> | ||
| + | </ul> | ||
| + | |||
| + | |||
| + | == Settings Tab == | ||
| + | [[File:Alpine_02_SettingsTab.png|none|470px|Settings Tab]] | ||
| + | |||
| + | |||
| + | <ul> | ||
| + | *'''Scale step: '''This setting controls the scale ratio of the additional noise layers added by the Lead-in octaves setting to the Feature scale value, as well as the ratio for the Smallest scale details. | ||
| + | <ul> | ||
| + | [[File:Alpine_25_ScaleStep.jpg|none|800px|The Scale step value is used to determine how large the additional noise layers are to the Feature scale value.]] | ||
| + | </ul> | ||
| + | |||
| + | |||
| + | *'''Stretch factor: '''This setting affects the smallest details in the mountain regions by stretching the noise pattern along its Y axis. At lower values, less stretching takes place resulting in a rougher looking surface. As the value increases smoother and more defined ridges appear along each mountain section. | ||
| + | <ul> | ||
| + | [[File:Alpine_24_StretchFactor.jpg|none|800px|The Stretch factor controls the roughness of the displaced terrain.]] | ||
| + | </ul> | ||
| + | |||
| + | |||
| + | == Deposition settings == | ||
| + | In nature, as the erosion process wears down the terrain, material is transported away from its source and deposited along other parts of the landscape. The deposition settings below simulate this effect and give you control over the amount of material that accumulates in the valleys, and on the slopes and crevices of the mountains. | ||
| + | |||
| + | *'''Late deposition:''' This setting provides a way to fill in the valleys and canyons between mountain ranges. As the value increases, lower parts of the terrain start to rise and fill in the gaps between mountain ranges. Visually, this can look as if there is a larger and smoother gap between mountain ranges, but note that this is due to the “sediment” rising vertically up the slopes as it fills in the gaps. | ||
| + | <ul> | ||
| + | [[File:Alpine_21_LateDeposition.jpg|none|800px|Late deposition fills in the gaps between mountain ranges.]] | ||
| + | </ul> | ||
| + | |||
| + | |||
| + | *'''Early deposition:''' This setting provides a way to fill in the ridges and crevices along the slopes of the mountain ranges. As the value increases, more of the ridges and crevices are filled in. This setting does not affect the accumulation of sediment along the base and ground level of the mountains. | ||
| + | <ul> | ||
| + | [[File:Alpine_16_EarlyDeposition.jpg|none|800px|Earl deposition fills in the ridges and crevices on the slopes of the mountain range.]] | ||
| + | </ul> | ||
| + | |||
| + | |||
| + | *'''Early deposition rate:''' This setting limits how high up the mountain range, the deposition can fill in the slopes, ravines and crevices. Lower values limit the area to the base regions of the mountain range, while higher values allow the deposition to extend further up the mountain sides. | ||
| + | <ul> | ||
| + | [[File:Alpine_22_EarlyDepositionRate.jpg|none|800px|Early deposition rate limits how high up on the mountain range the ridges and crevices are filled.]] | ||
| + | </ul> | ||
| + | </ul> | ||
| + | |||
| + | |||
| + | == Warp settings == | ||
| + | <br /> | ||
| + | *'''Warp amount:''' This setting applies a warp to the fractal pattern. Higher values yield a stronger warping effect. | ||
| + | <ul> | ||
{| | {| | ||
|- | |- | ||
| − | | | + | | [[File:Alpine_20_WarpAmount.jpg|none|800px|Warp amount]] |
| − | |||
| − | [[File: | ||
| − | | | ||
| − | |||
| − | |||
| − | |||
| − | |||
| − | |||
| − | |||
| − | |||
| − | |||
| − | |||
| − | | | ||
| − | |||
| − | |||
| − | | | ||
| − | |||
| − | |||
|- | |- | ||
| − | | | + | | [[File:Alpine_23_WarpAmount.jpg|none|800px|Warp amount on planetary scale]] |
| − | |||
| − | [[File: | ||
|} | |} | ||
| − | |||
| − | + | </ul> | |
[[Category:Displacement Shader]] | [[Category:Displacement Shader]] | ||
Latest revision as of 02:54, 28 May 2021
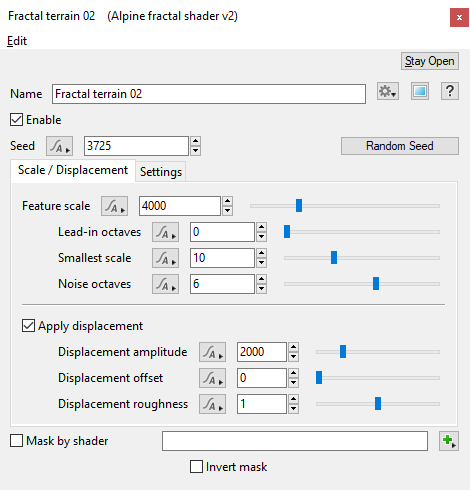
Overview[edit]
The Alpine Fractal Shader is an alternative terrain shape shader that creates a more natural, eroded-looking mountainous terrain shape than the basic Power Fractal. Unlike a heightfield erosion effect, the Alpine Fractal Shader is procedural so it retains the detail benefits of procedural terrains, as well as the ability for global coverage. This shader is more demanding to render than the Power Fractal. Version 2 of the Alpine Shader includes bug fixes and adjustments that changed the output, and therefore should be used for all new projects, but Version 1 is maintained for backwards compatibility with older projects.
Settings:
- Name: This setting allows you to apply a descriptive name to the node, which can be helpful when using multiple Alpine Fractal shader nodes in a project.
- Enable: When checked, the node is active and the settings below will affect the surface of the terrain. When unchecked, the node is ignored.
- Seed: This setting controls the fractal pattern used by the node to generate the terrain. This allows you to easily create variations of the terrain based on the node’s other settings. For example, you can define the “Feature scale” for the terrain and then explore variations on this theme by clicking on the “Random Seed” button which will change the Seed value. Using the same Seed value in multiple Alpine Fractal shader nodes will generate the same pattern.
- Random Seed: Clicking this button will randomly choose a new value for the “Seed” setting.
- Mask by shader: When checked and shader or function nodes are assigned to this setting, their values mask the Alpine fractal shader. Where the masking value is “1” no masking will occur and where the value is “0” that part of the Alpine fractal shader will be masked completely.
- Invert mask: When checked, the inverse of the shader or function nodes assigned as the mask is used as the mask.
Scale / Displacement Tab[edit]
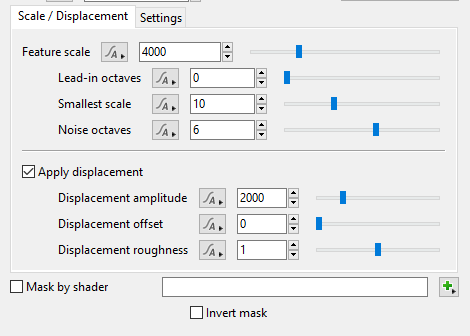
The settings under this section control the complexity and size of the fractal pattern that displaces the terrain. Understanding how these settings work with the Scale step value, found under the Setting tab, is critical in determining the final scale of the pattern.
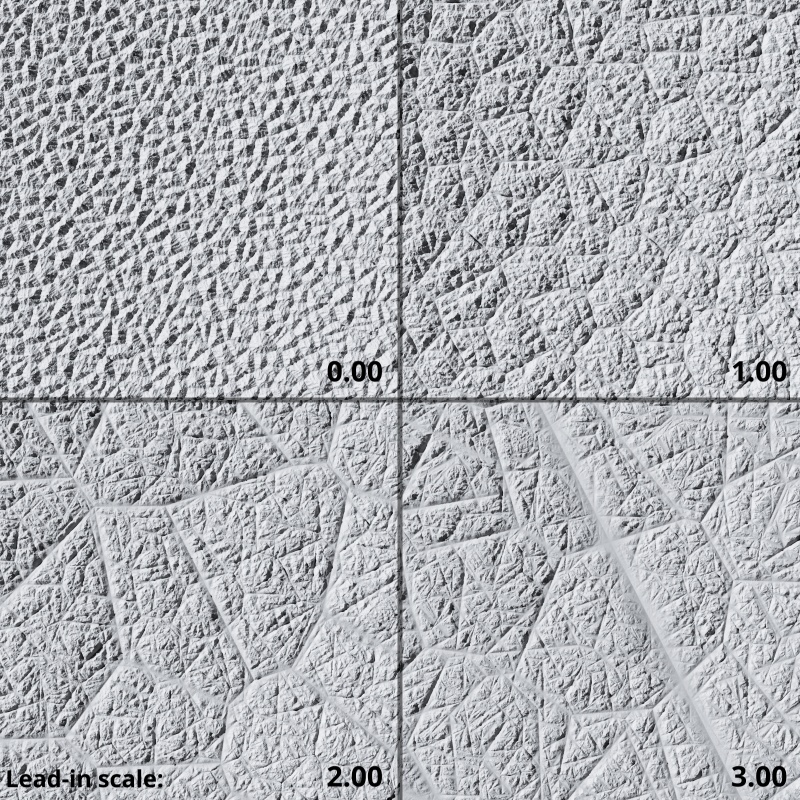
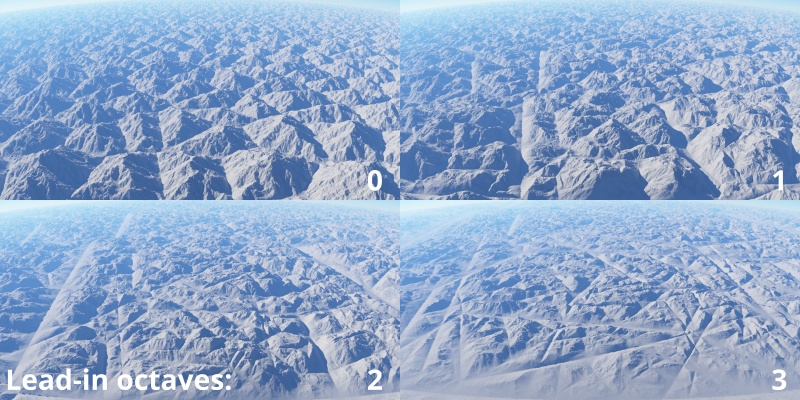
In the illustration below, the deposition and warp settings have been disabled in order to focus on the fractal pattern. The Feature scale is set to the default 4000 metres. As the Lead-in octaves increase, additional noise layers are added to the fractal pattern. Each noise layer is larger than its predecessor. How much larger is determined by the Scale step value.
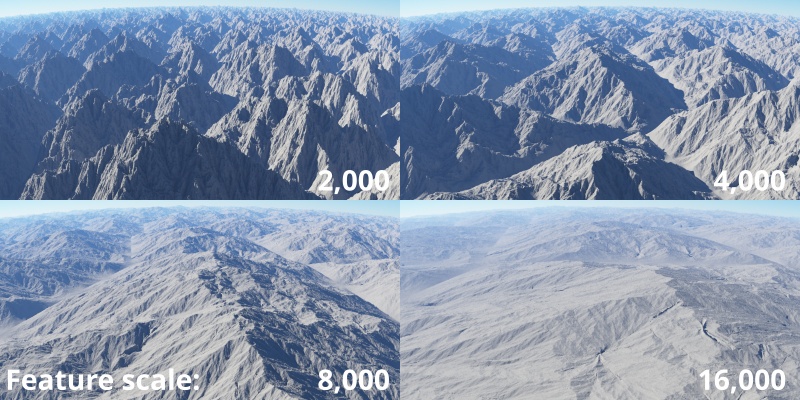
- Feature scale: This setting controls the average “cell” size of the fractal pattern used to generate the terrain in metres. Increasing the value results in larger features, while decreasing the value will create small features.
- Lead-in octaves: This setting controls the number of noise layers within the fractal pattern. When the value is “0” no additional noise patterns are added to the fractal pattern and the largest feature of the fractal pattern will be the same as the Feature scale setting. This leads to displacements that are relatively uniform in scale and shape. As this setting increases, additional noise layers, or octaves, are added to the pattern. Each noise layer is larger than the previous layer, and its maximum size is influenced by the Scale step setting under the Settings tab. As the number of noise layers increases the longer it will take to calculate and render.
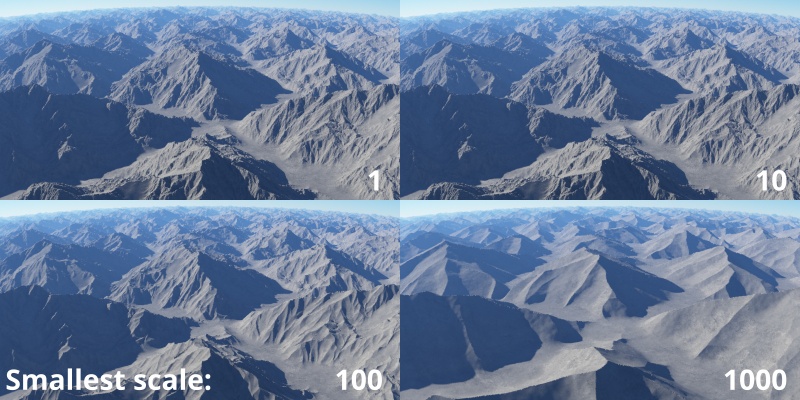
- Smallest scale: Terragen automatically updates this setting as other scale parameters are modified and attempts to create a balanced ratio between the largest and smallest noise patterns that define the Alpine fractal. This setting defines the cut off point at which Terragen will no longer calculate small details. You can manually set a value, but note that it may be changed by Terragen if other scale settings, such as Scale step, are modified afterwards.
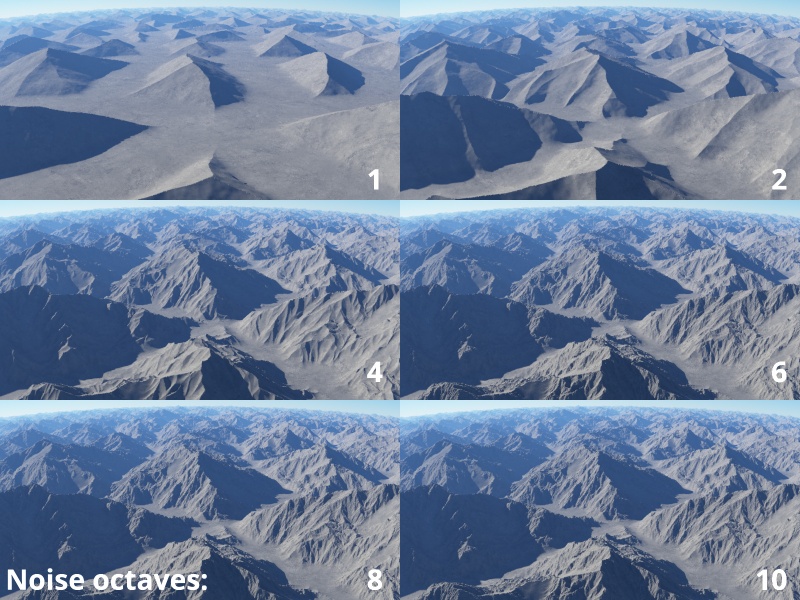
- Noise octaves: Terragen automatically updates this setting as other scale parameters are modified and attempts to create a balanced ratio between the number of octaves used to define the Alpine fractal. This setting defines the maximum number of octaves for the Alpine fractal. You can manually set a value, but note that it may be changed by Terragen if other scale settings, such as Scale step, are modified afterwards. Higher values mean more octaves which can increase detail and render time.
- Apply displacement: When checked, the settings below will displace the surface of the terrain.
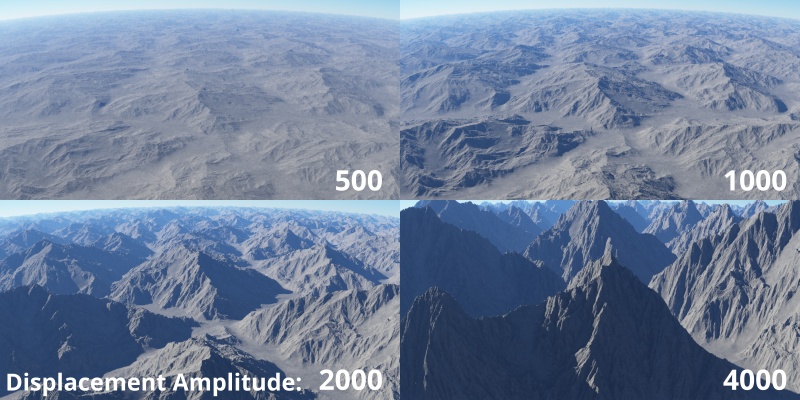
- Displacement amplitude: This setting controls the amplitude, or height, of the noise pattern used to displace the terrain. A value of “0” results in a flat curve, therefore no height or displacement occurs. As the value is raised, the higher and more pronounced the displacements become. The displacement of the terrain in meters is approximately half the value, assuming no other displacements are applied to the terrain and a Displacement offset of 0 is used.
- Displacement offset: This setting offsets the displacement in metres. Positive values raise the terrain, while negative values lower the terrain.
- Displacement roughness: This setting increases the amount of small detail within the noise pattern resulting in additional and smaller details as the value is increased.
Settings Tab[edit]
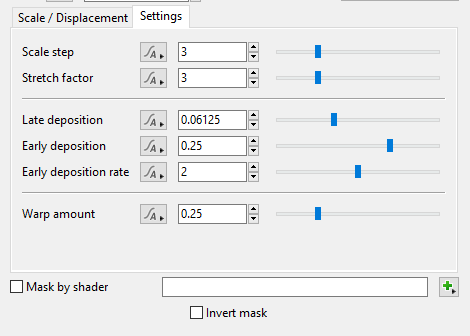
- Scale step: This setting controls the scale ratio of the additional noise layers added by the Lead-in octaves setting to the Feature scale value, as well as the ratio for the Smallest scale details.
- Stretch factor: This setting affects the smallest details in the mountain regions by stretching the noise pattern along its Y axis. At lower values, less stretching takes place resulting in a rougher looking surface. As the value increases smoother and more defined ridges appear along each mountain section.
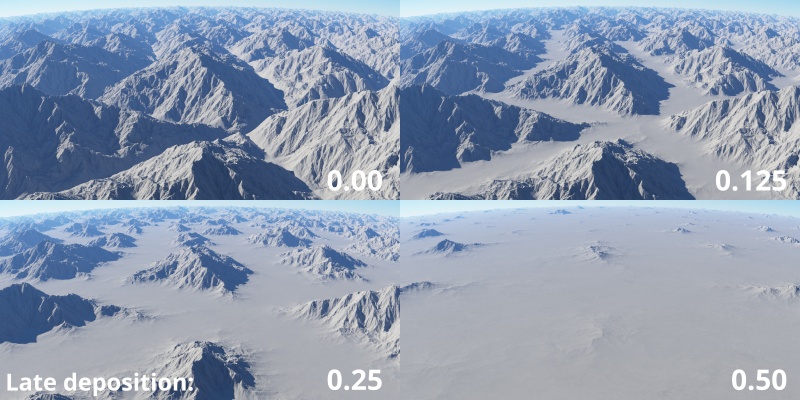
- Late deposition: This setting provides a way to fill in the valleys and canyons between mountain ranges. As the value increases, lower parts of the terrain start to rise and fill in the gaps between mountain ranges. Visually, this can look as if there is a larger and smoother gap between mountain ranges, but note that this is due to the “sediment” rising vertically up the slopes as it fills in the gaps.
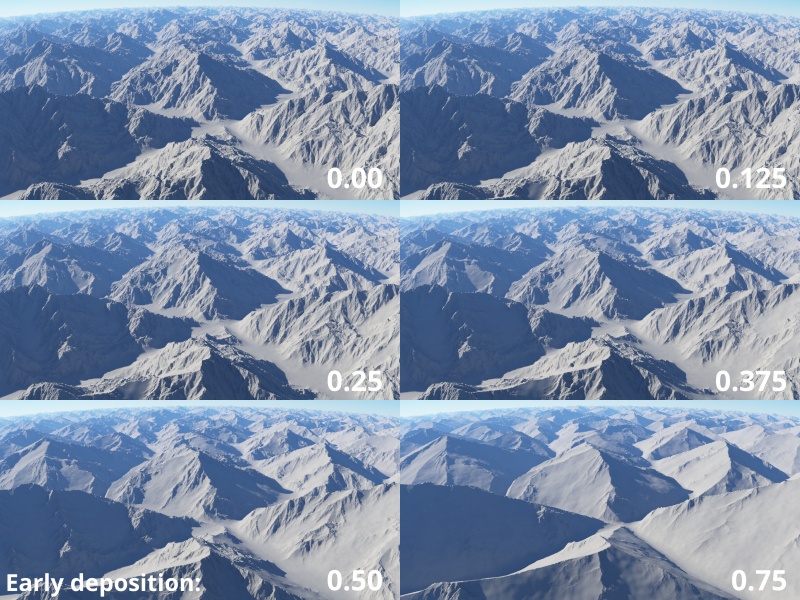
- Early deposition: This setting provides a way to fill in the ridges and crevices along the slopes of the mountain ranges. As the value increases, more of the ridges and crevices are filled in. This setting does not affect the accumulation of sediment along the base and ground level of the mountains.
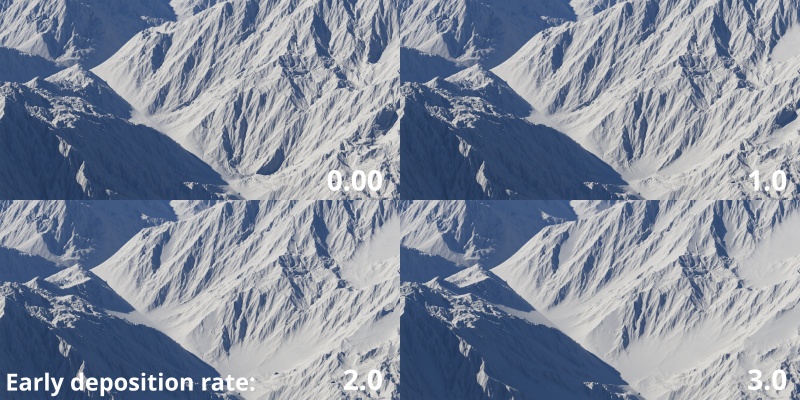
- Early deposition rate: This setting limits how high up the mountain range, the deposition can fill in the slopes, ravines and crevices. Lower values limit the area to the base regions of the mountain range, while higher values allow the deposition to extend further up the mountain sides.
Deposition settings[edit]
In nature, as the erosion process wears down the terrain, material is transported away from its source and deposited along other parts of the landscape. The deposition settings below simulate this effect and give you control over the amount of material that accumulates in the valleys, and on the slopes and crevices of the mountains.
Warp settings[edit]
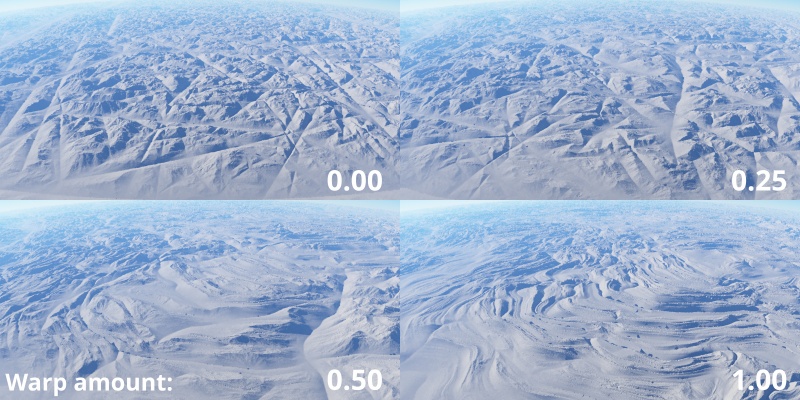
- Warp amount: This setting applies a warp to the fractal pattern. Higher values yield a stronger warping effect.
A shader is a program or set of instructions used in 3D computer graphics to determine the final surface properties of an object or image. This can include arbitrarily complex descriptions of light absorption and diffusion, texture mapping, reflection and refraction, shadowing, surface displacement and post-processing effects. In Terragen 2 shaders are used to construct and modify almost every element of a scene.
A heightmap or heightfield is an array of height values, usually in a grid which describe the height at specific points in a defined area. Heightfields are used to represent real-world and virtual terrain in a specific, easily converted format. Most heightfields can be represented as simple image data in grayscale, with black being minimum height and white being maximum height.
A single object or device in the node network which generates or modifies data and may accept input data or create output data or both, depending on its function. Nodes usually have their own settings which control the data they create or how they modify data passing through them. Nodes are connected together in a network to perform work in a network-based user interface. In Terragen 2 nodes are connected together to describe a scene.
Literally, to change the position of something. In graphics terminology to displace a surface is to modify its geometric (3D) structure using reference data of some kind. For example, a grayscale image might be taken as input, with black areas indicating no displacement of the surface, and white indicating maximum displacement. In Terragen 2 displacement is used to create all terrain by taking heightfield or procedural data as input and using it to displace the normally flat sphere of the planet.
Literally, to change the position of something. In graphics terminology to displace a surface is to modify its geometric (3D) structure using reference data of some kind. For example, a grayscale image might be taken as input, with black areas indicating no displacement of the surface, and white indicating maximum displacement. In Terragen 2 displacement is used to create all terrain by taking heightfield or procedural data as input and using it to displace the normally flat sphere of the planet.
