Difference between revisions of "Colour to Greyscale Colour"
m (Updated description of math involved.) |
(Added Fun with Colour to Greyscale Colour section.) |
||
| Line 3: | Line 3: | ||
[[File:ColourToGreyscaleColour_00_GUI.png|none|470px|Colour to Greyscale Colour]] | [[File:ColourToGreyscaleColour_00_GUI.png|none|470px|Colour to Greyscale Colour]] | ||
| + | |||
| + | __TOC__ | ||
== Overview == | == Overview == | ||
| Line 19: | Line 21: | ||
*'''Name:''' This setting allows you to apply a descriptive name to the node, which can be helpful when using multiple Colour to greyscale colour nodes in a project. | *'''Name:''' This setting allows you to apply a descriptive name to the node, which can be helpful when using multiple Colour to greyscale colour nodes in a project. | ||
*'''Enable:''' When checked, the node is active and the conversion operation will take place. When unchecked the values assigned to its Main Input, if any, are passed through, otherwise a value of 0 is passed through. | *'''Enable:''' When checked, the node is active and the conversion operation will take place. When unchecked the values assigned to its Main Input, if any, are passed through, otherwise a value of 0 is passed through. | ||
| + | |||
| + | |||
| + | == Fun with Colour to Greyscale Colour == | ||
| + | |||
| + | Need to desaturate an image? You can use the Colour to greyscale colour node to do that. | ||
| + | |||
| + | In this example, an image map shader supplies the colour values and the Colour to grayscale colour node converts it to shades of grey based on the luminance value of the pixel’s colour. A Mix colour node combines the image map node and the Colour to greyscale colour node based on the Constant scalar value assigned to the Mix controller input. | ||
| + | |||
| + | * Click on an empty space in the Node Network pane to focus the program's attention there. | ||
| + | * Press the tab key or “'''N'''” key to open the Quick Node Palette window. | ||
| + | * Start typing the words “'''Image map shader - Colour'''” and the closest match in the Node list will be highlighted. | ||
| + | * With “Image map shader - Colour” highlighted, press the enter key to add it to the project. | ||
| + | * Navigate to the location of your image and select it. | ||
| + | * Add a “'''Colour to greyscale colour'''” node to the project in a similar manner. | ||
| + | * Drag a connection line from the “'''Output'''” of the Image map shader to the ”'''Main input'''” of the Colour to greyscale colour node. | ||
| + | * Add a “'''Mix colour'''” node to the project. | ||
| + | * Drag a connection line from the “'''Output'''” of the Image map shader to the ”'''Main input'''” of the Mix colour node. | ||
| + | * Drag a connection line from the “'''Output'''” of the Colour to greyscale colour node to the ”'''Input 2'''” of the Mix colour node. | ||
| + | * Drag a connection line from the "'''Output'''" of the Mix colour node to the "'''Colour function'''" of the Default shader node. | ||
| + | * Add a “'''Constant scaler'''” node to the project. | ||
| + | * Drag a connection line from the “'''Output'''” of the Constant scalar node to the ”'''Mix controller'''” input of the Mix colour node. | ||
| + | * Double click on the “'''Constant scalar'''” node to open its dialog window. | ||
| + | * Set “'''Scalar'''” to any value between “'''0'''” and “'''1'''”. | ||
| + | <ul> | ||
| + | {| | ||
| + | |- | ||
| + | | [[File:ColourToGreyscaleColour_03_Nodes.jpg|none|800px|Node Network view.]] | ||
| + | |- | ||
| + | | [[File:ColourToGreyscaleColour_02_Tree.jpg|none|800px|Adjusting the Constant scaler’s Scalar value allows the Mix controller node to blend between the original fully saturated image and the greyscale version.]] | ||
| + | |- | ||
| + | | [[File:ColourToGreyscaleColour_01_Swatch.jpg|none|800px|Similar example on colour swatches.]] | ||
| + | |} | ||
| + | </ul> | ||
Latest revision as of 18:50, 30 March 2022
Overview[edit]
The Colour to greyscale colour node converts the Input colour into greyscale colour. The math is the same for converting colour data to scalar data according to the node input type conversion rules which are described in the Node Input Type Conversion documentation.
When converting a colour to a scalar, the scalar is set to the luminance value of the colour:
-
luminance = 0.2125 * r + 0.7152 * g + 0.0724 * b
Settings:
- Name: This setting allows you to apply a descriptive name to the node, which can be helpful when using multiple Colour to greyscale colour nodes in a project.
- Enable: When checked, the node is active and the conversion operation will take place. When unchecked the values assigned to its Main Input, if any, are passed through, otherwise a value of 0 is passed through.
Fun with Colour to Greyscale Colour[edit]
Need to desaturate an image? You can use the Colour to greyscale colour node to do that.
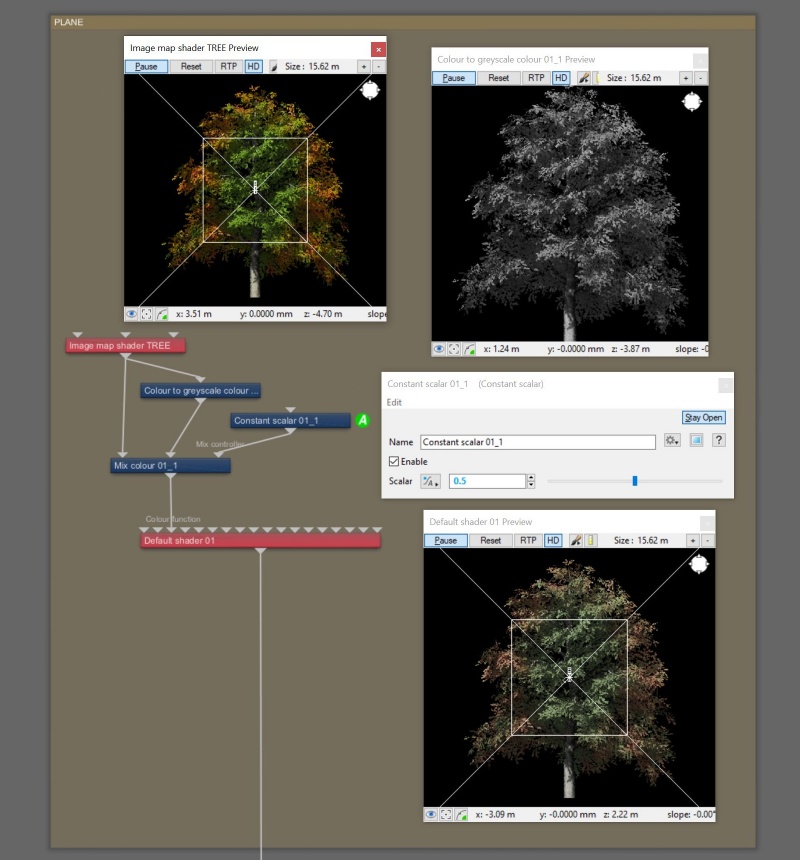
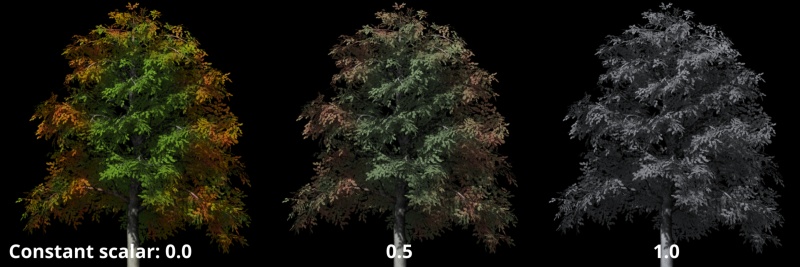
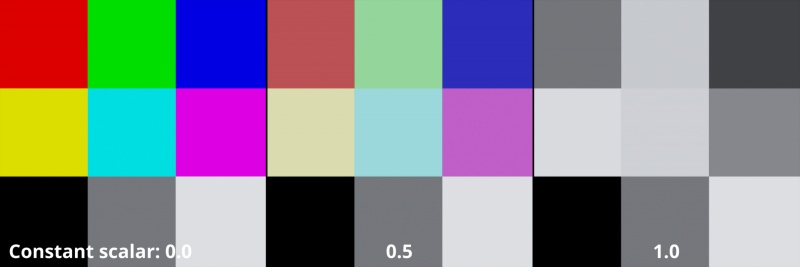
In this example, an image map shader supplies the colour values and the Colour to grayscale colour node converts it to shades of grey based on the luminance value of the pixel’s colour. A Mix colour node combines the image map node and the Colour to greyscale colour node based on the Constant scalar value assigned to the Mix controller input.
- Click on an empty space in the Node Network pane to focus the program's attention there.
- Press the tab key or “N” key to open the Quick Node Palette window.
- Start typing the words “Image map shader - Colour” and the closest match in the Node list will be highlighted.
- With “Image map shader - Colour” highlighted, press the enter key to add it to the project.
- Navigate to the location of your image and select it.
- Add a “Colour to greyscale colour” node to the project in a similar manner.
- Drag a connection line from the “Output” of the Image map shader to the ”Main input” of the Colour to greyscale colour node.
- Add a “Mix colour” node to the project.
- Drag a connection line from the “Output” of the Image map shader to the ”Main input” of the Mix colour node.
- Drag a connection line from the “Output” of the Colour to greyscale colour node to the ”Input 2” of the Mix colour node.
- Drag a connection line from the "Output" of the Mix colour node to the "Colour function" of the Default shader node.
- Add a “Constant scaler” node to the project.
- Drag a connection line from the “Output” of the Constant scalar node to the ”Mix controller” input of the Mix colour node.
- Double click on the “Constant scalar” node to open its dialog window.
- Set “Scalar” to any value between “0” and “1”.
A scalar is a single number. 1, 200.45, -45, -0.2 are all examples of scalar values.
This is essentially the brightness of the colour. Terragen converts RGB colours to greyscale by taking the luminance of the colour.
A single object or device in the node network which generates or modifies data and may accept input data or create output data or both, depending on its function. Nodes usually have their own settings which control the data they create or how they modify data passing through them. Nodes are connected together in a network to perform work in a network-based user interface. In Terragen 2 nodes are connected together to describe a scene.
A shader is a program or set of instructions used in 3D computer graphics to determine the final surface properties of an object or image. This can include arbitrarily complex descriptions of light absorption and diffusion, texture mapping, reflection and refraction, shadowing, surface displacement and post-processing effects. In Terragen 2 shaders are used to construct and modify almost every element of a scene.
A single element of an image which describes values for color and/or intensity, depending on the color system which the image uses. Groups of ordered pixels together form a raster image.


