Difference between revisions of "Crater Shader"
(Updated descriptions and example images, conformed to new layout.) |
|||
| (One intermediate revision by one other user not shown) | |||
| Line 1: | Line 1: | ||
| − | [[ | + | [[File:CraterShdr_00_GUI.png|none|470px|Crater Shader]] |
| − | |||
| − | |||
| − | |||
| − | |||
| − | |||
| − | |||
| − | |||
| − | |||
| − | |||
| − | |||
| − | |||
| − | |||
| − | |||
| − | |||
| − | |||
| − | |||
| − | < | + | == Overview == |
| + | The Crater node is a displacement shader which creates an effect like a crater on the moon or a volcanic crater. | ||
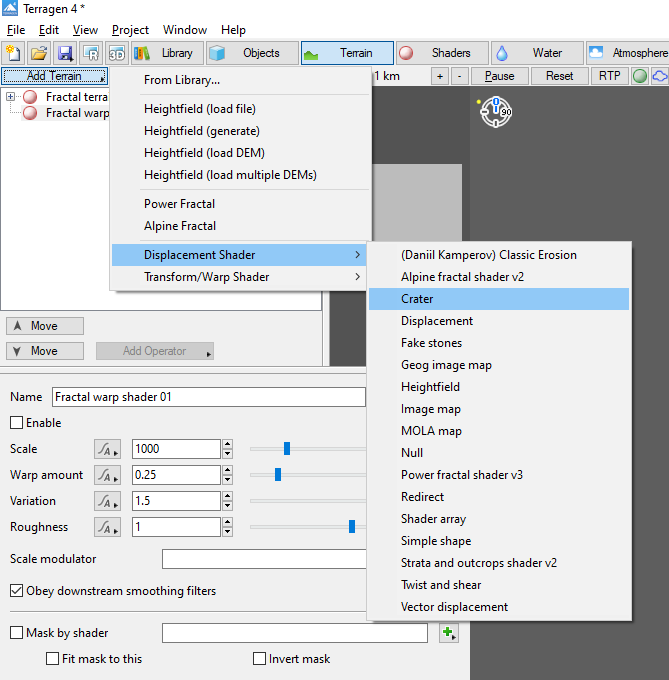
| + | To add a crater to the terrain, click on the “Add Terrain” button in the Terrain project view and choose the Crater shader from the Displacement shader submenu. | ||
| + | |||
| + | [[File:CraterShdr_01_AddCrater.png|none|669px|Add a Crater shader to your project via the “Add Terrain” button, then selecting Crater shader from the Displacement Shader submenu.]] | ||
| + | |||
| + | |||
| + | '''Settings''' | ||
| + | |||
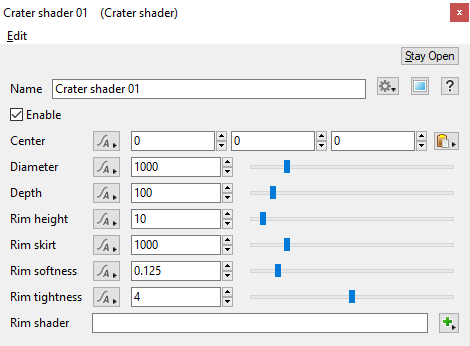
| + | *'''Name: '''This setting allows you to apply a descriptive name to the node, which can be helpful when using multiple Crater shader nodes in a project. | ||
| + | *'''Enable: '''When checked, the node is active and the settings below will affect the surface. When unchecked, the node is ignored. | ||
| + | |||
| + | *'''Center:''' This setting controls the position of the centre of the crater. | ||
| + | <ul> | ||
| + | [[File:CraterShdr_02_Center.jpg|none|800px|You can change the location of the crater via the Center setting.]] | ||
| + | </ul> | ||
| + | |||
| + | |||
| + | *'''Diameter:''' This setting controls the diameter of the crater. | ||
| + | <ul> | ||
| + | [[File:CraterShdr_03_Diameter.jpg|none|800px|You can change the size of the crater via the Diameter setting.]] | ||
| + | </ul> | ||
| + | |||
| + | |||
| + | *'''Depth:''' This setting controls the depth of the crater. Positive values result in a crater or depression on the surface, while negative values result in mounds upon the terrain surface.. | ||
| + | <ul> | ||
| + | {| | ||
| + | |- | ||
| + | |[[File:CraterShdr_04_Depth.jpg|none|800px|You can control how shallow or deep the crater is via the Depth setting.]] | ||
| + | |- | ||
| + | | [[File:CraterShdr_04_DepthNegative.jpg|none|800px|Depth values can be negative as well, creating a mound instead of a depression in the terrain.]] | ||
| + | |} | ||
| + | </ul> | ||
| + | |||
| + | |||
| + | *'''Rim height:''' This setting controls the height of the rim above the underlying terrain surface. | ||
| + | <ul> | ||
| + | [[File:CraterShdr_05_RimHeight.jpg|none|800px|The Rim height controls the height of the rim above the terrain.]] | ||
| + | </ul> | ||
| + | |||
| + | |||
| + | *'''Rim skirt:''' This setting controls the width of the rim skirt. The skirt is the outside part of the rim, if you think of the edge around the top of the rim dividing the crater into inside and outside parts. | ||
| + | <ul> | ||
| + | [[File:CraterShdr_06_RimSkirt.jpg|none|800px|The Rim skirt controls the width of the outer part of the crater.]] | ||
| + | </ul> | ||
| + | |||
| + | |||
| + | |||
| + | *'''Rim softness:''' This setting controls the softness of the rim profile. At a value of 0 the rim comes to a sharp peak. As the value increases the top of the rim along the edge of the peak begins to smooth out. The profile changes from a sharp peak to more like a soft hump. | ||
| + | <ul> | ||
| + | [[File:CraterShdr_07_RimSoftness.jpg|None|800px| The Rim softness setting controls how sharp or smooth the profile of the crater rim is.]] | ||
| + | </ul> | ||
| + | |||
| + | |||
| + | *'''Rim tightness:''' This setting affects the steepness of the curve of the rim profile. Larger values give the rim a steeper and sharper appearance. | ||
| + | <ul> | ||
{| | {| | ||
| − | |||
| − | |||
| − | |||
| − | |||
| − | |||
| − | |||
| − | |||
| − | |||
| − | |||
| − | |||
|- | |- | ||
| − | | | + | | [[File:CraterShdr_08_RimTightness.jpg|none|800px|Rim tightness controls the steepness of the rim profile curve.]] |
| − | |||
| − | [[File: | ||
| − | | | ||
| − | |||
| − | |||
| − | | | ||
| − | Rim tightness | ||
| − | |||
| − | |||
|- | |- | ||
| − | | | + | | [[File:CraterShdr_09_RimTightness.jpg|none|800px|Rim tightness controls the steepness of the rim profile curve.]] |
| − | |||
| − | [[File: | ||
| − | |||
|} | |} | ||
| + | </ul> | ||
| + | |||
| + | |||
| + | *''' Rim shader:''' The shader or function nodes assigned to the input field can add detail to the rim of the crater. | ||
| + | <ul> | ||
| + | [[File:CraterShdr_10_RimShader.jpg|none|800px|Shaders and function nodes can be assigned to the Rim shader in order to add detail to the crater.]] | ||
| + | </ul> | ||
| + | |||
| + | <br /n> | ||
| − | |||
[[Category:Displacement Shader]] | [[Category:Displacement Shader]] | ||
Latest revision as of 23:36, 23 August 2021
Overview[edit]
The Crater node is a displacement shader which creates an effect like a crater on the moon or a volcanic crater. To add a crater to the terrain, click on the “Add Terrain” button in the Terrain project view and choose the Crater shader from the Displacement shader submenu.
Settings
- Name: This setting allows you to apply a descriptive name to the node, which can be helpful when using multiple Crater shader nodes in a project.
- Enable: When checked, the node is active and the settings below will affect the surface. When unchecked, the node is ignored.
- Center: This setting controls the position of the centre of the crater.
- Diameter: This setting controls the diameter of the crater.
- Depth: This setting controls the depth of the crater. Positive values result in a crater or depression on the surface, while negative values result in mounds upon the terrain surface..
- Rim height: This setting controls the height of the rim above the underlying terrain surface.
- Rim skirt: This setting controls the width of the rim skirt. The skirt is the outside part of the rim, if you think of the edge around the top of the rim dividing the crater into inside and outside parts.
- Rim softness: This setting controls the softness of the rim profile. At a value of 0 the rim comes to a sharp peak. As the value increases the top of the rim along the edge of the peak begins to smooth out. The profile changes from a sharp peak to more like a soft hump.
- Rim tightness: This setting affects the steepness of the curve of the rim profile. Larger values give the rim a steeper and sharper appearance.
- Rim shader: The shader or function nodes assigned to the input field can add detail to the rim of the crater.
Literally, to change the position of something. In graphics terminology to displace a surface is to modify its geometric (3D) structure using reference data of some kind. For example, a grayscale image might be taken as input, with black areas indicating no displacement of the surface, and white indicating maximum displacement. In Terragen 2 displacement is used to create all terrain by taking heightfield or procedural data as input and using it to displace the normally flat sphere of the planet.
A shader is a program or set of instructions used in 3D computer graphics to determine the final surface properties of an object or image. This can include arbitrarily complex descriptions of light absorption and diffusion, texture mapping, reflection and refraction, shadowing, surface displacement and post-processing effects. In Terragen 2 shaders are used to construct and modify almost every element of a scene.
A single object or device in the node network which generates or modifies data and may accept input data or create output data or both, depending on its function. Nodes usually have their own settings which control the data they create or how they modify data passing through them. Nodes are connected together in a network to perform work in a network-based user interface. In Terragen 2 nodes are connected together to describe a scene.


