Difference between revisions of "Heightfield Crop"
(Added descriptions and example images for Heightfield Crop.) |
|||
| Line 1: | Line 1: | ||
| − | [[ | + | [[File:HFCrop_GUI.png|none|470px|Heightfield Crop]] |
| + | |||
| + | |||
| + | == Overview == | ||
| + | The Heightfield Crop node is used to crop a portion of the heightfield it is applied to. | ||
| + | |||
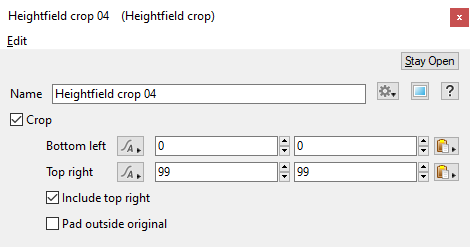
| + | It is important to understand that the values entered into the “Bottom left” and “Top right” settings correspond to the number of sample points in a TER file, or the number of pixels in an image file, such as an EXR. The values do not represent metres unless there is one sample point or pixel per metre in the source heightfield. | ||
| + | |||
| + | For example, a heightfield covering 1,000 square meters could be generated using 100 sample points on each X and Y axis. Therefore each sample point is 10 metres apart. To crop half of the heightfield you would enter a value of 50 in the “Bottom left” setting’s X and Y fields for half of the sample points, not 500 for half of the distance in metres. | ||
| + | |||
| + | Cropping begins at the bottom left corner of the heightfield and extends along the X and Y axis for the values entered in the “Bottom left” setting. | ||
| + | |||
| + | If values have been entered in the “Top right” setting, a second crop occurs from the top right corner of the previously cropped section, extending along the -X and -Y axis direction. Note, that if no values have been entered in the “Bottom left” setting, then the crop will begin at the bottom left corner of the heightfield using the “Top right” values. | ||
| + | |||
| + | The final size of the cropped region is the absolute value of the “Bottom left” X and Y axis components minus the “Top right” components. | ||
| + | |||
| + | You can create offsets for the cropped region by entering values greater than the number of sample points in the heightfield and enabling the “Pad outside original” setting. | ||
| + | |||
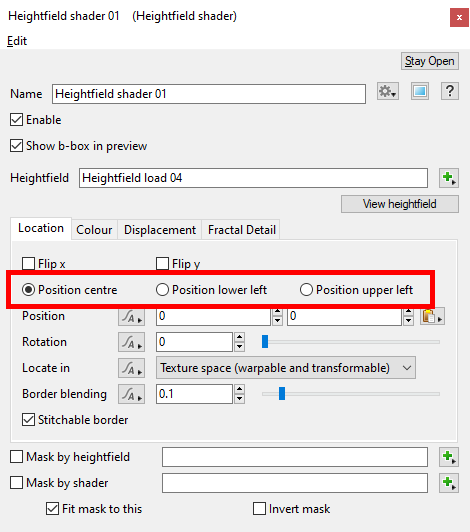
| + | The cropped region is positioned based on the Heightfield’s “Position” settings. This radio button can be found under the Heightfield shader’s Location tab. | ||
| + | |||
| + | [[File:HFShader_GUI_PositionRadioButton.png|none|470px|Heightfield shader Location tab]] | ||
| + | |||
| + | In this way you can isolate any section of the heightfield. | ||
| + | |||
| + | |||
| − | |||
[[Category: Heightfield Operators]] | [[Category: Heightfield Operators]] | ||
| − | |||
| − | |||
| + | '''Settings:'''<br /> | ||
| + | <ul> | ||
| + | In the example images below this image was used as the heightfield to easily demonstrate where the heightfield is cropped and how it is positioned. The image resolution is 1000 x 1000 pixels, and the values used to crop the heightfield are based on pixels. | ||
| + | [[File:HFCrop_Heightfield1000x1000.jpg|none|400px|Image used as heightfield for examples.]] | ||
| − | + | Here the image has been applied as a heightfield. | |
| + | [[File:HFCrop_00_NoCrop.jpg|none|400px|Image used as heightfield, no cropping.]] | ||
| − | ''' | + | <br /> |
| + | * ''' Name: ''' This setting allows you to apply a descriptive name to the node, which can be helpful when using multiple Heightfield crop nodes in a project. | ||
| + | <br /> | ||
| + | * ''' Crop: ''' When checked, or enabled, the heightfield is cropped by the settings below. Note that it is sometimes necessary to disable then re-enable this checkbox after changing the other settings in order to recalculate the crop region correctly. | ||
| + | <br /> | ||
| + | * '''Bottom left: ''' This is the number of data samples to include along the X and Y axis starting from the bottom left corner of the heightfield. Values greater than the actual number of data samples are ignored if the “Pad outside original” setting is disabled, but are taken into account when the setting is enabled. See the “Pad outside original” setting for more information. | ||
| + | <ul> | ||
| + | [[File:HFCrop_09_BottomLeft_0001.jpg|none|800px|Bottom left exampless.]] | ||
| + | </ul> | ||
| + | |||
| + | |||
| + | * '''Top right: ''' When the “Bottom left” X and Y axis values are 0.0, the "Top right" values indicate the number of data samples to include along the X and Y axis starting from the bottom left corner of the heightfield. Otherwise, they are the number of data samples to include along the -X and -Y axis starting from the top right corner of the region cropped by the “Bottom left” setting. Values greater than the actual number of data samples are ignored if the “Pad outside original” setting is disabled, but are taken into account when the setting is enabled. See the “Pad outside original” setting for more information. | ||
<ul> | <ul> | ||
| − | + | [[File:HFCrop_10_TopRight.jpg|none|800px|Top right examples.]] | |
| − | |||
| − | |||
| − | |||
| − | |||
| − | |||
| − | |||
| − | |||
| − | |||
| − | |||
| − | |||
</ul> | </ul> | ||
| + | |||
| + | * '''Include top right: ''' | ||
| + | |||
| + | |||
| + | * '''Pad outside original: ''' When unchecked, or disabled, values entered in the “Bottom left” and “Top right” settings that exceed the actual number of data samples in the heightfield are ignored. When checked, or enabled, the cropped region is increased in size and offset by the exceeded amount that the data samples represent. | ||
| + | <ul> | ||
| + | [[File:HFCrop_11_PadOutsideOriginal.jpg|none|800px|Pad outside original examples.]] | ||
| + | </ul> | ||
| + | </ul> | ||
| + | <br /> | ||
[[Category: Heightfield Operators]] | [[Category: Heightfield Operators]] | ||
Revision as of 08:24, 3 January 2021
Overview[edit]
The Heightfield Crop node is used to crop a portion of the heightfield it is applied to.
It is important to understand that the values entered into the “Bottom left” and “Top right” settings correspond to the number of sample points in a TER file, or the number of pixels in an image file, such as an EXR. The values do not represent metres unless there is one sample point or pixel per metre in the source heightfield.
For example, a heightfield covering 1,000 square meters could be generated using 100 sample points on each X and Y axis. Therefore each sample point is 10 metres apart. To crop half of the heightfield you would enter a value of 50 in the “Bottom left” setting’s X and Y fields for half of the sample points, not 500 for half of the distance in metres.
Cropping begins at the bottom left corner of the heightfield and extends along the X and Y axis for the values entered in the “Bottom left” setting.
If values have been entered in the “Top right” setting, a second crop occurs from the top right corner of the previously cropped section, extending along the -X and -Y axis direction. Note, that if no values have been entered in the “Bottom left” setting, then the crop will begin at the bottom left corner of the heightfield using the “Top right” values.
The final size of the cropped region is the absolute value of the “Bottom left” X and Y axis components minus the “Top right” components.
You can create offsets for the cropped region by entering values greater than the number of sample points in the heightfield and enabling the “Pad outside original” setting.
The cropped region is positioned based on the Heightfield’s “Position” settings. This radio button can be found under the Heightfield shader’s Location tab.
In this way you can isolate any section of the heightfield.
Settings:
-
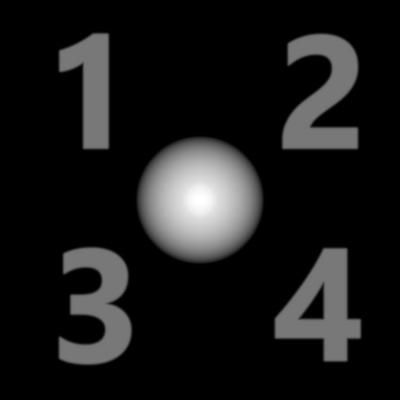
In the example images below this image was used as the heightfield to easily demonstrate where the heightfield is cropped and how it is positioned. The image resolution is 1000 x 1000 pixels, and the values used to crop the heightfield are based on pixels.
- Name: This setting allows you to apply a descriptive name to the node, which can be helpful when using multiple Heightfield crop nodes in a project.
- Crop: When checked, or enabled, the heightfield is cropped by the settings below. Note that it is sometimes necessary to disable then re-enable this checkbox after changing the other settings in order to recalculate the crop region correctly.
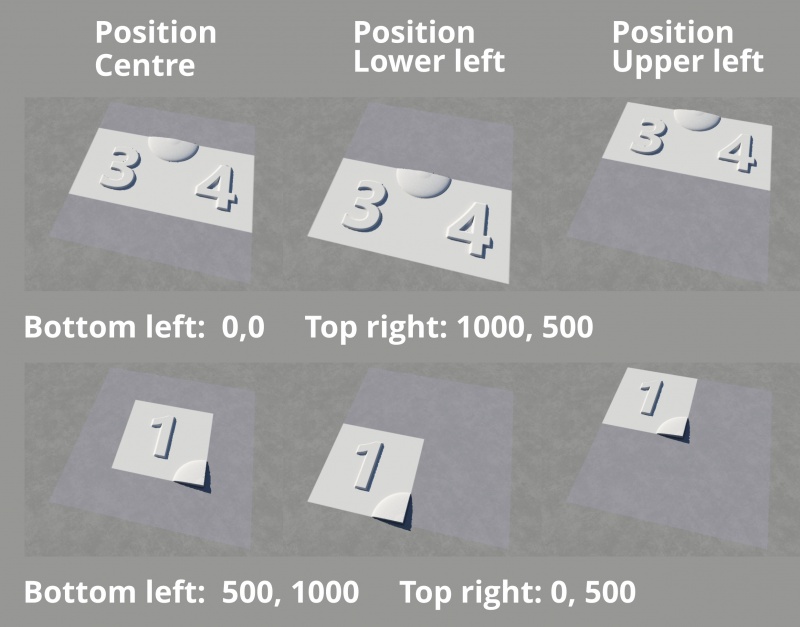
- Bottom left: This is the number of data samples to include along the X and Y axis starting from the bottom left corner of the heightfield. Values greater than the actual number of data samples are ignored if the “Pad outside original” setting is disabled, but are taken into account when the setting is enabled. See the “Pad outside original” setting for more information.
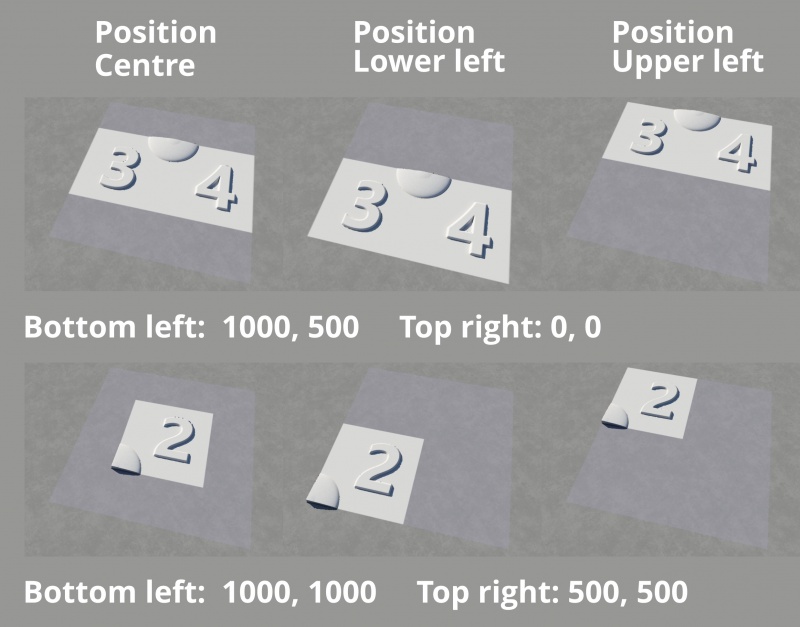
- Top right: When the “Bottom left” X and Y axis values are 0.0, the "Top right" values indicate the number of data samples to include along the X and Y axis starting from the bottom left corner of the heightfield. Otherwise, they are the number of data samples to include along the -X and -Y axis starting from the top right corner of the region cropped by the “Bottom left” setting. Values greater than the actual number of data samples are ignored if the “Pad outside original” setting is disabled, but are taken into account when the setting is enabled. See the “Pad outside original” setting for more information.
- Include top right:
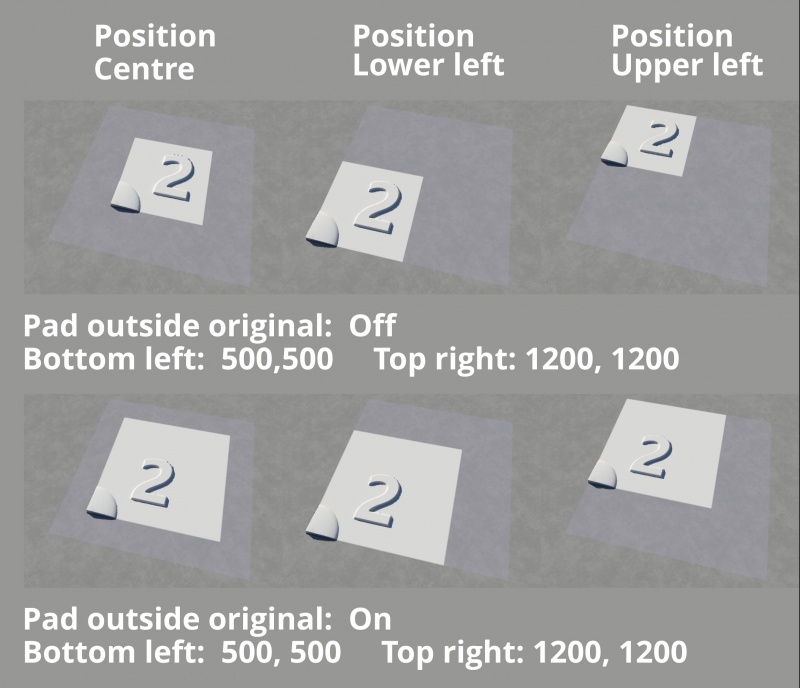
- Pad outside original: When unchecked, or disabled, values entered in the “Bottom left” and “Top right” settings that exceed the actual number of data samples in the heightfield are ignored. When checked, or enabled, the cropped region is increased in size and offset by the exceeded amount that the data samples represent.
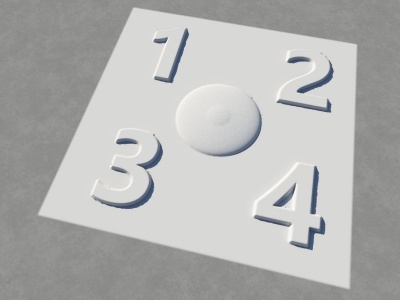
Here the image has been applied as a heightfield.
A heightmap or heightfield is an array of height values, usually in a grid which describe the height at specific points in a defined area. Heightfields are used to represent real-world and virtual terrain in a specific, easily converted format. Most heightfields can be represented as simple image data in grayscale, with black being minimum height and white being maximum height.
A sample refers to a value or set of values at a point in time and/or space. The defining point of a sample is that it is a chosen value out of a continuous signal. In Terragen 2 it is usually a mathematical (procedural) function that is being sampled.
A single element of an image which describes values for color and/or intensity, depending on the color system which the image uses. Groups of ordered pixels together form a raster image.
A shader is a program or set of instructions used in 3D computer graphics to determine the final surface properties of an object or image. This can include arbitrarily complex descriptions of light absorption and diffusion, texture mapping, reflection and refraction, shadowing, surface displacement and post-processing effects. In Terragen 2 shaders are used to construct and modify almost every element of a scene.
A single object or device in the node network which generates or modifies data and may accept input data or create output data or both, depending on its function. Nodes usually have their own settings which control the data they create or how they modify data passing through them. Nodes are connected together in a network to perform work in a network-based user interface. In Terragen 2 nodes are connected together to describe a scene.
