Difference between revisions of "OBJ Reader"
(klml0u35) |
(Updating OBJ_Reader docs to reflect current parameters. Update currently in progress.) |
||
| Line 1: | Line 1: | ||
| − | [[ | + | [[File:OBJReader_00_GUI.png|center|470px|OBJ Reader]] |
| + | |||
| + | == Overview == | ||
| − | |||
The OBJ Reader node loads models from a Wavefront .OBJ file. The OBJ Reader can also load .mtl files specified by the OBJ containing texturing information. When you create an OBJ Reader it opens a file dialog allowing you to choose the file to load. | The OBJ Reader node loads models from a Wavefront .OBJ file. The OBJ Reader can also load .mtl files specified by the OBJ containing texturing information. When you create an OBJ Reader it opens a file dialog allowing you to choose the file to load. | ||
| Line 13: | Line 14: | ||
<li> | <li> | ||
'''Population mode:''' This popup has two options: | '''Population mode:''' This popup has two options: | ||
| − | <ul> | + | |
| − | <li> | + | [[File:OBJReader_01_PopulationMode.png|none|322px|Population mode parameters]] |
| − | <u>Individual Object:</u> This is the default for objects created individually, not part of a population. If you choose this option for objects that are part of a population the population instances will still render but the object itself will also show up at its original position. | + | |
| − | </li><li> | + | <ul><li><u>Individual Object:</u> This is the default for objects created individually, not part of a population. If you choose this option for objects that are part of a population the population instances will still render but the object itself will also show up at its original position. </li> |
| − | <u>Member of a Population:</u> This is the default for objects created as part of creating a population. It means the objects only render as part of a population. If you choose this option for an individual object it won't render. | + | <li><u>Member of a Population:</u> This is the default for objects created as part of creating a population. It means the objects only render as part of a population. If you choose this option for an individual object it won't render. |
</li> | </li> | ||
</ul> | </ul> | ||
If you create an object as part of a population and then decide to use it on its own you may need to change the popup to <u>Individual Object</u> to get it to render. | If you create an object as part of a population and then decide to use it on its own you may need to change the popup to <u>Individual Object</u> to get it to render. | ||
| − | + | ||
| − | '''Preview mode:''' This popup lets you choose how the object should be displayed in the 3D Preview | + | <li>'''Preview mode:''' This popup has five options: |
| − | </li><li> | + | [[File:OBJReader_02_PreviewMode.png|none|234px|Preview Mode parameters]]</li> |
| + | <ul><li> This popup lets you choose how the object should be displayed in the 3D Preview, and sets the most detailed mode that the object can be displayed in. The Object Display Mode button in the 3D Preview controls the mode for the preview as a whole. For example if you set the '''Preview mode''' of the object to Wireframe but the 3D Preview object display mode is set to '''Show as bounding boxes''' then the object will only be drawn as a bounding box.</li></ul> | ||
| + | |||
| + | <li>''' Preview Colour:''' Enabling this parameter causes the object to be drawn in the 3D preview using the preview colour when the object display mode is set to bounding box or wireframe. When set to smooth shaded or texture display mode, the preview colour tints the object’s textured surface. This is useful for making a particular object stand out in the 3D preview. Clicking on the colour swatch to the right of the parameter label opens the Colour picker pane. | ||
| + | </li> | ||
| + | <br /> | ||
| + | == File Read Tab == | ||
| + | [[File:OBJReader_03_FileReadTab.png|none|460px|File Read Tab]] | ||
| + | |||
| + | '''Settings:''' | ||
| + | <ul><li>'''Filename:''' This parameter shows the path to the file used by the OBJ Reader. You can use the file button at right to load a different file but this isn't recommended as the materials for the new file won't be loaded.</li></ul> | ||
| + | <br /> | ||
| + | == Sequence Tab == | ||
| + | [[File:OBJReader_04_SequenceTab.png|none|460px|Sequence Tab]] | ||
| + | '''Settings:''' | ||
| + | <ul><li>'''Sequence first:''' This value controls both the geometry and the frame on which that geometry is loaded. <ul><li> For example, when set to a value of 1, MyObject_0001.obj will load on frame 1, when the “Offset” value is zero. </li> | ||
| + | [[File:OBJReader_05_SequenceTab_SequenceFirst_1-10LoopOffset0.gif|none|400px|Ten sequential objects, looping, no offset.]] | ||
| + | <li> If an “Offset” value other than zero is present, that value will be added to the “Sequence first” value to determine which geometry is loaded. For example, with an “Offset” value of “4”, MyObject_0005.obj will load on frame 1.</li> | ||
| + | [[File:OBJReader_06_SequenceTab_SequenceFirst_1-10LoopOffset4.gif|none|400px|Ten sequential objects, looping, offset is four.]] | ||
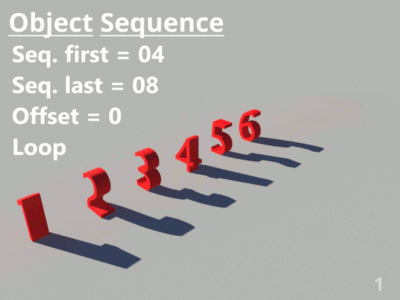
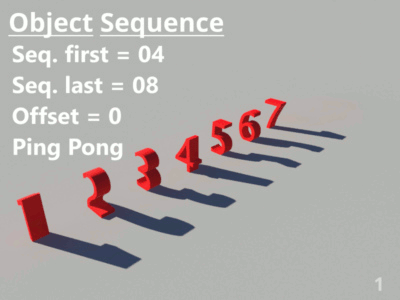
| + | <li> Terragen can cycle through a subset of the total available sequential geometry by specifying the range to use in the “Sequence first” and “Sequence last” values. For example, if the “Sequence first” value was set to “4” and the “Sequence last” value was set to “8”, then Terragen would cycle through the sequential objects named MyObject_0004.obj through MyObject_0008.obj. MyObject_0004.obj would load on frame 4 and MyObject_0008.obj would load on frame 8, if the “Offset” value were zero. Note, that frames 1, 2 and 3 would load MyObject_0006.obj, MyObject_0007.obj, and MyObject_0008.obj respectively if “Loop” where enabled, and MyObject_0005.obj, MyObject_0006.obj and MyObject_0007.obj if “Ping pong” were enabled.</li> | ||
| + | [[File:OBJReader_07_SequenceTab_SequenceFirst_4-8LoopOffset0.gif|none|400px|Five sequential objects, looping, no offset.]] | ||
| + | [[File:OBJReader_08_SequenceTab_SequenceFirst_4-8PingOffset0.gif|400px|Five sequential objects, ping pong, no offset.]] | ||
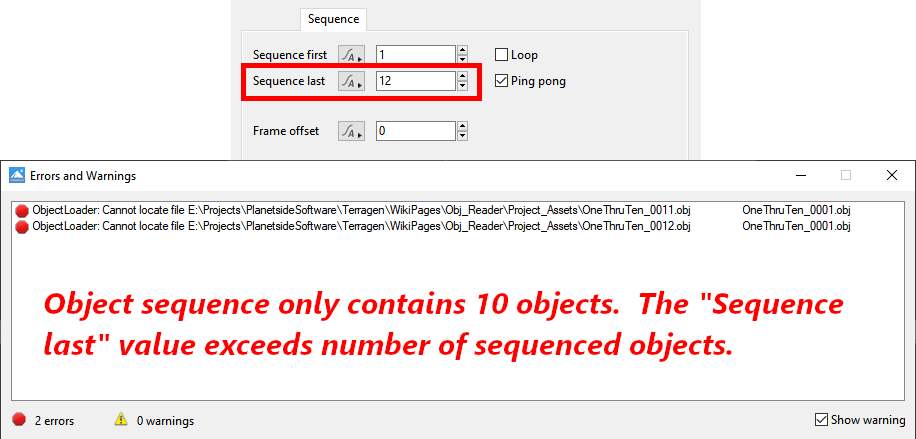
| + | <li> If the sequential object number does not exist, Terragen will display a warning message to alert you.</li> | ||
| + | [[File:OBJReader_09_SequenceTab_SeqeuenceFirst_MissingObjects.png|none|916px|Warning message if sequential object is missing.]] | ||
| + | </ul> | ||
| + | |||
| + | |||
'''Visible to camera:''' If this is checked the object is visible to cameras such as the render camera. In other words it will show up in renders. If this is unchecked the object won't show up in renders. However if, for example, the '''Cast shadows''' checkbox is checked then the shadows cast by the object will still be visible. | '''Visible to camera:''' If this is checked the object is visible to cameras such as the render camera. In other words it will show up in renders. If this is unchecked the object won't show up in renders. However if, for example, the '''Cast shadows''' checkbox is checked then the shadows cast by the object will still be visible. | ||
</li><li> | </li><li> | ||
| Line 35: | Line 62: | ||
</li><li> | </li><li> | ||
'''Flip normals:''' Check this to flip or reverse the object normals. You might want to use this on an imported object if it has gaps or strange dark patches when rendered. | '''Flip normals:''' Check this to flip or reverse the object normals. You might want to use this on an imported object if it has gaps or strange dark patches when rendered. | ||
| − | |||
| − | |||
</li> | </li> | ||
</ul> | </ul> | ||
Revision as of 20:47, 7 August 2020

Overview[edit]
The OBJ Reader node loads models from a Wavefront .OBJ file. The OBJ Reader can also load .mtl files specified by the OBJ containing texturing information. When you create an OBJ Reader it opens a file dialog allowing you to choose the file to load.
Node Type: Object
Settings:
-
Population mode: This popup has two options:
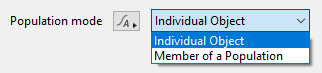
- Individual Object: This is the default for objects created individually, not part of a population. If you choose this option for objects that are part of a population the population instances will still render but the object itself will also show up at its original position.
- Member of a Population: This is the default for objects created as part of creating a population. It means the objects only render as part of a population. If you choose this option for an individual object it won't render.
If you create an object as part of a population and then decide to use it on its own you may need to change the popup to Individual Object to get it to render.
- Preview mode: This popup has five options:
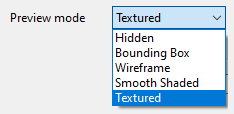
- This popup lets you choose how the object should be displayed in the 3D Preview, and sets the most detailed mode that the object can be displayed in. The Object Display Mode button in the 3D Preview controls the mode for the preview as a whole. For example if you set the Preview mode of the object to Wireframe but the 3D Preview object display mode is set to Show as bounding boxes then the object will only be drawn as a bounding box.
- Preview Colour: Enabling this parameter causes the object to be drawn in the 3D preview using the preview colour when the object display mode is set to bounding box or wireframe. When set to smooth shaded or texture display mode, the preview colour tints the object’s textured surface. This is useful for making a particular object stand out in the 3D preview. Clicking on the colour swatch to the right of the parameter label opens the Colour picker pane.
- Filename: This parameter shows the path to the file used by the OBJ Reader. You can use the file button at right to load a different file but this isn't recommended as the materials for the new file won't be loaded.
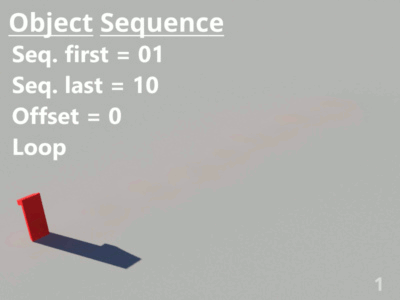
- Sequence first: This value controls both the geometry and the frame on which that geometry is loaded.
- For example, when set to a value of 1, MyObject_0001.obj will load on frame 1, when the “Offset” value is zero.
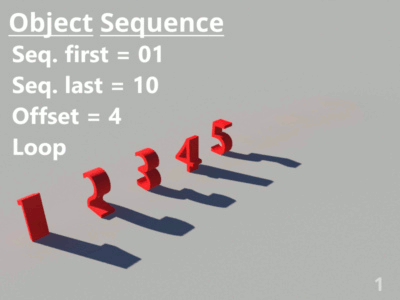
- If an “Offset” value other than zero is present, that value will be added to the “Sequence first” value to determine which geometry is loaded. For example, with an “Offset” value of “4”, MyObject_0005.obj will load on frame 1.
- Terragen can cycle through a subset of the total available sequential geometry by specifying the range to use in the “Sequence first” and “Sequence last” values. For example, if the “Sequence first” value was set to “4” and the “Sequence last” value was set to “8”, then Terragen would cycle through the sequential objects named MyObject_0004.obj through MyObject_0008.obj. MyObject_0004.obj would load on frame 4 and MyObject_0008.obj would load on frame 8, if the “Offset” value were zero. Note, that frames 1, 2 and 3 would load MyObject_0006.obj, MyObject_0007.obj, and MyObject_0008.obj respectively if “Loop” where enabled, and MyObject_0005.obj, MyObject_0006.obj and MyObject_0007.obj if “Ping pong” were enabled.
- If the sequential object number does not exist, Terragen will display a warning message to alert you.
Visible to camera: If this is checked the object is visible to cameras such as the render camera. In other words it will show up in renders. If this is unchecked the object won't show up in renders. However if, for example, the Cast shadows checkbox is checked then the shadows cast by the object will still be visible. -
Visible to other rays: When this is checked the object is visible to various rays which are traced during rendering, such as reflection, transparency and GI rays. As an example, if this was unchecked the object would not show up in reflections.
-
Cast shadows: This should be checked if you want the object to cast shadows.
-
Double-sided surface: If this is checked object surfaces are double sided. A single sided surface is only visible from the "front", which is the direction the surface normal is pointing. If you look at it from the other direction the surface isn't visible. Double sided surfaces are visible from all directions.
-
Use smooth normals: If this is checked the object normals are interpolated to make the surface appear smooth. If it's unchecked the surface will look faceted.
-
Flip normals: Check this to flip or reverse the object normals. You might want to use this on an imported object if it has gaps or strange dark patches when rendered.
- Translate: This sets the position of the object.
-
Rotate: This rotates the object about its origin. The order of the values is heading, pitch then bank.
-
Scale: You can use this parameter to scale the object in the X, Y and Z directions.
-
Import chan file: Clicking this button allows you to import a .chan file for animating the object position and rotation.


File Read Tab[edit]

Settings:
Sequence Tab[edit]

Settings:


Transform tab
<a href=http://allopurinol-300mg.us/>allopurinol</a> <a href=http://finasteride5mg.webcam/>finasteride 5 mg</a> <a href=http://buy-acyclovir.us/>acyclovir</a> <a href=http://celexa-online.us/>celexa</a>
The bounding box is a box which surrounds (or bounds) an object or shader. This box shows the maximum extents of the item inside it. Sometimes abbreviated as "b-box".
A parameter is an individual setting in a node parameter view which controls some aspect of the node.