An arctic erosion journey - Start to work with the Classic Erosion Plugin

Started by Stormlord, October 24, 2023, 09:10:24 AM

Previous topic - Next topic

Stormlord

Arctic Erosion 2023 - Part 1

In the past, I have seen astonishing pictures, created with the Classic Erosion plugin for Terragen. Recently I purchased a license of the Erosion Plugin from Daniils Kamperov for just 29€ and began to experiment with it.
So this is the story, how I started with eroding terrain in Terragen. In this report I intend first, to achieve a nice looking terrain and second, rendering a cool erosion scenery in the next step.

Because I have more material to present to you, than I can upload in just only one session, this thread will come in several parts.
This is part one.

Allow me to mention, that I had only 7 GB RAM with my outdated computer, just recently I purchased a new machine, an i9900K with 128GB RAM.
Equipped with these new capabilities, I started weeks full of eroding experience and a lot of coffee.
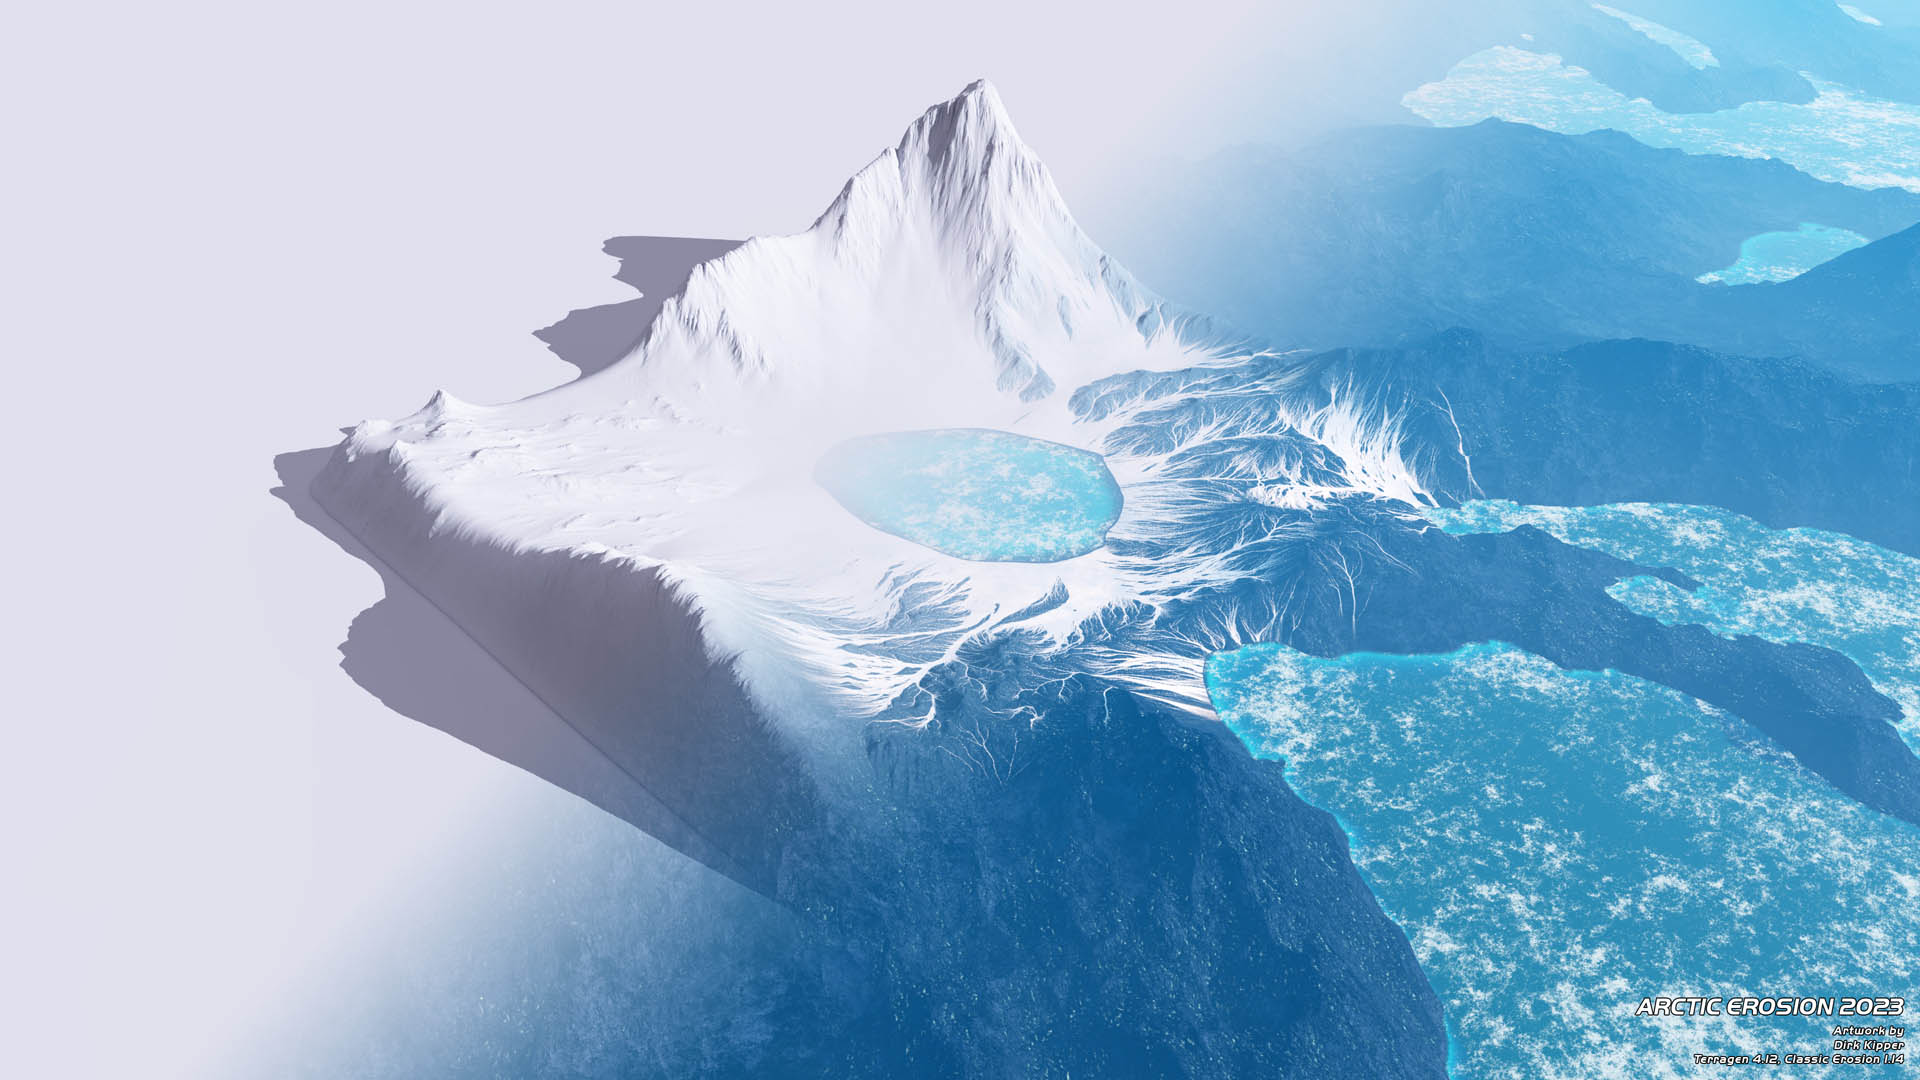
30 - Arctic Erosion 7 - Perspective 1+2 Mixed.jpg
Creating terrains with Classic Erosion


My Erosion Journey begins...

My first challenge was to find out, how you really start to work with the Classic Erosion Plugin from Daniil Kamperov?
So I began to search at the Planetside forum and stumbled over a nice example scene file, which has been created by the author of the plugin.
It clearly shows how you can set up your scene, before you start to erode your own terrains. Embedded is a starter scene which you can also download.
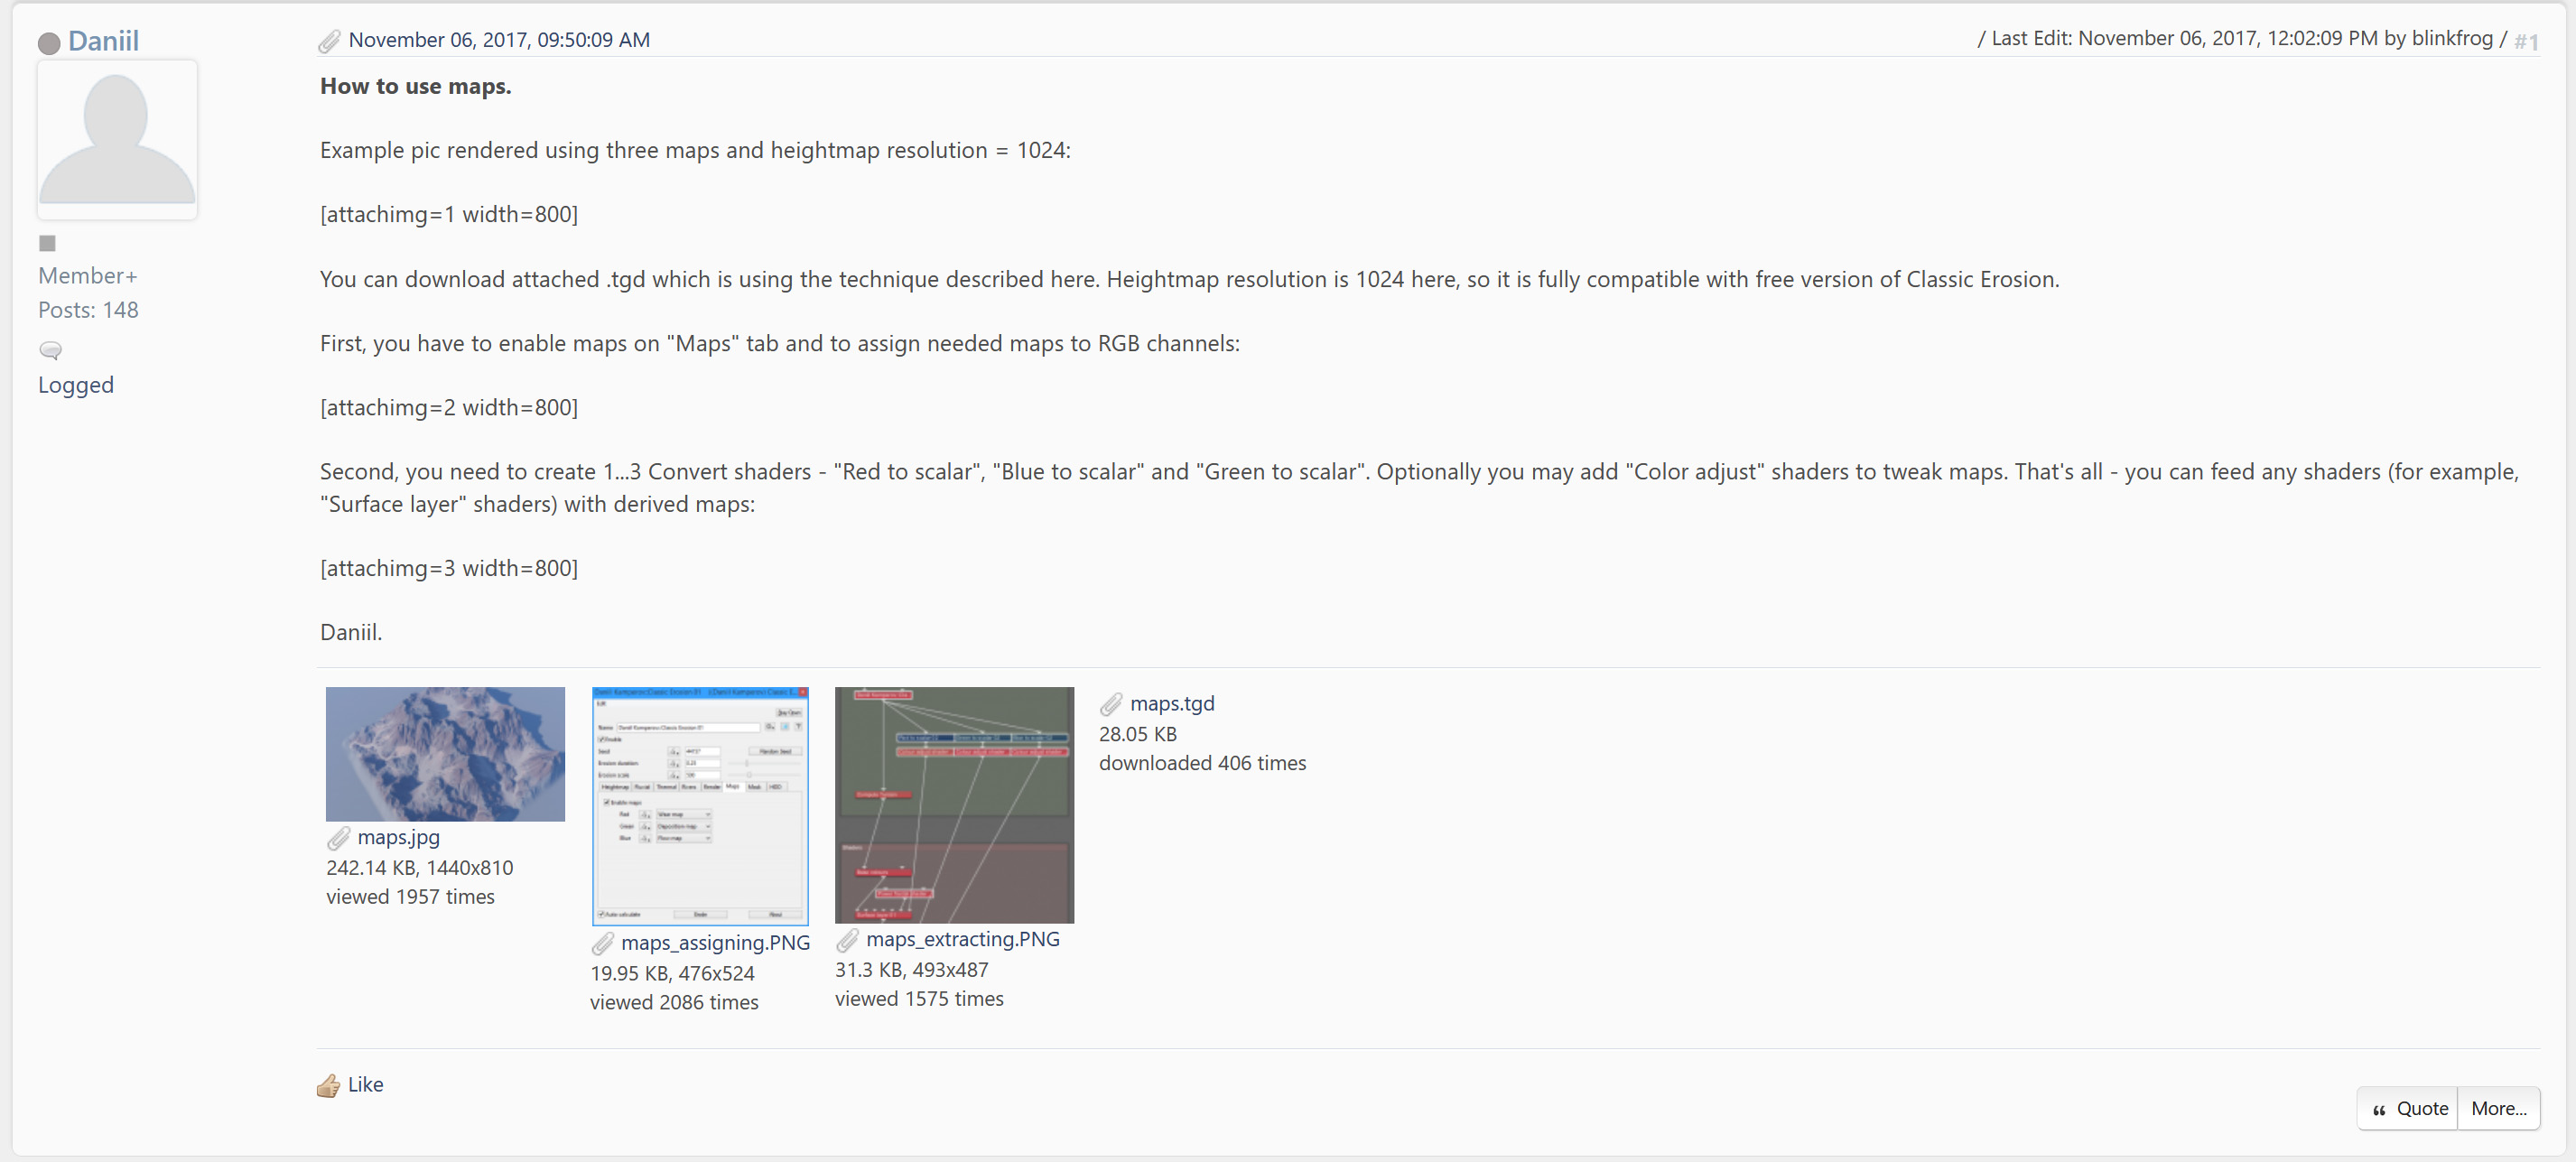
Daniils Kamperovs Starter Scene.jpg
Example scene from Daniil Kamperov
https://planetside.co.uk/forums/index.php/topic,23764.msg240254.html#msg240254

Download basic starter scene by Daniil Kamperov
https://planetside.co.uk/forums/index.php?action=dlattach;topic=23764.0;attach=76954


Based upon this little scene, I created my own setup as a basic starter scene to begin my erosion journey.
I try to help you to make a good start, so please allow me to explain a little bit more here at this point.
Then I will proceed with my story...


Scalar and Vector

Very Important to know and to understand for Terragen is this important principle!
And I wish, I had known this right from the beginning! It took years to find that out!

In Terragen scalar and vectors are often used. Scalar values consist of a single number or magnitude,
while vector and color values are made up of several components, such as the values, that make up the red, green, and blue channel of a particular color.

Simply said, a scalar is a fixed size or number. But what is a vector? Imagine a vector is like an arrow. The length of the arrow defines the size, the tip of the arrow shows the direction, while the arrow itself defines the position in space.
The arrow consist of a shaft and an arrowhead. The shaft of the arrow has a beginning and an end. In other words, it has a start and an ending point. The arrowhead in turn is indicating the direction oft the arrow. So that is a vector.
A start and ending point (line) with an indicator for the direction (arrowhead).

If you imagine the shaft of the arrow alone in 3D space (in an X-Y-Z coordinate system), you got a line somewhere. If you decompose this line, it consists of a share (length) in the X-, a share (length) in the Y- and a share (length) in the Z-plane in 3D space.
This way, you can define the position of a vector in 3D space. Or in other words, you define a line in an X-Y-Z coordinate system.


Colors are coded coordinates
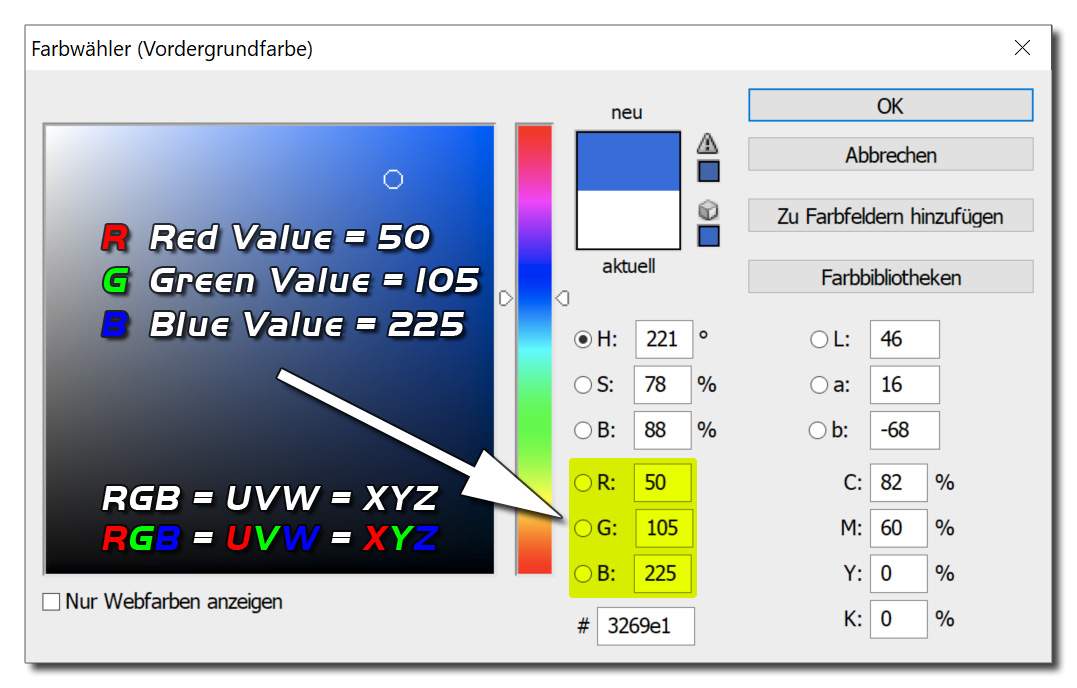
2 - Photoshop Farbwähler.jpg
RGB = UVW = XYZ

A given color consists of a part in the red channel, a part in the green and a part in the blue.
If you take apart a specific color, you can specify the given color by its value in a red, green and blue portion.

Now take the share in the red as a value for an x-coordinate.
Now take the share in the green as a value for a y-coordinate.
Now take the share in the blue as a value for a z-coordinate.

You will end up with a point in space. This point is exactly defined by its x,y,z coordinate. So colors can be used to code a coordinate of a point in a 3D space.
If you understand this, then you are able to understand, how specific colors or color channels are used, to transfer values in Terragen.
This is a very important concept in Terragen!


Starter Scene
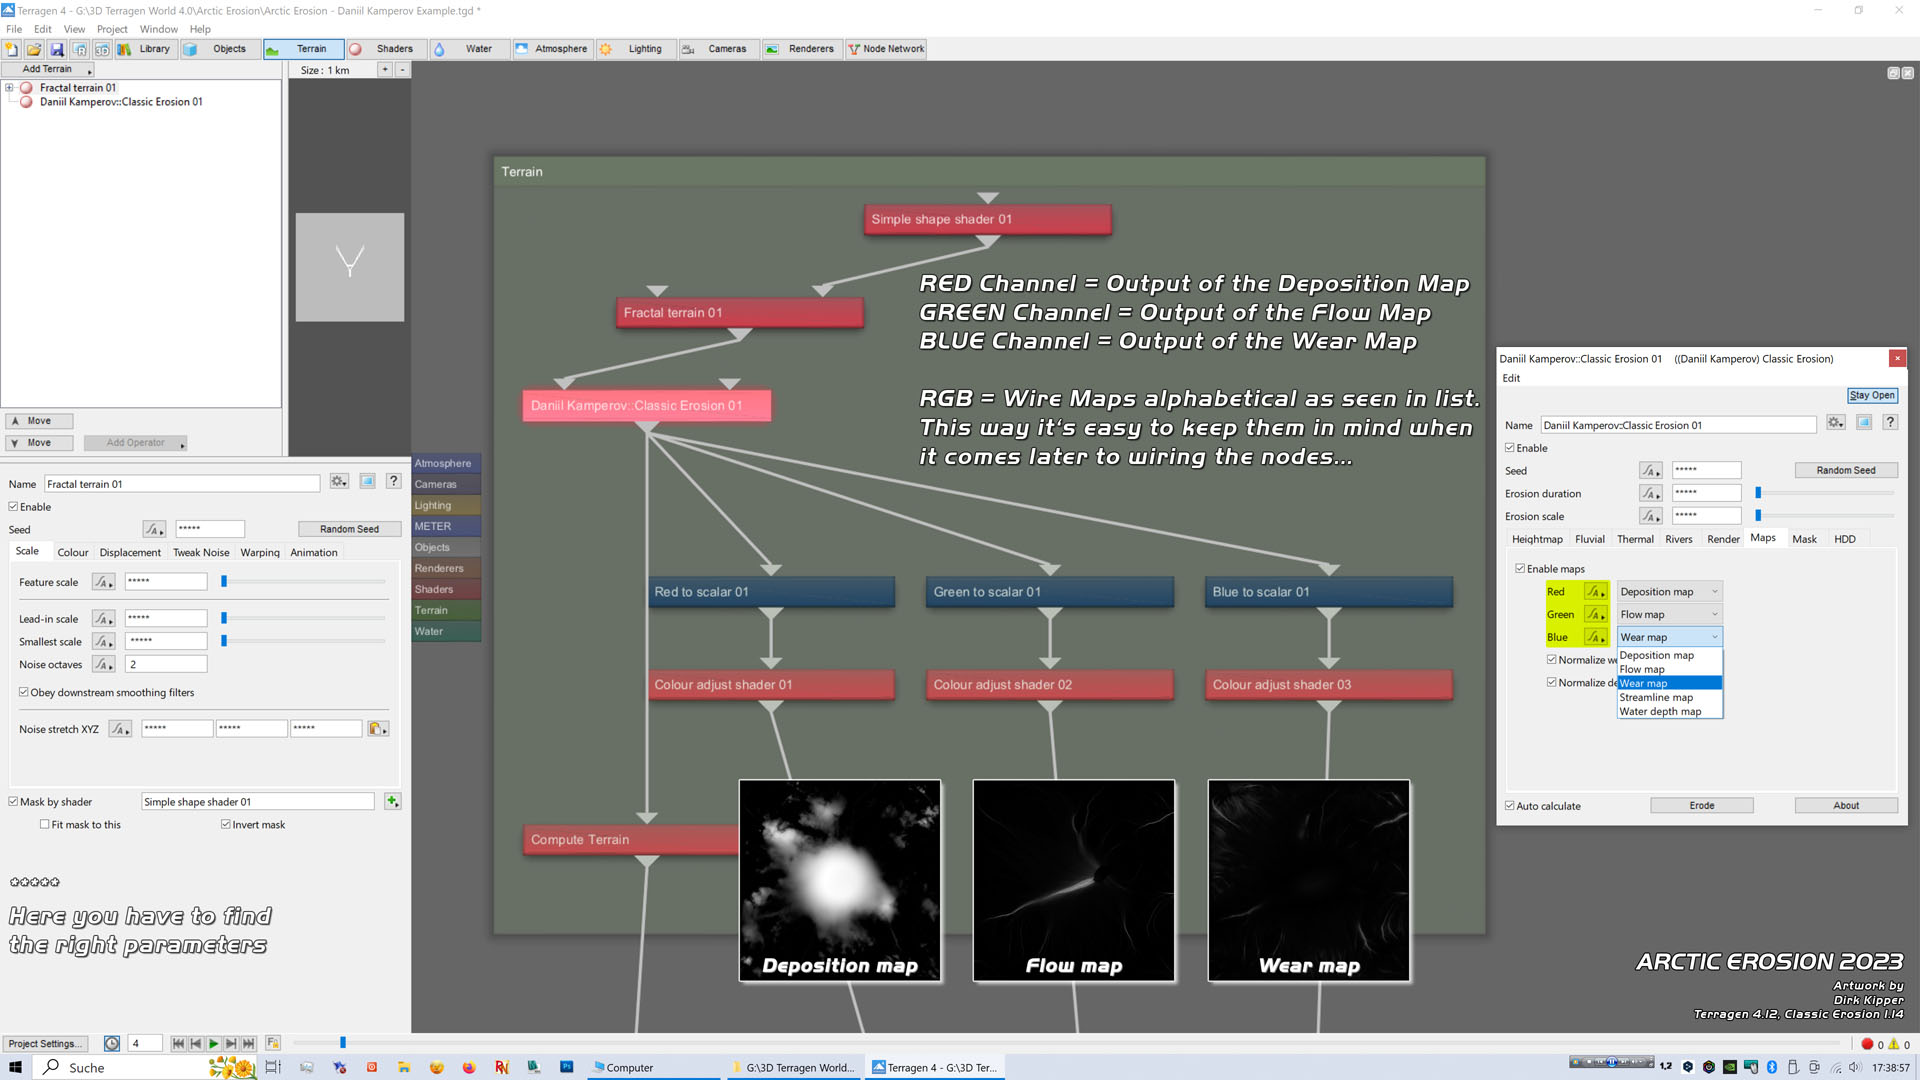
1 - Daniils Starter Scene.jpg 
Starter scene Node Network (Terrain)

Classic Erosion uses the red, green and blue channel to transfer the calculated erosion data represented by erosion maps.
Before using the desired output as maps for distribution, masking, coloring ect. you have to transform the data through a ,,Red to scalar", ,,Green to scalar" and ,,Blue to scalar" node.
Immediately should follow a ,,Colour adjust shader" to simply increase or decrease the output value. Then you can wire it into any node, that has an input channel, which normally will be a shader.
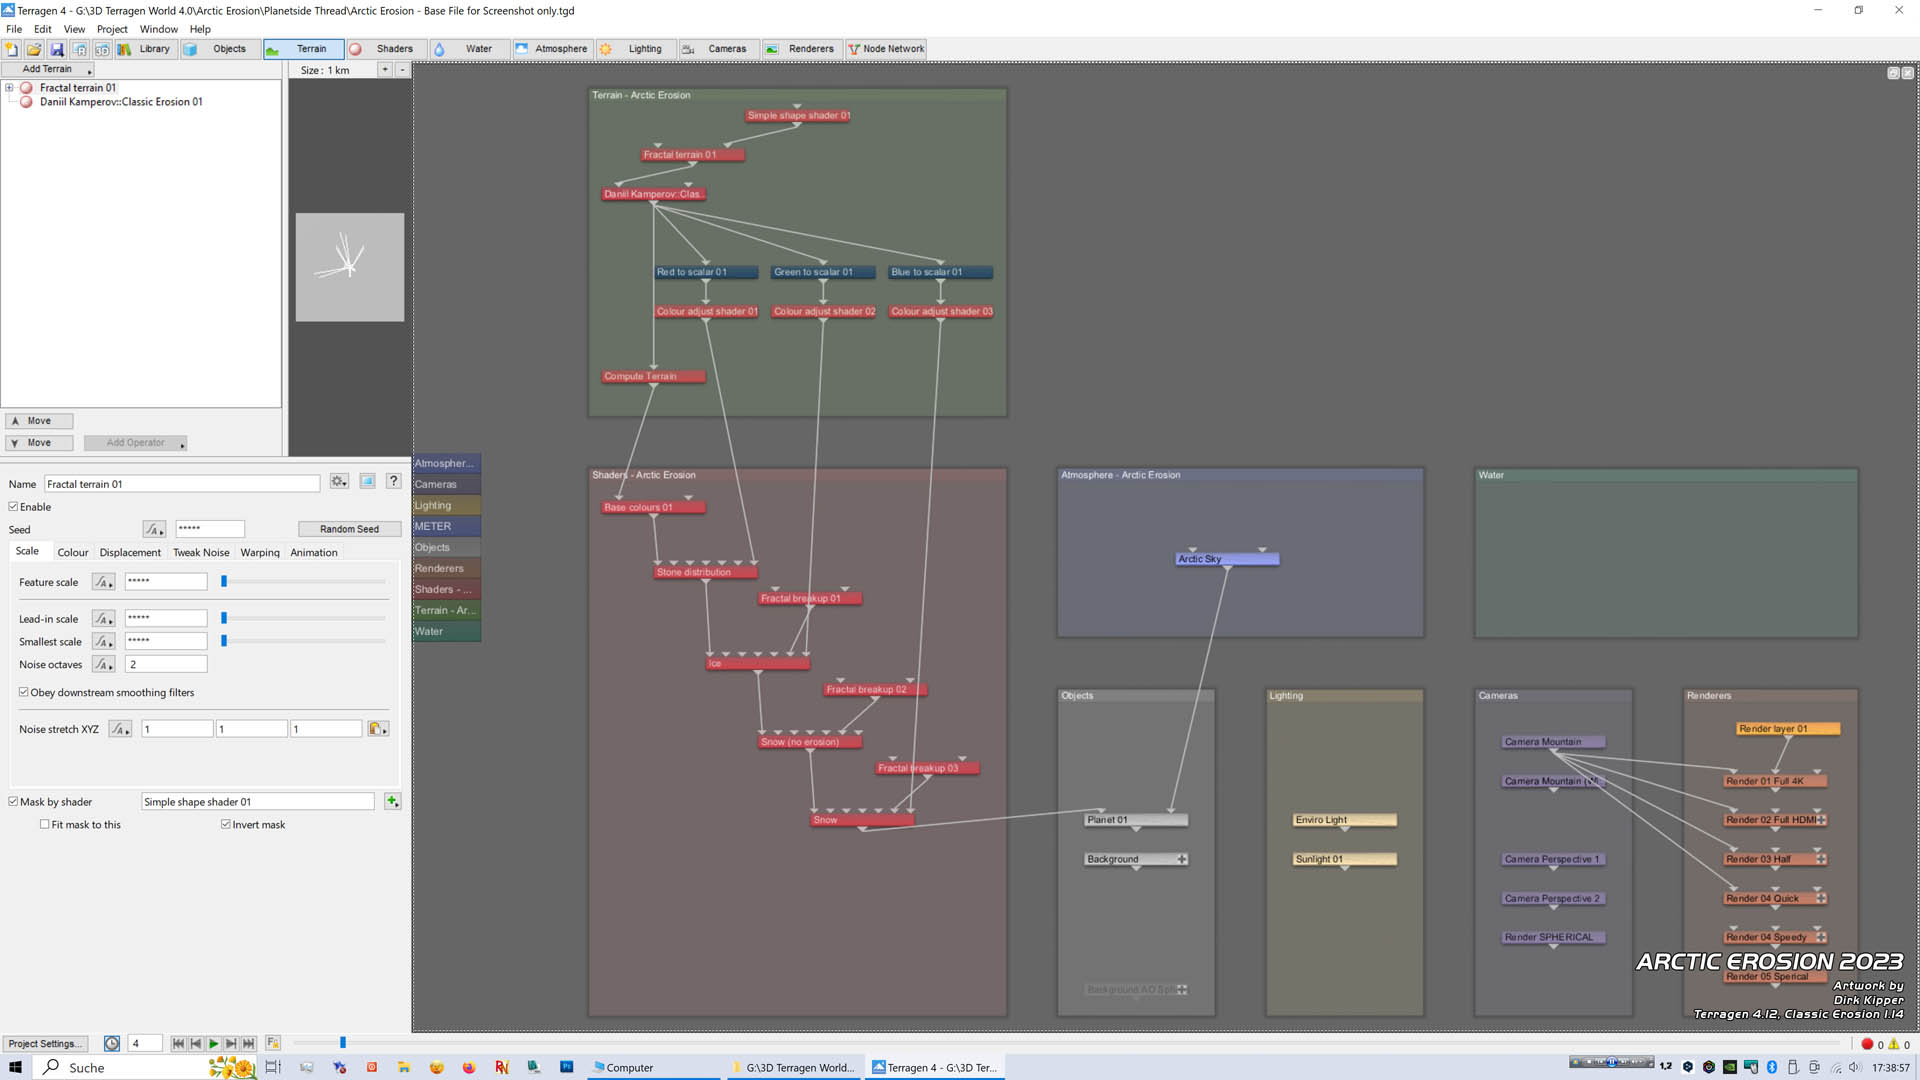
3 - Starter Scene (Terrain).jpg
Basic Example for Erosion Data Output to Shaders


Map Tab

At the map tab you can wire the red, green and blue channel as you like. But I recommend doing that in alphabetical order. Deposition-Flow-Wear is alphabetically ordered.
So follow the same simple principle. It's easy to keep it in mind, when you're later wiring many output lines crisscross to your nodes and ask yourself, ,,Damm.. which color channel was the flow map?
If you do it my way, You can immediately guess and say it was the green channel!


Generating Terrain

I started to read ,,Daniil Kamperov's beginner guide" to learn more about the plugin.
His guide can be found in the Planetside Wiki if you search for ,,Daniil Kamperov Classic Erosion".
https://daniilkamperov.com/download/Classic-Erosion-User-Guide.pdf

So I played with all possible parameters until I ended up with this beautiful terrain.
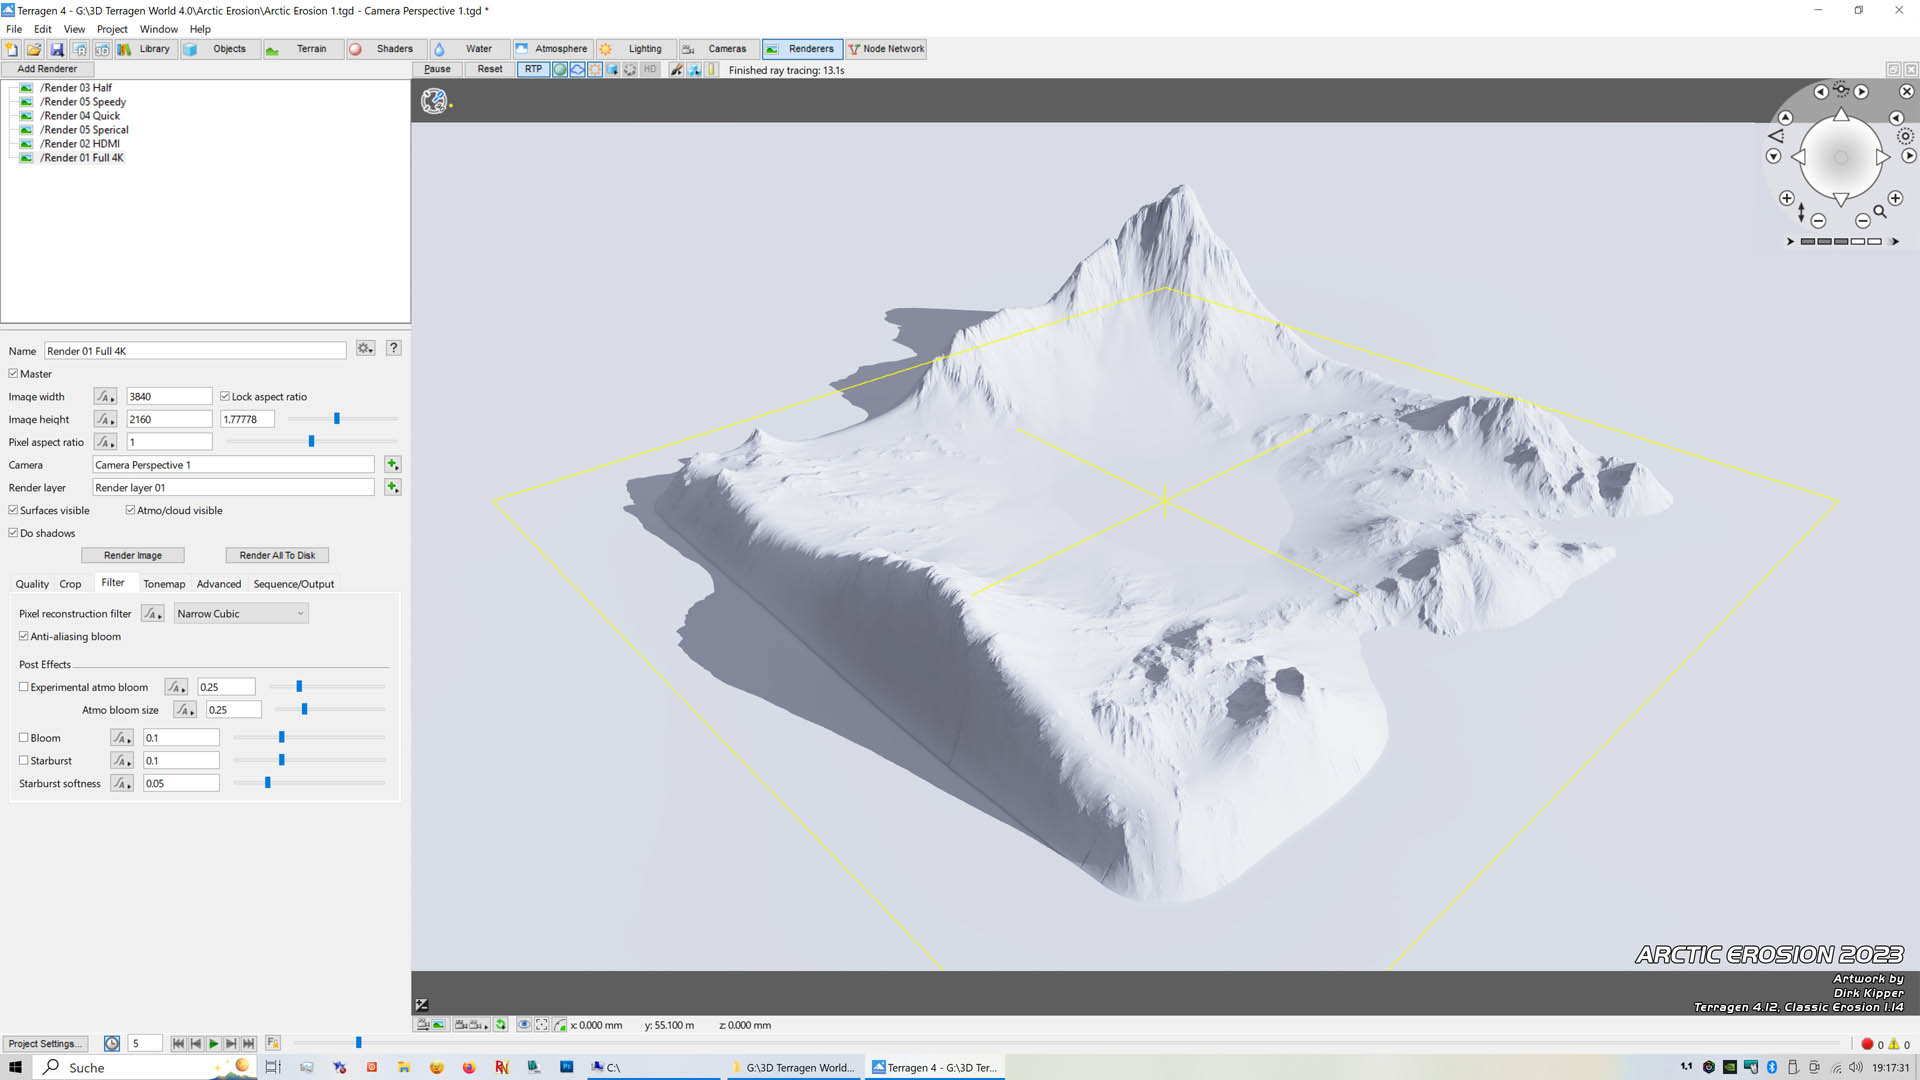
4 - Arctic Erosion Terrain.jpg
After a lot of experimenting, I ended up with this beautiful Terrain in 16K

Just to give you an idea about render times...
The calculation of this 16K high resolution erosion solution took on my i9-9900K with 128GB RAM nearly 4 hours.
But at the end, I earned a splendid set of erosion maps, full of details in a terrific resolution by 16234x16234!

Also, my machine is equipped with a modern 2TB SDD.
So I can load the huge amount of data which has been calculated within seconds into my computer.
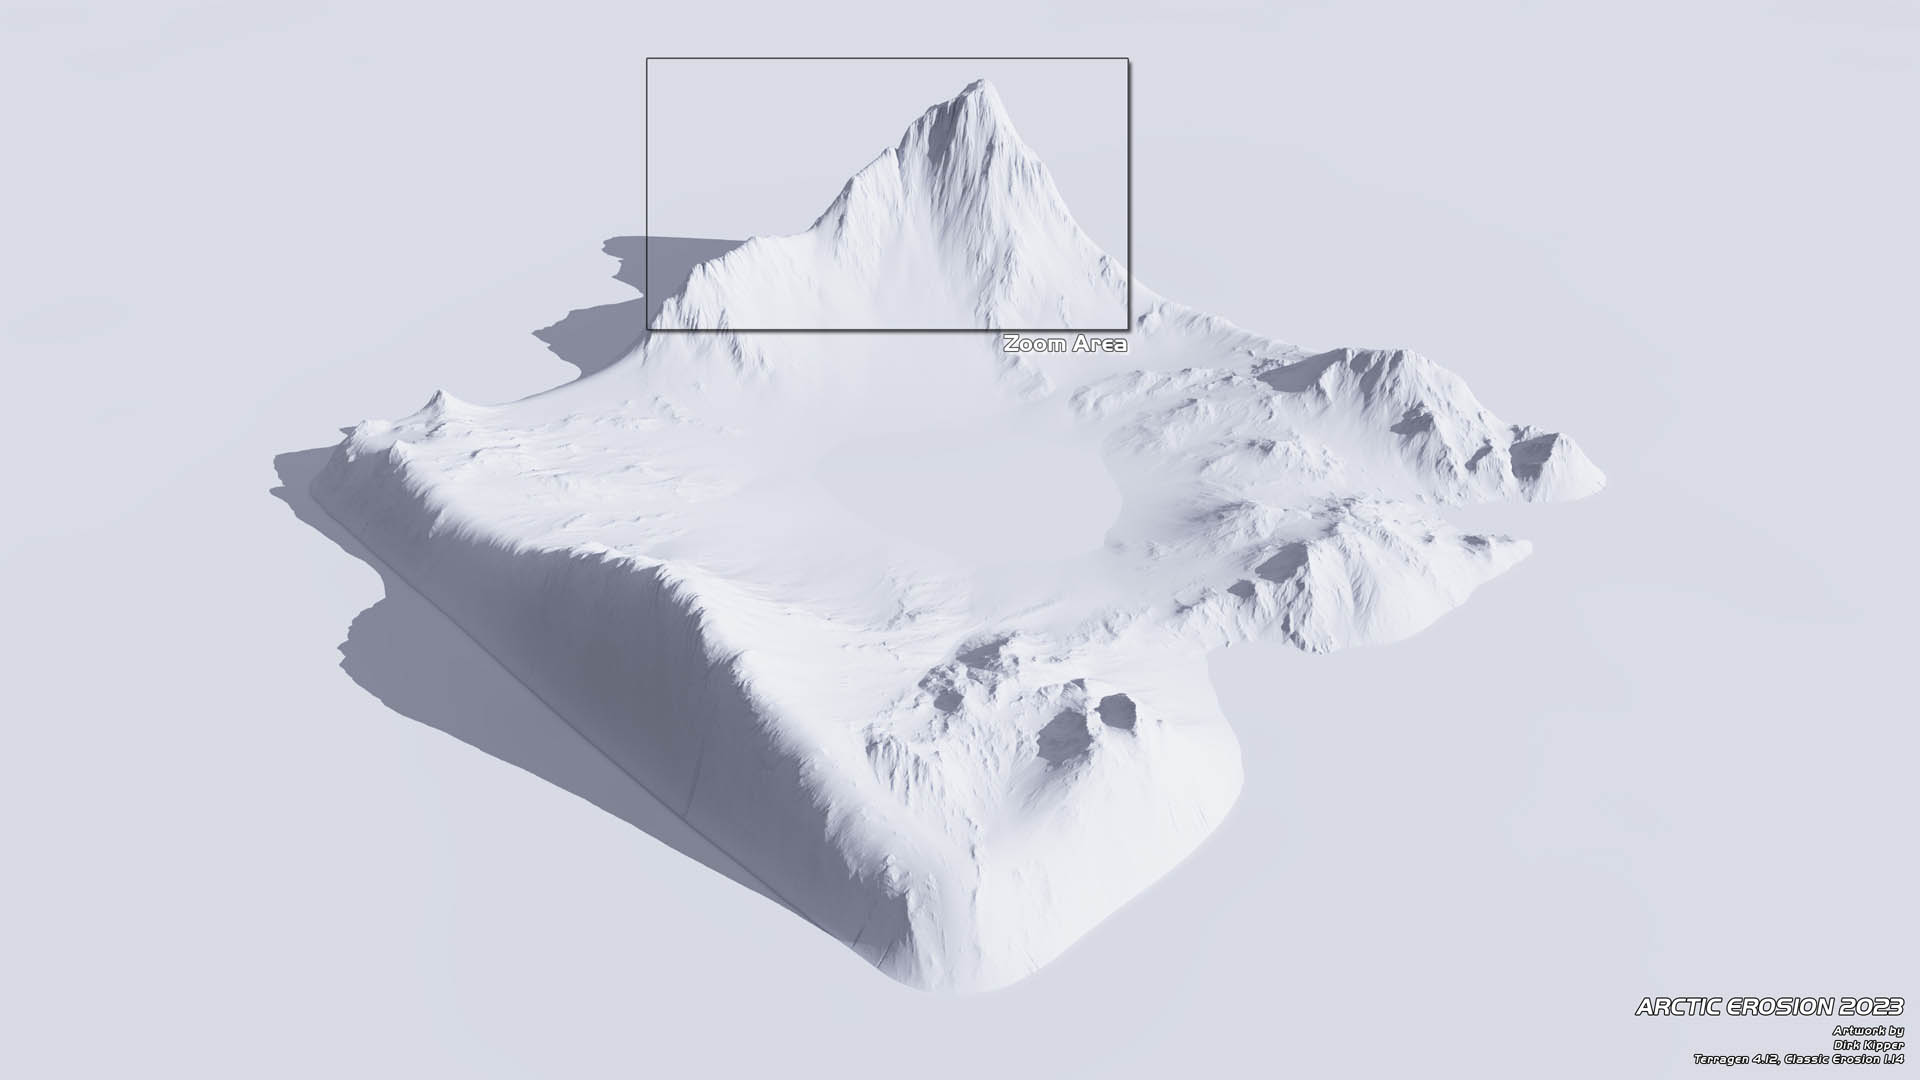
5 - Camera Perspective 1 (Weißer Würfel) AO.jpg 
Original 4K Rendering with the maximum Heighmap of 16384

Next was to find out, which resolution is suitable for terrains?
Yes, I know the highest available, but which is also economic?

So I started to render the same terrain with an Ambient Occlusion Shader (AO) to see in detail, the fine differences along the night.
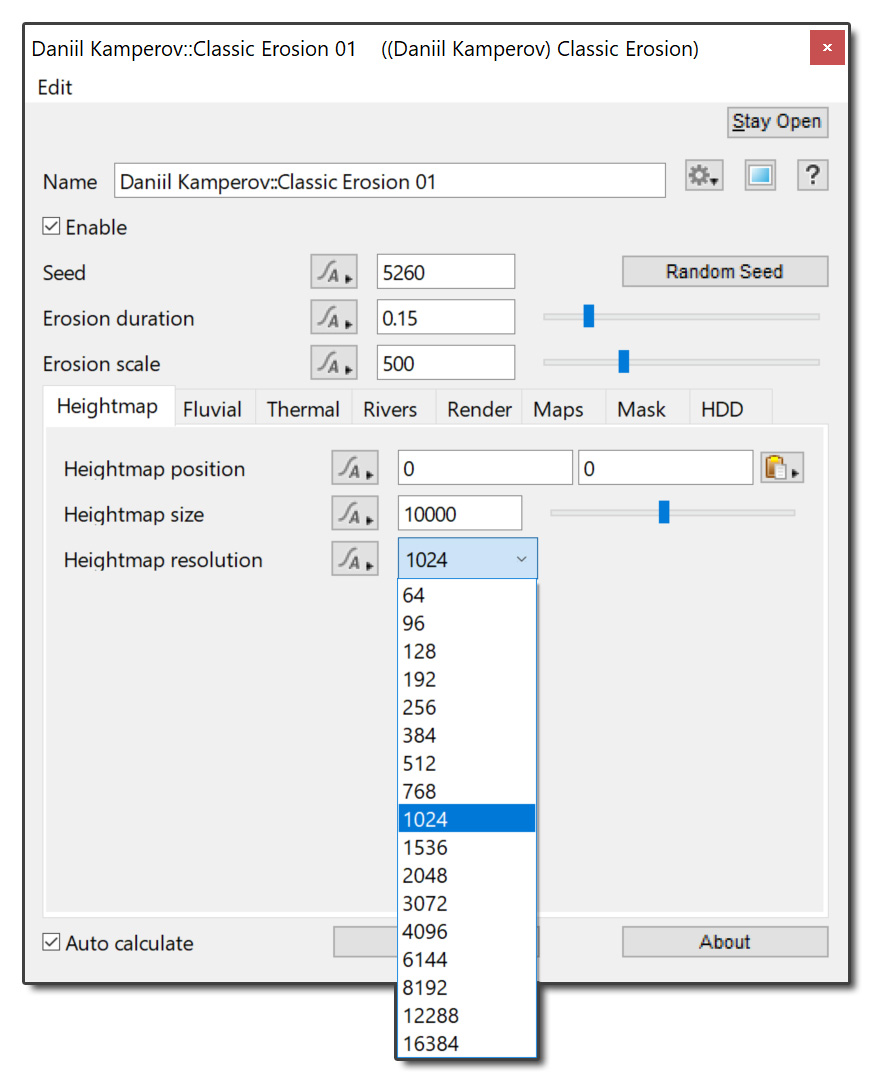
6 - Heightmap Sizes Tab.jpg
Classic Erosion Plugin
Heigthmap Tab

Note:
The free version oft the plugin is limited to Heightmaps up to 1024.
From Low Resolution to High Resolution I rendered one after another image in 4K.
I just want to find out, which solution is good but also economic, suitable for an intended final outcome, depending on the point of view and level of detail?
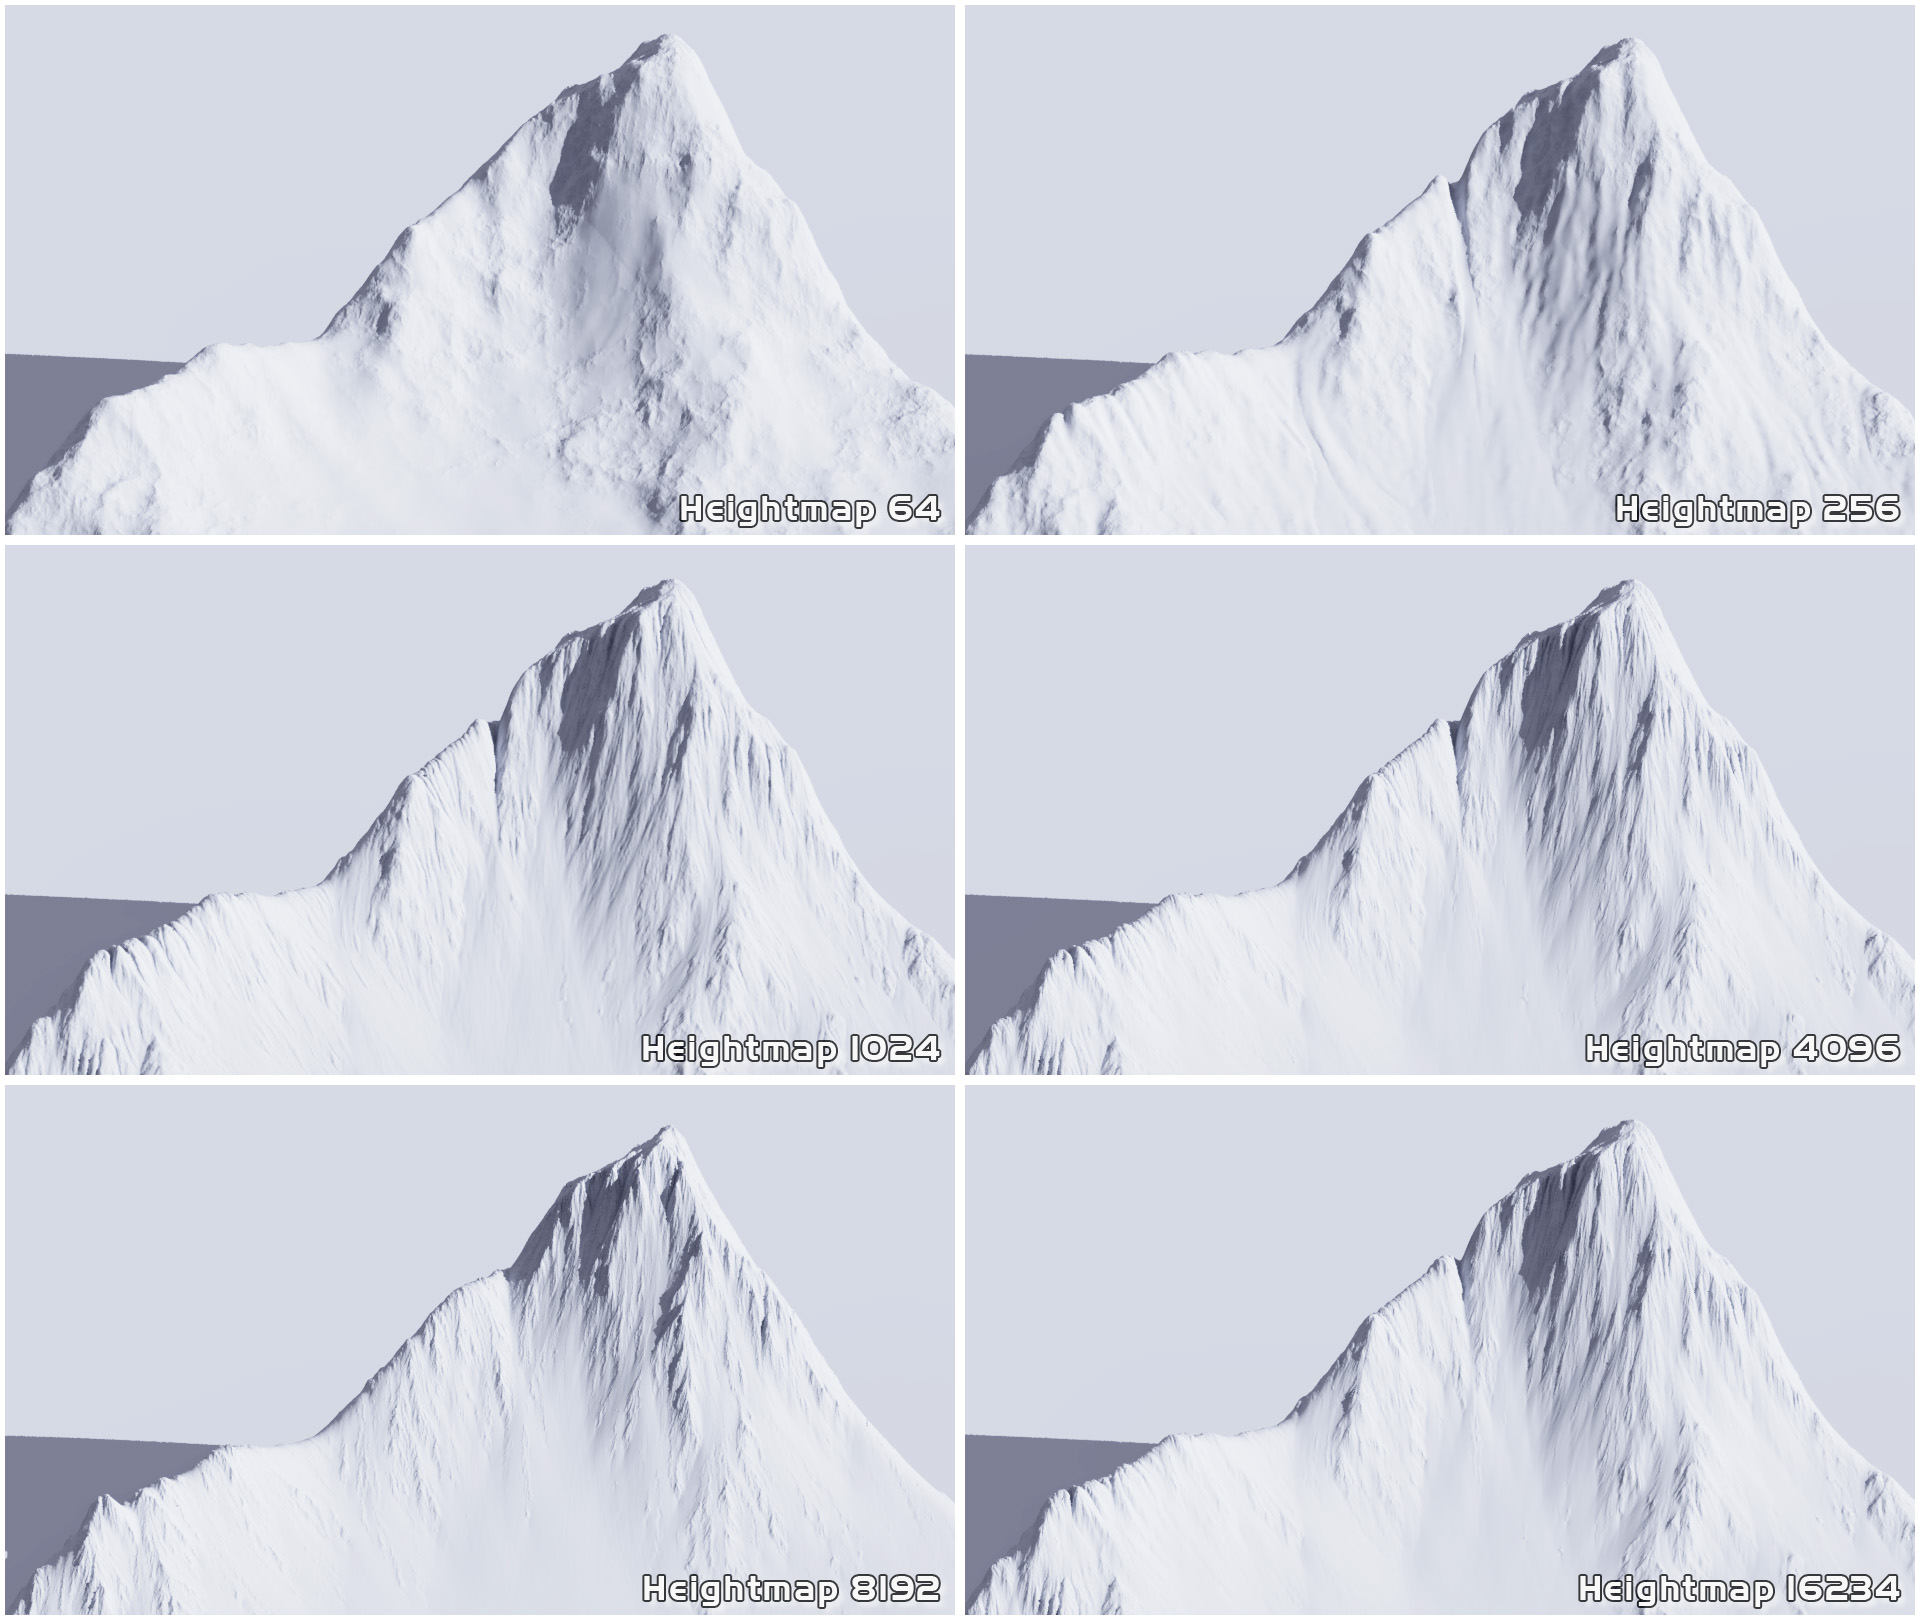
7 - Heightmap Sizes.jpg
Six Different Heightmap Renderings
(Zoom into the Original 4K Renderings)

Luckily it is possible to save the calculated erosion data as an .erd file from within the classic erosion plugin at the end of the calculation.
The saved seize of the "Arctic Erosion 16K.erd" data file here is 4.75GB (only).

But you can save the erosion data also as separate image maps in the PNG-Fomat.
I saved all four maps of the rendered terrain above as PNG's (Greyscale, 16-Bit, 16K resolution). They have in total just... ,,Just!" 858MB.
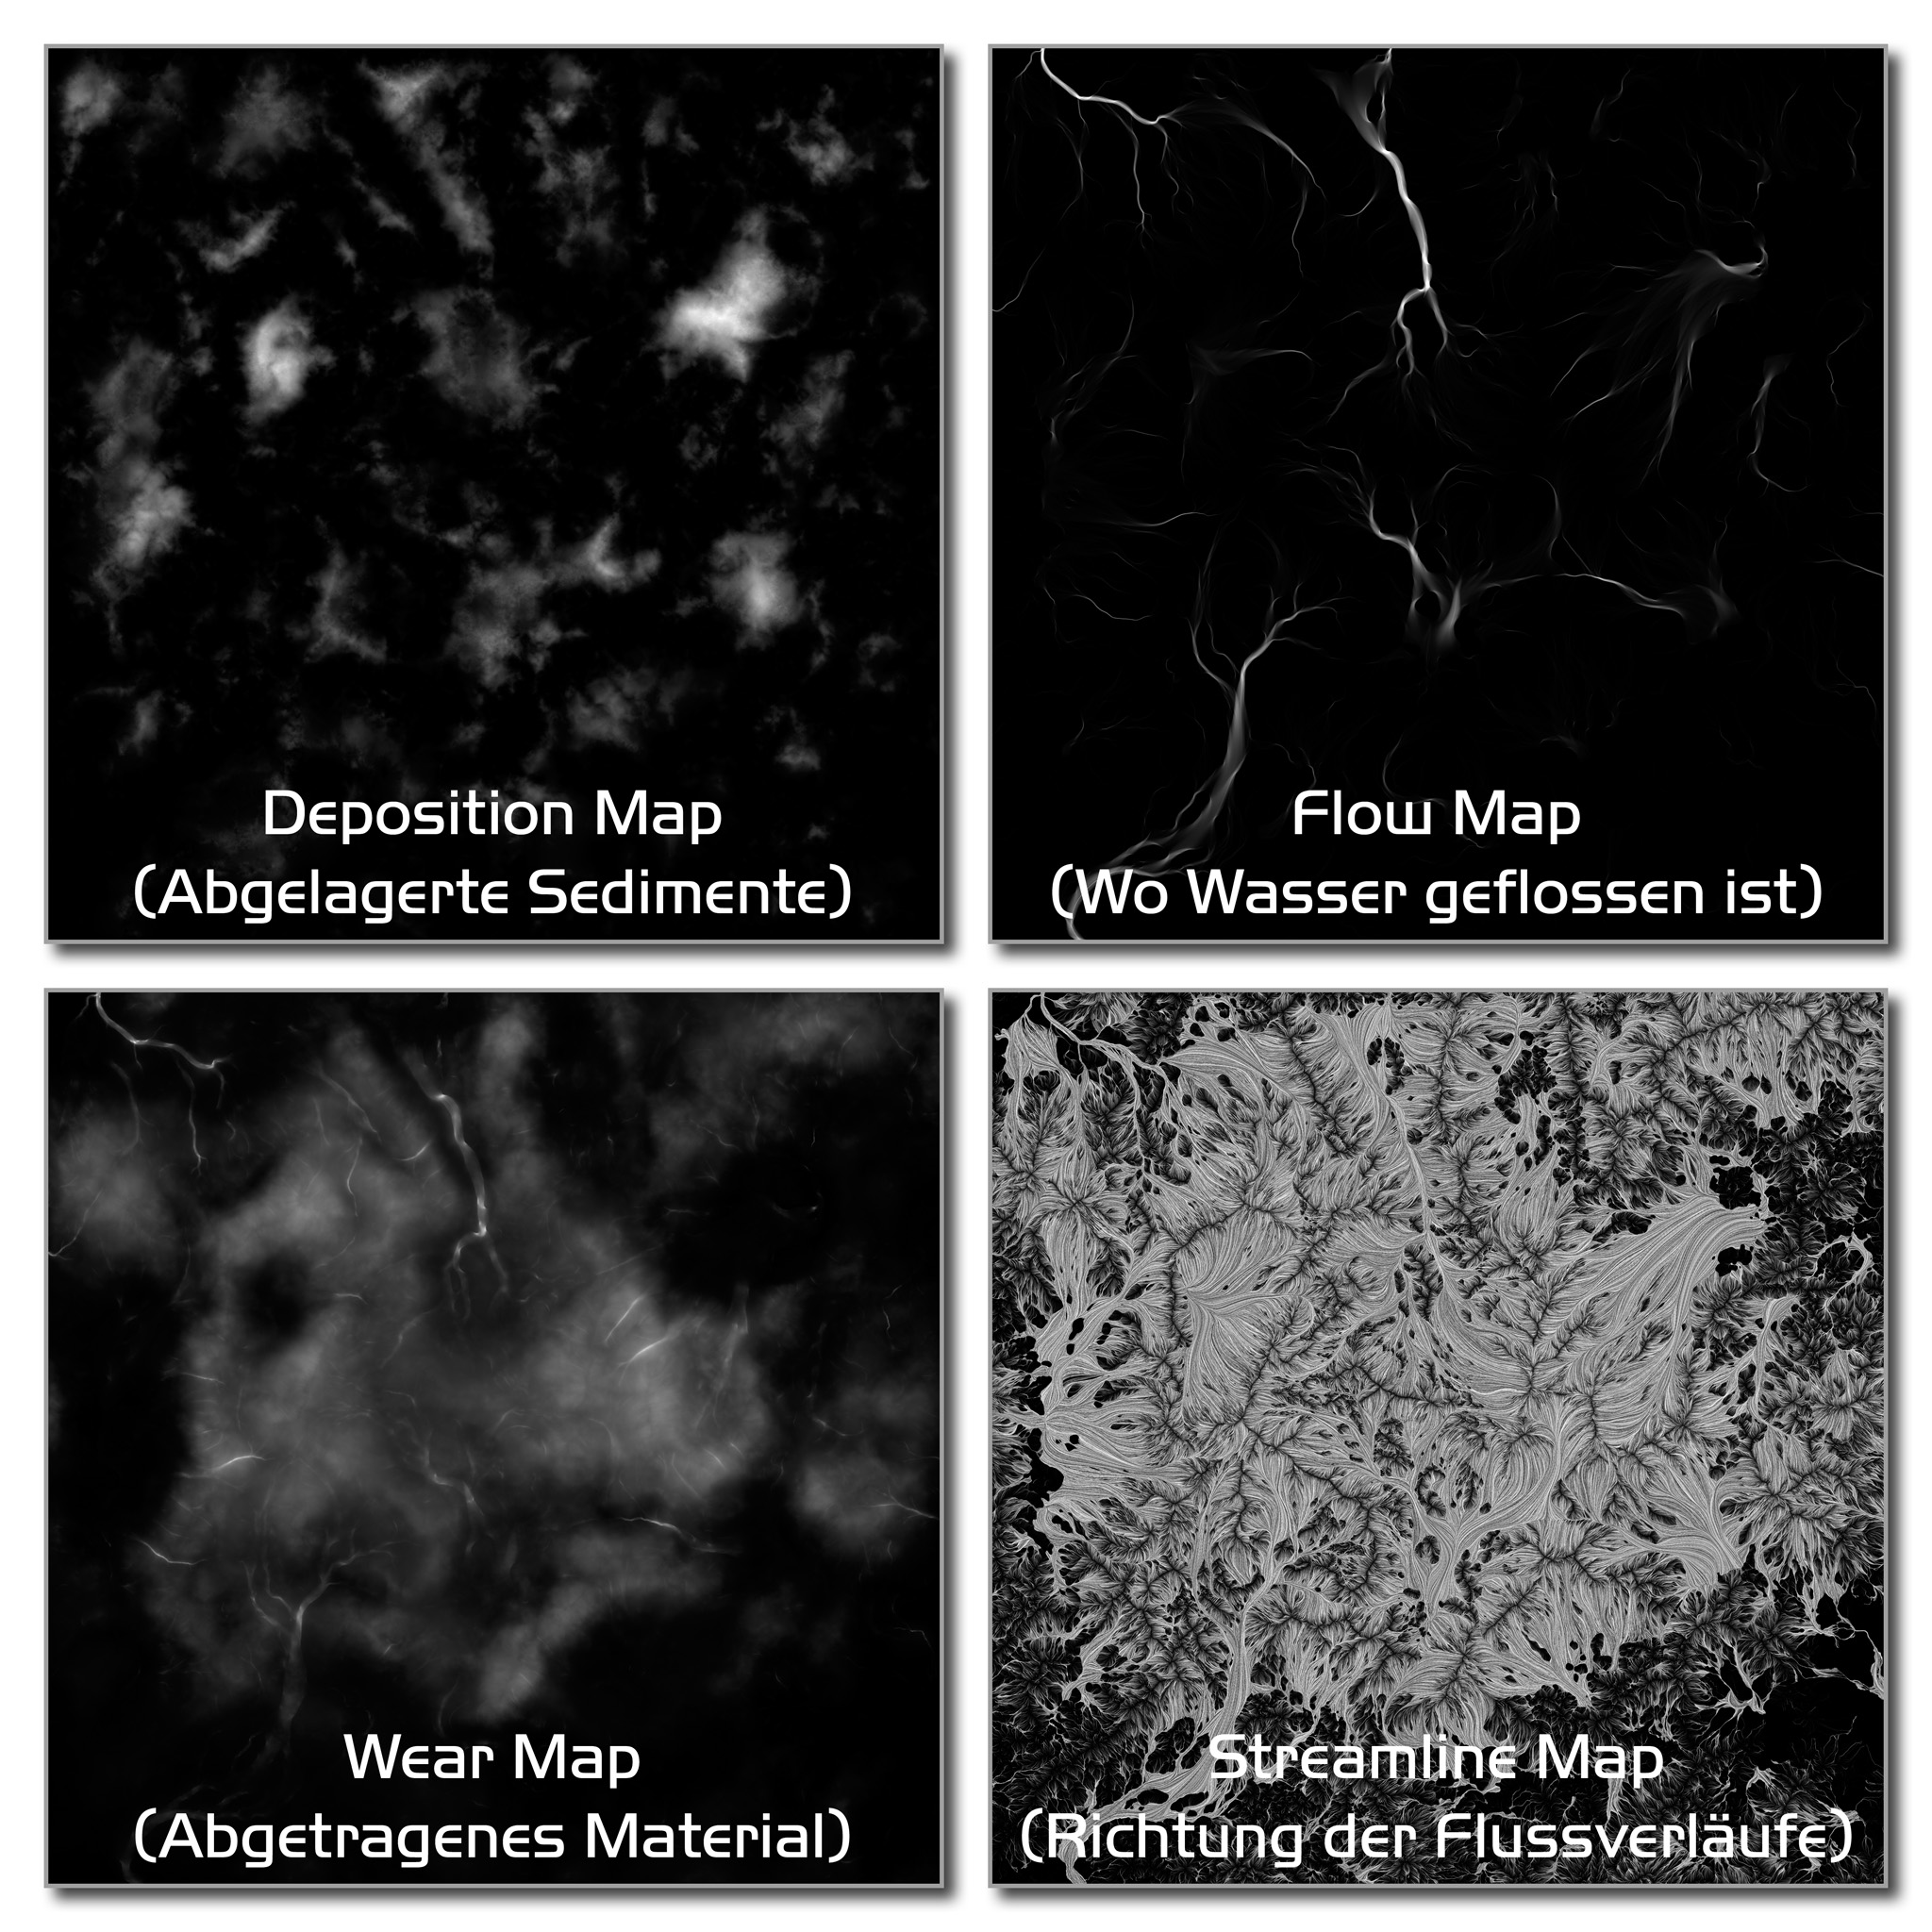
8 - Erosion Maps.jpg
The four rendered Erosion Maps of my ,,Arctic Erosion" Terrain in 16K

Well it is much data, which is stored on the computer.
But this way you ensure to get the exact same eroded data, and you don't waste time with calculating it again!

Just load and go on another time with the exact same data and settings...
So even if you dont like huge files, just do it and save it all for a future erosion party!

To comprehend what is ongoing here, imagine the same terrain data saved as...

.erd-File                                        .png-file
1024 = 19MB                              1024 = 4.64 MB
4096 = 309MB                            4096 = 67.7 MB
8191 = 1.09 GB                          8192 = 281 MB
16234 = 4.5 GB                        16234 = 858 MB

To show you another example of the terrific details, which are rendered by the plugin.
Here comes the original 16K Flow map with a zoom into its original resolution.
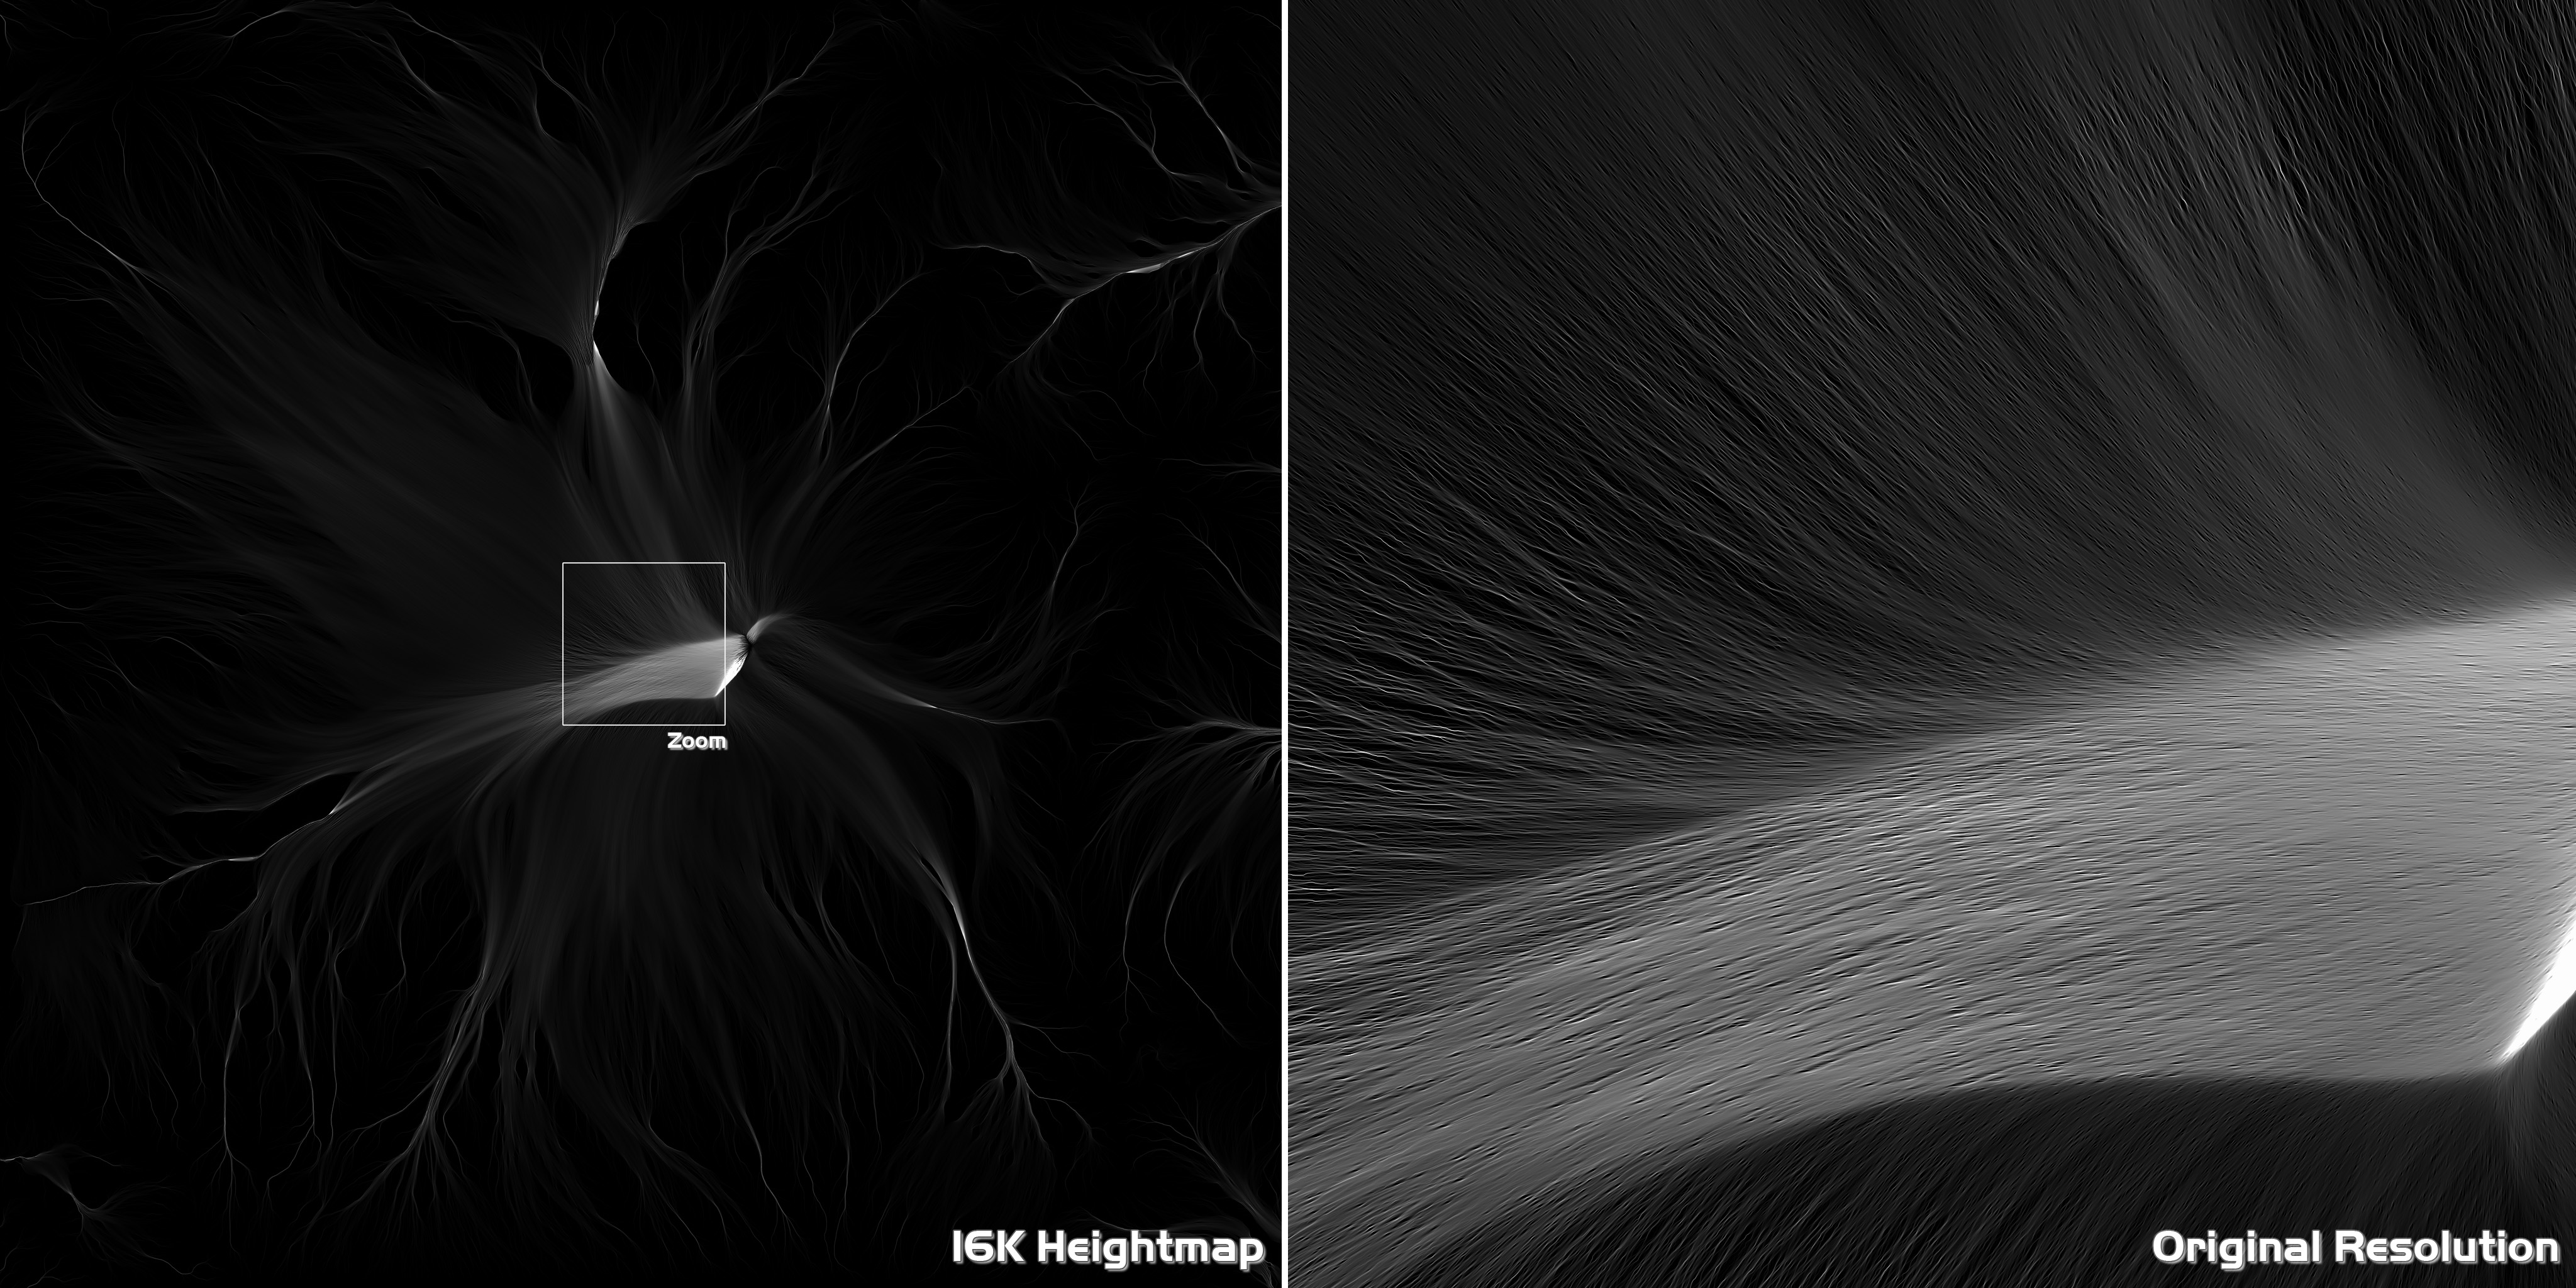
9 - Arctic Erosion.flow 16K.jpg
Rendered 16K Flow Map
Just WOW !!!

All the other Maps are also high quality, they just blow you away if you zoom into!
My personal opinion... JUST GET IT !!! Really awesome...


End of Part 1


STORMLORD


Dune

Cool that you do this. It's really fun to work with. I hardly ever go above 1024 or 1536, as the effect is negligable, IMO. You can also use a high resolution on a smaller part just in front of the cam, and use a lower one for a much bigger area further away (in a second shader).

Hetzen

Good essay on your findings. Thanks for posting.

You can define a smaller area the plugin works on, so you can adjust to taste the erosion pattern you're looking for, then increase the plugin area and render at higher resolutions. I agree with Ulco, depending on the POV, you can often work at 1024.

Another little trick, is to use a Generate Heightfield to create a .ter file after the erosion plugin, and use the combined R, G, B values added on top of each other, so you don't need the plugin if you need to send the scene to a render farm.

Stormlord

Quote from: Dune on October 25, 2023, 02:53:12 AMCool that you do this. It's really fun to work with. I hardly ever go above 1024 or 1536, as the effect is negligable, IMO. You can also use a high resolution on a smaller part just in front of the cam, and use a lower one for a much bigger area further away (in a second shader).

This is excately what I did Uldo, read on to find out...

Quote from: Hetzen on October 25, 2023, 12:30:45 PMGood essay on your findings. Thanks for posting.
You can define a smaller area the plugin works on, so you can adjust to taste the erosion pattern you're looking for, then increase the plugin area and render at higher resolutions. I agree with Ulco, depending on the POV, you can often work at 1024.
Another little trick, is to use a Generate Heightfield to create a .ter file after the erosion plugin, and use the combined R, G, B values added on top of each other, so you don't need the plugin if you need to send the scene to a render farm.

This is a very clever idea Hetzen, I will keep that in mind!

_____________________________________________

Arctic Erosion 2023 - Part 2

Workflow to create the whole scenery

After eroding a really satisfying terrain, I'll come to my second intention.
Rendering a really cool scenery with my eroded terrain.
I like the arctic a lot, so I will create an arctic scenery.

To transfer this idea into reality, there are several steps necessary.
Maybe not all, but some of the following ideas should be visualized.

- Finding beautiful viewpoints (perspective, directly frontal and confrontative)
- Creating shaders (rock, snow, ice, water, fake stones, sand, underwater sand)
- Create atmosphere with clouds (snowflakes, rain?)
- Water (lake, ocean, rivers, beach zone, shoreline?)
- Fake stones, boulder rocks, gravel, pebbles, sand


Starting erosion shader design

So after finding some good viewpoints, a major one was set and fixed. I always try to keep things simple in the beginning.
So I just created a basic shader setup consisting of four simple main shaders for rock, ice, snow (no erosion) and snow.

10 - Starter Scene - Shader Design.jpg
Starter scene network and a first "half = 960 x 540" erosion rendering in 39 seconds


Render settings

A few words regarding render settings. If you have much render power this may be obsolete, but operating a low-end machine at the other side, it forces you to be economic with your render times.
I had such a computer in use for the last 12 years. In 2023 once I booted my machine in the morning and as always it greeted me with ASUS 2009 motherboard, please wait while booting... I bought a new one!
So I had the need to develop a good render rig, to be as economic as a miserly Scotsman.

Is it not this way? Many fiddle around with just one or two render settings. They offer a superb scene as .tgd file in the forum, but their Render Tab inside their scene is absolutely poor and spartanic.
We can do it better! Absolutely!

And is it not this way? You simply need to know where the clouds are positioned, if the light is bright enough on the hillside, the water color fits into the scene etc.
Here, you don't need to render a scene with high quality settings. It is better to design a render rig, which has from the low-end upwards, increasing render settings.
The higher you go, the more the settings increase. At the high end, you go on with high quality settings and of course your render layers activated (if you have it available)!

11 - Render Setup.jpg
My standard render rig with economic render settings
(Please pay attention to the yellow marked settings also in the edit sampling tab)

So why not using a standard render rig like this in your standard scene?
So may I ask YOU at this point...

"Do you have a standard scene ?"

Does Terragen load your standard scene when starting?
If not, Preferences -> Startup -> Load from file -> Choose File...

Did you already edit the settings under Edit Sampling?

Do you have a render layer already inside your render tab (if available)?
Did you activate all render layer? (The standard here is pre-deactivated check boxes)
Sometimes it happens that you render for many hours only to find out you miss one!

Do you have also a spherical camera in your camera tab?
Never seen one in a .tgd!

This way, you will have always optimal settings in regard to your changing needs always at your fingertips?

If you like it, then copy my standard rig presented above.
Simply create these settings... don't forget to edit the sample settings also...

Render 05 - Speedy 480 x 270 MD 0.2 and AA 0.1 1/64 first samples
Render 04 - Quick 640 x 360 MD 0.4 and AA 0.3 1/16 first samples
Render 03 - Half 960 x 540 MD 0.5 and AA 0.4 1/16 first samples
Render 02 - HDMI 1920 x 1080 MD 0.6 and AA 0.5 All Render layers active
Render 01 - Full 4K 3840 x 2160 MD 0.8 and AA 0.8 All Render layers active
Render 06 - Spherical camera (if available) with individual project settings

Standard Scene by Dirk Kipper (STORMLORD).tgd
Or just download the file...


Shader Development

Tweaking here and there lead me to these first quite cool erosion renderings.
A fine line at the bottom is added to mark a future sea level at the mountain base.
The sky has been spared to have a black background for a neutral color comparison.

12 - Arctic Erosion 4 - (Gestein hellgrau).jpg
Eroded arctic mountain scenery
(Rock brownish-grey, improved snow, fine waterline, 4K+8K map mix)


13 - Arctic Erosion 4 - (Gestein blaugrau).jpg
Eroded arctic mountain scenery
(Rock bluish-grey, improved snow, fine waterline 4K+8K map mix)


Node Network Shader Improvements

In the Node Network, you can see that many nodes has been added now.
I also tested mixing up 4K maps together with 8K maps to achieve different results.

A simple but good-looking water shader and atmosphere with clouds has been added also.

14 - Node Network - Arctic Terrain Shader Settings 4.jpg
Shader Design 4.0
(snow white, snow greenish, snow-ice mix, wet shoreline, sand, 4K+8K map mix)

15 - Arctic Erosion Terrain (Heightfield 16384).jpg
Shader Design 4.0
Eroded arctic mountain scenery in a perspective view


At this point, I had a little bit fun while rendering this nice erosion scenery.
Here is one version with my Arctic Ocean water around and another blended version.
Both looking fine, but there is more room for improvements...

16 - Arctic Erosion 5 - Camera Perspective 1.jpg
Original 4K Rendering with applied shader design 5.0
(snow-ice mix with sparkled cracks, wet shoreline, underwater sand, 16K maps)

17 - Arctic Erosion 7 - Perspective 1+2 Mixed.jpg
Neutral 4K Rendering blended with applied shader design 5.0
These two blended terrains are looking so cool!


The first improvement I did, was to create a nice sky with clouds. So the image looks more natural and attractive.
Without clouds, it looks somehow sterile, and you miss shadows on the terrain, which gives the rendering a more natural appearance.

18 - Arctic Erosion 3 - Ohne Himmel.jpg
Arctic Erosion without clouds

19 - Arctic Erosion 3 - Mit Himmel.jpg
Arctic Erosion with clouds and their shadows on the terrain


Water Shader

At this point, many will ask themselves, how did this guy get this nice looking arctic water?
My way to do it, is to set as the last shader a nearly white underwater sand shader.
If you have a bright underwater sand, then the reflection lightens up the water.

20 - Ocean - Underwater Sand - OFF.jpg
Arctic Ocean Water with bright underwater sand layer - OFF

20 - Ocean - Underwater Sand - ON.jpg
Arctic Ocean Water with bright underwater sand layer - ON

In a direct comparison, you see the difference at the first glance.
The left image is rendered without the white underwater sand shader at the end of the shader tree.
Right, it is rendered with the whitish underwater sand. The sand brightens up the ocean water.

Isn't it a good idea?
This water looks so much more tasty.

20 - Unterwater Sand ON-OFF.jpg
Arctic Ocean with near white underwater sand layer in direct comparison
ON-OFF -> You decide !

19 - Node Network - Arctic Terrain Shader Settings 7 - Detail.jpg 
Arctic Erosion Shader Design 7.0 (Water Shader in detail)
The underwater sand layer at the end of the shader tree makes the difference !

By the way... the color of the water is designed to fit the atmosphere color in this image, which is a lightweight turquoise.
Maybe too bright, but ice will be added next. The ice is white, so bright white colors are a nice extra to illuminate it from beneath.

Another thing to mention is that the sea is now rougher than in the first rendering.
A more dramatic view can be achieved, when the camera is just a little, let's say 0.5m above the surface.
Watch towards the shoreline in the images above and notice the shaped sea towards the horizon.


End of Part 2


STORMLORD

Stormlord

Arctic Erosion 2023 - Part 3

Adding more details, cracks in the snow, fake stone shader shoreline, ice fields in the water

Then I added cracks in the snowfields and some ice in the water.
But 1my main focus is on the foreground.

The first render didn't look promising, because the point of view is 30 meters higher, than the water level.
In the second, I lowered the camera to 55.4 meter, while the water level is at 55 meter.

21 - Arctic Erosion 7 - Camera 30m above sea level.jpg
Camera set 30 meter above sea level
Sea ice displacement is nearly invisible (but good for drifting ice fields in open water)

22 - Arctic Erosion 7 - Camera 0.4m above sea level.jpg
Camera set just 0.4 meter above sea level
Much more dramatic 3D view of the arctic sea ice and waves at the horizon

The camera set just a little above the sea leads to a much more interesting and dramatic view.
You will notice that the waves at the horizon are now curved (dramatic) and the sea ice displacement becomes clearly visible.

To illuminate the sea ice a little bit more realistic, I used some render layer elements to design a better 3D looking effect.
In this case, I used the Z-Depth Layer (tgSurfDepth) to get a better illumination in the ice caps of my ice field in the sea.

23 - Arctic Erosion 7 - Z-Depth Layer (tgSurfDepth).jpg
Render element - Z-Depth Layer
tgSurfDepth

Because my concept a little bit abstract, I made this screenshot in Adobe Photoshop to make it more clear for you.
So just follow the lines in the screenshot...

24 - Arctic Erosion 7 - Z-Depth Layer (tgSurfDepth) added.jpg
Illuminating the sea ice with a z-depth mask in Photoshop

Here I spiced up the sea ice a little bit. I took the tgSurfDepth-layer (z-depth) element, masked it and used this mask for a tonal correction layer in Photoshop.
This brightens up the ice in front of you, but lowering the influence of the tonal correction layer towards the horizon. In other words, it becomes more 3D looking.

So this small trick generates the sea ice a little bit more illuminated in the front (more whitish) and leaves it normally illuminated at the horizon.
To trigger this effect further, I also used the tgSurfDirectSpec-layer to light up the sparkles in the ice itself.

Finally, even if you don't see it in this rendering, I added some fake stones at the shoreline to pimp the beach a little bit more.
Surely more details like big boulders could be added too, but for now, I think the scene is really a fine first erosion experiment.

So my first erosion journey has come to an end here at this point.
Finally, let me present to you the final render in full 4K resolution.

Arctic Erosion 2023 by Dirk Kipper.jpg
Arctic Erosion 2023 in 4K

As a Bonus, I made a PDF for you, which you can also download.
Download Arctic Erosion PDF

Inside you will find detailed screenshots from the Node Network.
My Classic Erosion Setup, Shader development, ice, snow, cracks, water, ice fields and so on.

STORMLORD


Dune

Quote from: Stormlord on October 29, 2023, 06:27:25 AMgenerates the sea ice a little bit more illuminated
Very cool tutorial. I hope many people will see this and use it to their advantage.
May I add a few hints? You can lighten up the ice within TG by merging in a default shader, or even use a default shader by itself if you play the settings correctly. In the default shader you can add a bit of illumination (masked by altitude or distance if you need), and reflection. Using a higher refraction index and a bit of metalness, and/or different reflection color, e.g. you can fake the reflections and get an icy surface. Faster too. If you need real reflections add a reflective shader after the default, but that will add render time.

Stormlord

I hope to, to be a blessing with this tutorial for others.
Therefore I have sent my PDF to Daniil Kamerov and to the Planetside Team.
If they like it, they can take it for free as a starter for beginners with Classic Erosion and for the Planetside Wikipedia.
___________________________________________________________________________________________________________________________

Thank you for your constructive critics and new ideas, Ulco!
I have noticed that in the same way you set up your basic snow, I took your idea for my snowfield here in my scene.
But I need to experiment more this way to get a better understanding of this technique for ice-fields.
Surely there is more fine-tuning needed to make this scene a real Final, but for now I'm glad to understand how erosion works.

I am not new to Terragen, but here I see again that I have a lot to learn.
So I am really thankful for every great idea which helps me to improve my skills.

Let me remark, that I already have tinted Luminosity in the sea ice 1.15 activated, in another test I increased it to 2.0 in the next rendering.

Arctic Erosion 2023 - Illumination Ice.jpg
Sea Ice Luminosity set to 2.0

STORMLORD

Dune

Ah, you have luminosity set, so it's a surface layer as well. Didn't really think when I saw your version.

I'll put up a simple scene here, so you can see what I mean. Might be kind of similar. You may grab an idea from it. The foam is not too good, very basic.

Stormlord

Thank you for your example attached !
I have never seen a water surface created by a default shader!
This is a completely new concept for me :o
Learned something again!

Allow me to show you my setup for the arctic ice water.

Arctic Erosion - Node Network - Ice water.jpg
Arctic Erosion 2023
Ice Water Shader

STORMLORD


Daniil

Cool tutorial with some interesting techniques mentioned. Nice scene and the overall mood.

Flow map looks cool indeed at this resolution! I think I've never seen it at 16k. In overall, such resolution looks like some overkill for this particular scene: only a corner of eroded landscape ended up being rendered. Interesting how spherical render would look in this particular scene, since you've eroded much bigger area than it is on your current render.

Daniil

Stormlord

Quote from: Daniil on December 01, 2023, 11:27:05 AMCool tutorial with some interesting techniques mentioned. Nice scene and the overall mood.

Flow map looks cool indeed at this resolution! I think I've never seen it at 16k. In overall, such resolution looks like some overkill for this particular scene: only a corner of eroded landscape ended up being rendered. Interesting how spherical render would look in this particular scene, since you've eroded much bigger area than it is on your current render.

Daniil
4096 x 2048 - Arctic Erosion 2023 by Stormlord.jpg
Arctic Erosion Panorama

STORMLORD


Daniil

This looks cool in a panorama viewer! And underwater ice texture is beautiful.