Title: Eroded fakestones - tutorial
Post by: kevnar on May 28, 2009, 02:43:44 PM
Post by: kevnar on May 28, 2009, 02:43:44 PM
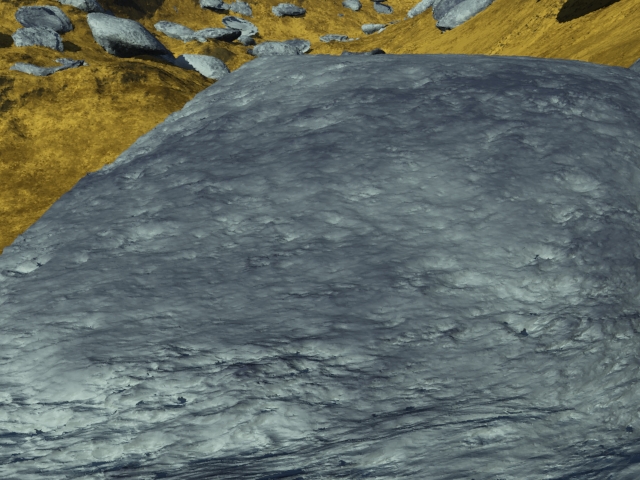
Following are renders of a fakestone extremely close up. In the first image I used the following settings for the fake stones of the first image:
Stone scale 10
Density 0.1
Tallness 1
pancake 2
for the power fractal shader:
Feature Scale 0.1
Lead-in scale 100
smallest scale 0.02
noise flavor: perlin billows
Under displacement:
Displacement amplitude 0.1
displacement offset 0.1
You can see how it looks bumpy, and sort of unnatural-looking. In nature, stones are eroded away into pock marks as softer spots of the rock are worn and chipped away over time.

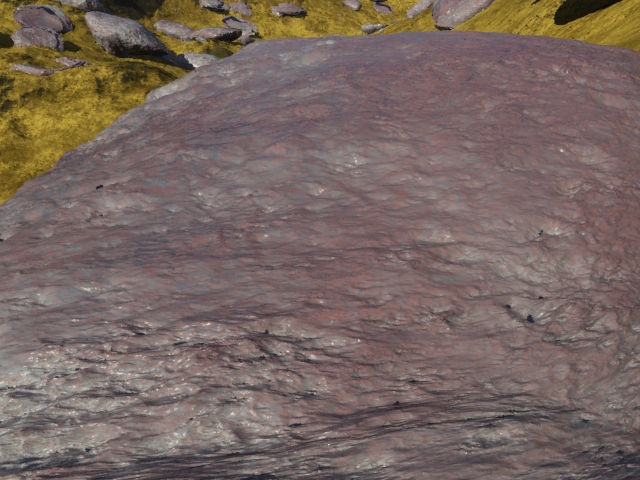
So for the second image, I went into the displacement amplitude of the power fractal shader and switched it to -0.1. It basically turns the bumps inside out and makes them into pock marks, the way a real stone would have in nature. The trick is, setting the amplitude to a negative value. And of course a lower amplitude, of say -0.3 or -0.4 would make even deeper pock marks.
For the final image (below), I added another power fractal as a child of the fake stones. First I unclicked both apply color settings, as I've already set the color in the first shader. Then I set the displacement amplitude to -0.3 and the displacement offset to 0.3. Then I clicked the move button to have it render the larger pock marks first, and the smaller -0.1 pock marks after (inside) the larger ones. You can keep adding layers of larger and larger pock marks, but the larger ones only really show up on stones that are further away.
I child-added a surface layer of pinkish brown colour (coverage 0.5) to spice it up, stretching the noise of the fractal break up by a factor of 100-1-10 for a nice stripey look. I adjusted the strength of the fractal breakup to 1 (from 0.5) to make the colour veins look less blurry. I also adjusted the feature scale of the fractal breakup here to 1, lead in scale to 0, and smallest scale to 0.01. This gives us a more veiny (less blurry) look to the colour, with perlin ridges as the noise flavour. The altitude and slope constraints are off of course as we want the colour to look like it's inside the rock, not on top of it.
Finally, I child-added a reflective shader with about 0.5 reflectivity. Erosion tends to polish stones up a bit after all.
Note: The images below got reverse when I clicked submit. This forum engine is a little clunky sometimes. I'm sure you can tell the differences.

Stone scale 10
Density 0.1
Tallness 1
pancake 2
for the power fractal shader:
Feature Scale 0.1
Lead-in scale 100
smallest scale 0.02
noise flavor: perlin billows
Under displacement:
Displacement amplitude 0.1
displacement offset 0.1
You can see how it looks bumpy, and sort of unnatural-looking. In nature, stones are eroded away into pock marks as softer spots of the rock are worn and chipped away over time.
So for the second image, I went into the displacement amplitude of the power fractal shader and switched it to -0.1. It basically turns the bumps inside out and makes them into pock marks, the way a real stone would have in nature. The trick is, setting the amplitude to a negative value. And of course a lower amplitude, of say -0.3 or -0.4 would make even deeper pock marks.
For the final image (below), I added another power fractal as a child of the fake stones. First I unclicked both apply color settings, as I've already set the color in the first shader. Then I set the displacement amplitude to -0.3 and the displacement offset to 0.3. Then I clicked the move button to have it render the larger pock marks first, and the smaller -0.1 pock marks after (inside) the larger ones. You can keep adding layers of larger and larger pock marks, but the larger ones only really show up on stones that are further away.
I child-added a surface layer of pinkish brown colour (coverage 0.5) to spice it up, stretching the noise of the fractal break up by a factor of 100-1-10 for a nice stripey look. I adjusted the strength of the fractal breakup to 1 (from 0.5) to make the colour veins look less blurry. I also adjusted the feature scale of the fractal breakup here to 1, lead in scale to 0, and smallest scale to 0.01. This gives us a more veiny (less blurry) look to the colour, with perlin ridges as the noise flavour. The altitude and slope constraints are off of course as we want the colour to look like it's inside the rock, not on top of it.
Finally, I child-added a reflective shader with about 0.5 reflectivity. Erosion tends to polish stones up a bit after all.
Note: The images below got reverse when I clicked submit. This forum engine is a little clunky sometimes. I'm sure you can tell the differences.
Title: Re: Eroded fakestones - tutorial
Post by: kevnar on May 28, 2009, 02:44:53 PM
Post by: kevnar on May 28, 2009, 02:44:53 PM
Here's the final render.
Title: Re: Eroded fakestones - tutorial
Post by: Henry Blewer on May 28, 2009, 03:08:31 PM
Post by: Henry Blewer on May 28, 2009, 03:08:31 PM
I use perlin noise now instead of the power fractal. From the fake stones shader input, I make a new surface layer. Within the new surface layer I can add more surface layer for color and displacement. I rarely use power fractals for coloring in the new surface layer/s. I don't use them for displacement. Why? They generate displacement in a range that is positive and negative. This causes the 'exploding stones' difficulty.
The rest of your tutorial seems great. I did not think to use a reflective shader. I have used lambert shading to get a 'wet' look. The height of the 'wet' can be controlled easily in the surface layers altitude functions.
The rest of your tutorial seems great. I did not think to use a reflective shader. I have used lambert shading to get a 'wet' look. The height of the 'wet' can be controlled easily in the surface layers altitude functions.
Title: Re: Eroded fakestones - tutorial
Post by: rcallicotte on May 28, 2009, 04:17:58 PM
Post by: rcallicotte on May 28, 2009, 04:17:58 PM
Great thread. Thanks for the details. I did something like this (but, not in this manner). You can find my work in the File section.
Title: Re: Eroded fakestones - tutorial
Post by: kevnar on May 28, 2009, 05:00:49 PM
Post by: kevnar on May 28, 2009, 05:00:49 PM
I'm still a newb myself, still learning, and I find the tutorials that are most useful are the ones that walk you through each step and explain why things work the way they do. Do this to get that because TG works like this and that.
Feel free to correct any mistakes I make, guys. I'm mostly making this stuff up as a I go. :-\
Feel free to correct any mistakes I make, guys. I'm mostly making this stuff up as a I go. :-\
Title: Re: Eroded fakestones - tutorial
Post by: Henry Blewer on May 29, 2009, 01:18:27 AM
Post by: Henry Blewer on May 29, 2009, 01:18:27 AM
We all are. The docs are spotty. But together we will all master this wonderful program.
Title: Re: Eroded fakestones - tutorial
Post by: domdib on May 29, 2009, 04:49:07 AM
Post by: domdib on May 29, 2009, 04:49:07 AM
Hear! Hear!