Sculpting ripples in water

Started by David, December 04, 2019, 06:19:03 PM

Previous topic - Next topic

David

First off, thanks Steve and Dune for taking the trouble to answer my convoluted questions. Thanks for bringing clarity to the knotty problem of updating OBJ's - it's not obvious to a beginner the best workflow.
To backtrack a little, WAS kindly provided a scene to help me out with displacing the water surfaces and I've since been making tests with it by substituting different image maps. However, attempting to duplicate WAS's procedure from scratch I suddenly found myself back in the foothills of basic 'newbeeland'. The 2 grabs below shows a difference in the water node trees that I can't fathom. The Transform Input Shader shows in both shader windows but I can't understand why it doesn't show on my left hand window like that in WAS's. (I've noticed that this window doesn't always show until it is refreshed by a restart). I constructed my water shader within the shader node, was I correct? In other words I'm finding difficulty in ordering in my mind the correct sequencing of node structures - is there a video somewhere (I've looked) that clarifies this?
Dune, regarding Poseray, I agree it is very useful for cleaning models etc however I find that when it exports back to OBJ all my surface names suddenly lose alphabetical order when they appear back in Terragen. Have you found this?
Finally, I've attached my first 'look see' Terragen scene with the Greek Trireme. The ship isn't complete and there is still some surfacing work to do. I've parked a 'default' dude on the deck to give a sense of scale. I still have to create the rowers of course, complicated by the need to make them each slightly different due to the many different pitches of oars. 
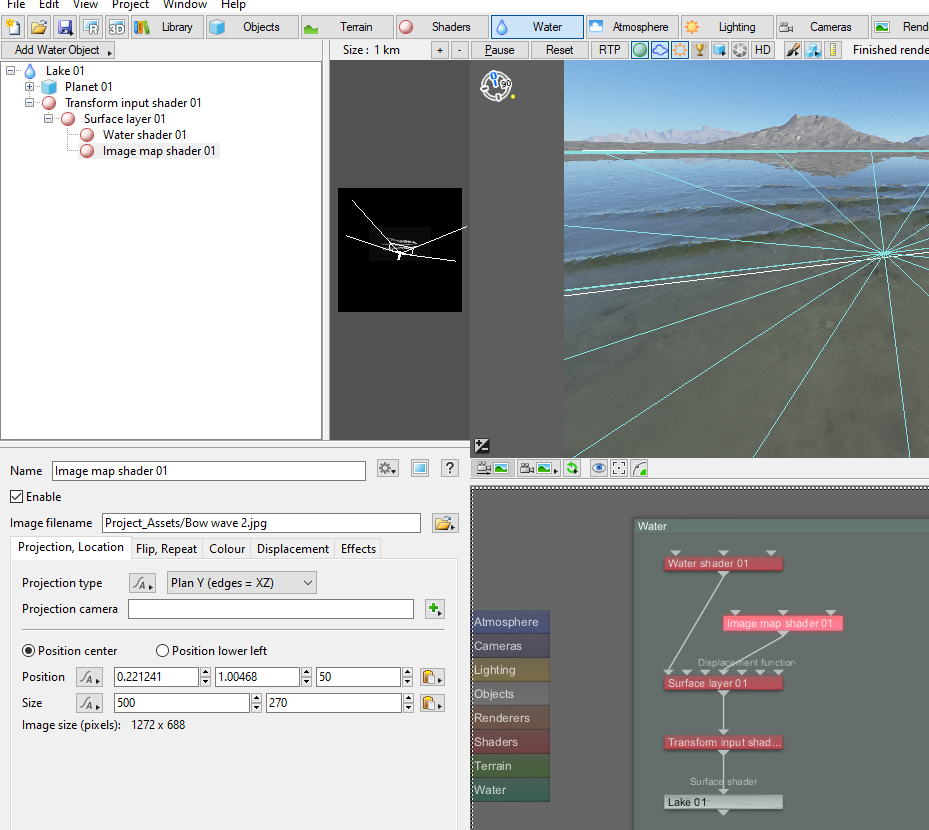
WAS setup.jpg

Dune

I wouldn't look at the top left pane. I never use it, unless for objects sometimes. But it's strange that it isn't visible indeed.

You can construct networks within 'container-nodes' indeed, leaving less clutter on the main node layout. Only when you need to link from within one node to (within) another it will be a little more complicated. But it should work fine. I often set up in the main layout first, then ctrl+X all attached and put inside the (say) surface shader. Then link each input from the outside (input disappears).

I would put the transform directly under the image map, and have image map at 0/0, setting transform with location/rotation of ship, and fine tune then. Quite a big map, btw. 500x270m?

I've noticed that PR problem too, and it sometimes irritates me. I know of no way to alter sequence.

Great ship! Creating all those rowers will be challenging. Good luck and thanks for showing this.

sboerner

QuoteI wouldn't look at the top left pane. I never use it, unless for objects sometimes.
Echo this. (I'd close this pane if I could.) And someone with your experience is better off focusing on the node pane anyway.


Cool model. Looking forward to seeing your progress on this.

David

I struggling to get the glass shader to show any SSS. In fact no adjustment I make to the settings in this shader makes any changes. I think that there must be something wrong with the way I'm connecting the nodes. As ever, I'd be very grateful for any insights. Otherwise, the scene above makes good progress thanks to WAS and Ulco's help with water surfacing on another post.

WAS

#19
Double-sided/thin walled doesn't work with SSS as far as I know. If you turn that off you'll see your settings are working and it becomes a solid white object. That setting is meant for like windows which don't really obstruct the view much.

Here's an idea to work from

David

Fantastic! Thank you WAS. You also correctly anticipated that I'd want to put a slope in for the foam. I really can't thank you enough!

If anyone at TG is listening, why not provide small downloadable .tgd's like this on the Docs pages, a few simple examples of such 'trees' would save beginners days of fruitless work. For someone like me that has no capacity for studying learned books on shader theory, this is the perfect way to speed up learning of Terragen.

Thank goodness for this forum!

PS. I have the 'notifications' box checked but don't get the alerts.

David

#21
Hi WAS, I'm not quite there yet as my OBJ seems to have different attributes to your default sphere (top left menus). I stuffed the splash thru PosRay but don't understand what might still be wrong with my model. Also, I'm not sure why the splash has a 'water' surface (lower screengrab), and what I should do with it, ... disable it? I can't find an explanation in the docs either. Sorry for these, possibly, dumb questions!

WAS

I'd need that object too to be able to see the problem. If it's shareable you can gather the project and upload a zip.

I should be able to dial in some settings with the actual object.

David

#23
Thanks WAS. Herewith the OBJ, let me know if you need more. David

WAS

Welcome. I'll take a look in a bit. Battling a 5gb model export I need to fix the normals on. xD

WAS

I hadn't had a chance to look over your project but I did play with the water splash, maybe this will work in PT with some adjustments.

Dune

It looks a bit like milk, is that the idea you're after? I thought the initial render of the transparent water in post #18 looked just fine.

WAS

Quote from: Dune on September 17, 2020, 02:01:02 AMIt looks a bit like milk, is that the idea you're after? I thought the initial render of the The transparent water in post #18 looked just fine.
Yeah, I don't think this model is rough enough, more like a dunk splash of something small. Needs more jagged broken up areas, and a UV map to really texture them in

David

Hi Guys, thanks for taking a look. The main issue for me is that the .obj I've posted above, which does have UV's, doesn't allow the same texturing as WAS's elongated default sphere, (also above). His application of a 'foam' gradient is brilliant and just what I need. Yes Dune, the earlier post #18 does look fairly convincing however it is often hard to see when it is placed in the scene at a proper scale. I think this is because there should be micro bubbles in the small spheres that would diffuse the light better. Translucency would be nice but with the glass shader on this .OBJ, I can't get any such changes to work. In fact, whatever I change in the glass shader menus, seems to make no difference! So the ideal is to find some way to incorporate WAS's shader on an OBJ.

WAS

One you re-open the object based on your HDD path it will work. Paths are absolute mostly in TG unless gathering.