Difference between revisions of "Sunlight"
(Updated descriptions and added example images for settings.) |
|||
| (4 intermediate revisions by 3 users not shown) | |||
| Line 1: | Line 1: | ||
| − | [[ | + | [[File:Sun_00_GUI.png|none|470px|Sunlight]] |
| + | |||
| + | |||
| + | ==Overview== | ||
| + | The Sunlight node is the primary method of lighting your scene, and by default is added to each new scene. You can however, create as many suns as you like. | ||
| + | When using the 2D Heading style compass in the 3D Preview all of the Sunlight nodes in the scene are shown as yellow dots around the outside of the compass. The position of the dot corresponds to the Heading parameter of the Sunlight node. | ||
| + | |||
| + | [[File:Sun_07_2DCompass.jpg|none|100px|2D Heading compass]] | ||
| + | |||
| + | |||
| + | '''Settings:''' | ||
| + | |||
| + | |||
| + | *'''Name:''' This setting allows you to apply a descriptive name to the node, which can be helpful when using multiple Sunlight nodes in a project. | ||
| + | |||
| + | |||
| + | *'''Enable:''' When checked, the node is active and the Sunlight node will illuminate the scene. When unchecked, the node is ignored. | ||
| + | |||
| + | |||
| + | *'''Light Surfaces:''' When checked, surfaces in the scene are illuminated by this Sunlight node. | ||
| + | <ul> | ||
| + | [[File:Sun_08_LightSurfaces.jpg|none|800px|Light surfaces on and off.]] | ||
| + | </ul> | ||
| + | |||
| + | |||
| + | *'''Light atmo/cloud:''' When checked, the atmosphere and cloud layers are illuminated by this Sunlight node. | ||
| + | <ul> | ||
| + | [[File:Sun_09_LightAtmoCloud.jpg|none|800px|Light atmo/cloud on and off.]] | ||
| + | </ul> | ||
| + | |||
| + | |||
| + | *'''Heading:''' This sets the direction of the sun, in degrees. 0 is North, 90 is East, 180 is South, and 270 is West. | ||
| + | <ul> | ||
| + | {| | ||
| + | |- | ||
| + | | [[File:Sun_01_Heading.jpg|none|800px|The Heading parameter establishes the direction of the sun.]] | ||
| + | |- | ||
| + | | [[File:Sun_05_HeadingNESW.jpg|none|800px|The Heading value set to 0, 90, 180, and 270 degrees.]] | ||
| + | |} | ||
| + | </ul> | ||
| + | |||
| + | |||
| + | *'''Elevation:''' This sets the height of the sun in the sky, in degrees. 90 is directly overhead, 0 is the horizon. | ||
| + | <ul> | ||
| + | [[File:Sun_02_Elevation.jpg|none|800px|The Elevation setting determines the height of the sun in the sky.]] | ||
| + | </ul> | ||
| + | |||
| + | |||
| + | *'''Colour:''' This sets the colour of the sunlight. The default color is slightly blue but, due to the realistic attenuation effect of atmosphere simulated in Terragen, it will still turn out slightly yellow once it reaches the planet surface. Terragen does not have a "white balance" control for the camera, so the default color is set this way to achieve the correct real-world look as a baseline. | ||
| + | <ul> | ||
| + | [[File:Sun_03_Colour1.jpg|none|800px|The Colour parameter sets the colour of the sunlight.]] | ||
| + | </ul> | ||
| + | |||
| + | |||
| + | *'''Strength:''' This controls how powerful or bright the sunlight is. Larger numbers mean stronger sunlight. | ||
| + | <ul> | ||
| + | [[File:Sun_06_Strength.jpg|none|800px|The Strength setting controls the brightness of the sunlight.]] | ||
| + | </ul> | ||
| + | |||
| + | |||
| + | *'''Cast shadows:''' When checked, shadows will be cast by this light source. Shadows are enabled by default and it is not recommended to disable them as they greatly increase realism. Shadow casting can be controlled separately for Surfaces and Atmosphere using the check boxes below. You can control the shadow casting of specific elements of the scene like a particular cloud layer using settings in the Cloud Layer v3 node itself. | ||
| + | <ul> | ||
| + | [[File:Sun_10_CastShadows.jpg|none|800px|Cast shadows on and off.]] | ||
| + | </ul> | ||
| + | |||
| + | |||
| + | *'''Shadows on surfaces:''' When checked, shadows are cast by surfaces in the scene that are affected by this Sunlight node. For example, 3D objects will cast shadows onto nearby terrain. | ||
| + | <ul> | ||
| + | [[File:Sun_11_ShadowsOfSurf.jpg|none|800px|Shadows of surfaces on and off.]] | ||
| + | </ul> | ||
| + | |||
| + | |||
| + | *'''Shadows of atmosphere and clouds:''' When checked, shadows are cast from the atmosphere elements affected by this Sunlight node onto each other and the terrain. For example, cloud layers will cast shadows onto the terrain as well as other cloud layers, which is important for maintaining overall sky and cloud realism. Disabling this setting is not recommended. | ||
| + | <ul> | ||
| + | [[File:Sun_12_ShadowsOfAtmoClouds.jpg|none|800px|Shadows of atmosphere and clouds on an off.]] | ||
| + | </ul> | ||
| + | |||
| + | |||
| + | *'''Do soft shadows:''' When checked, shadows cast by the sun will be soft rather than hard. Soft shadows tend to be more realistic, but take longer to render. The Soft Shadow effect is controlled by the diameter and samples settings below, which determine the softness or "spread" of the effect and its quality. | ||
| + | <ul> | ||
| + | [[File:Sun_13_DoSoftShadows.jpg|none|800px|Do soft shadows on and off.]] | ||
| + | </ul> | ||
| + | |||
| + | |||
| + | *'''Soft shadow diameter:''' This setting controls the softness of the shadows, measured in degrees of diameter. Larger numbers mean softer shadows. The diameter will normally correspond with the Angular Diameter of the Visible Disc below as in the real world this would be the reason for soft shadows due to angular dispersion. Note that higher Soft Shadow Diameters will probably require higher Soft Shadow Sample values to maintain quality. You can of course set them to different values to achieve different effects. | ||
| + | <ul> | ||
| + | [[File:Sun_14_SoftShadowDiameter.jpg|none|800px|Increasing the Soft shadow diameter value softens the shadows.]] | ||
| + | </ul> | ||
| + | |||
| + | |||
| + | *'''Soft shadow samples:''' This setting controls the number of samples used to render the soft shadow effect. The higher the number of samples, the higher the quality of the soft shadows, but render time will also increase. Lower sample values tend to create noisier and less precise soft shadows. The default of 9 creates a good balance between quality and render time at the default Soft Shadow Diameter of 0.5. Values above 20 are generally not recommended. | ||
| + | <ul> | ||
| + | [[File:Sun_15_SoftShadowSamples.jpg|none|800px|Increasing the Soft shadow samples value results in less noise in the shadows.]] | ||
| + | </ul> | ||
| + | |||
| + | |||
| + | *'''Jitter samples:''' This setting controls the randomness of soft shadow sample positions. Lower values will result in less noise, but can create banding and less realistic-looking soft shadows. However, lower values will also result in less noise, so in some cases (animation, for example) the trade-off can be worthwhile, especially where the camera is in motion and the negative effects may not be noticeable. With a jitter value of 0, soft shadow samples can be as low as 4 with the default 0.5 Soft Shadow Diameter, and still be relatively noise-free. The default value is 1 and it's generally recommended to leave it there for most scenes; values above 1 are not supported. | ||
| + | <ul> | ||
| + | [[File:Sun_16_JitterSamplesOff.jpg|none|800px|Banding in the shadow areas become more apparent when Jitter samples is unchecked.]] | ||
| + | </ul> | ||
| + | |||
| + | |||
| + | *'''Glow in atmosphere and clouds:''' When checked, this light source will create a glow effect in the atmosphere. The glow effect simulates the lighting of particulates in the atmosphere and in normal scenes will enhance realism. This setting is enabled by default. | ||
| + | <ul> | ||
| + | [[File:Sun_17_GlowInAtmoCld.jpg|none|800px|Glow in atmosphere and clouds on and off.]] | ||
| + | </ul> | ||
| + | |||
| + | |||
| + | *'''Specular highlights:''' When checked, specular highlights will be rendered on shiny surfaces for this light source. Specular highlights are the bright reflections of a light source on a reflective object and are an important part of the realistic appearance of shiny surfaces. This setting is enabled by default. Note that this controls specular highlights for this light source only. | ||
| + | <ul> | ||
| + | [[File:Sun_18_SpecHighlights.jpg|none|800px|Specular highlights on and off.]] | ||
| + | </ul> | ||
| + | |||
| + | |||
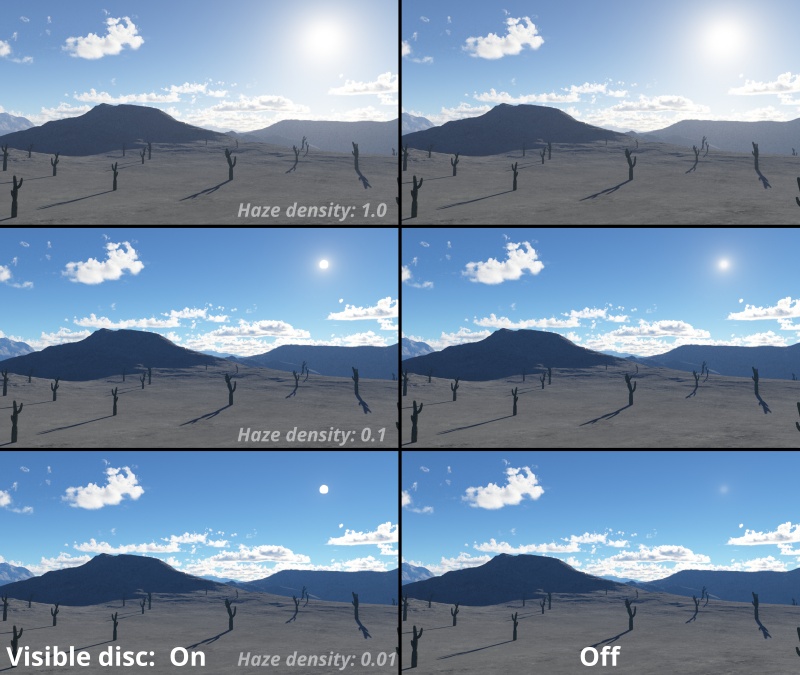
| + | *'''Visible disc:''' When checked, the sun will be rendered as a visible disc or circle in the sky. This setting roughly simulates the visual effect of the sun in the real world, which appears as a "disc" in the sky when obscured by clouds for example. When disabled this light source will only be visible by the light it casts into the scene and will not be visible itself. | ||
| + | <ul> | ||
| + | [[File:Sun_19_VisibleDisc.jpg|none|800px|Visible disc setting on and off viewed through several Haze Density values.]] | ||
| + | </ul> | ||
| + | |||
| + | |||
| + | *'''Angular diameter:''' This sets the size of the visible disc in the sky. The angular diameter describes how much of the sky the sun disc covers. The measurement is in degrees. | ||
| + | <ul> | ||
| + | [[File:Sun_20_AngularDiameter.jpg|none|800px|Increasing the Angular diameter value increases the size of the sun disc in the sky.]] | ||
| + | </ul> | ||
| + | |||
| + | |||
| + | <br /n> | ||
| − | |||
[[Category: Lighting Nodes]] | [[Category: Lighting Nodes]] | ||
Latest revision as of 01:21, 23 October 2021
Overview[edit]
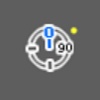
The Sunlight node is the primary method of lighting your scene, and by default is added to each new scene. You can however, create as many suns as you like. When using the 2D Heading style compass in the 3D Preview all of the Sunlight nodes in the scene are shown as yellow dots around the outside of the compass. The position of the dot corresponds to the Heading parameter of the Sunlight node.
Settings:
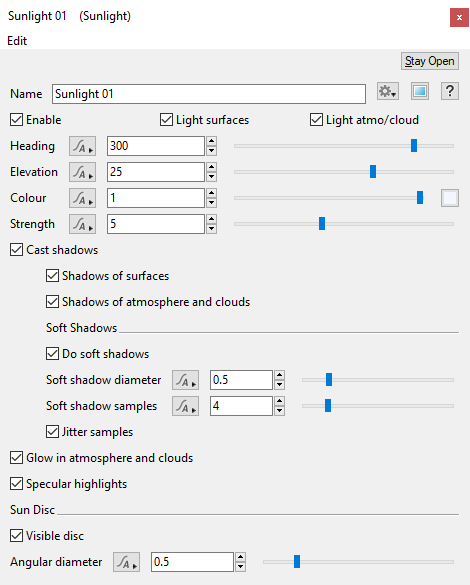
- Name: This setting allows you to apply a descriptive name to the node, which can be helpful when using multiple Sunlight nodes in a project.
- Enable: When checked, the node is active and the Sunlight node will illuminate the scene. When unchecked, the node is ignored.
- Light Surfaces: When checked, surfaces in the scene are illuminated by this Sunlight node.
- Light atmo/cloud: When checked, the atmosphere and cloud layers are illuminated by this Sunlight node.
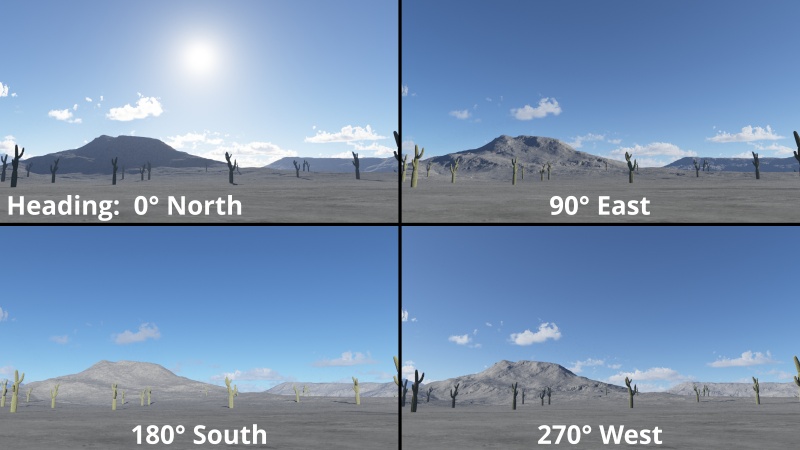
- Heading: This sets the direction of the sun, in degrees. 0 is North, 90 is East, 180 is South, and 270 is West.
- Elevation: This sets the height of the sun in the sky, in degrees. 90 is directly overhead, 0 is the horizon.
- Colour: This sets the colour of the sunlight. The default color is slightly blue but, due to the realistic attenuation effect of atmosphere simulated in Terragen, it will still turn out slightly yellow once it reaches the planet surface. Terragen does not have a "white balance" control for the camera, so the default color is set this way to achieve the correct real-world look as a baseline.
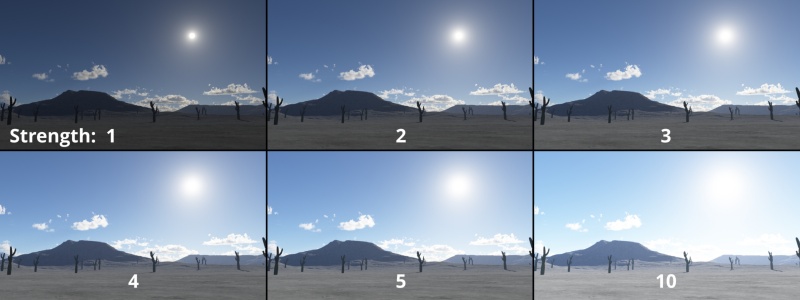
- Strength: This controls how powerful or bright the sunlight is. Larger numbers mean stronger sunlight.
- Cast shadows: When checked, shadows will be cast by this light source. Shadows are enabled by default and it is not recommended to disable them as they greatly increase realism. Shadow casting can be controlled separately for Surfaces and Atmosphere using the check boxes below. You can control the shadow casting of specific elements of the scene like a particular cloud layer using settings in the Cloud Layer v3 node itself.
- Shadows on surfaces: When checked, shadows are cast by surfaces in the scene that are affected by this Sunlight node. For example, 3D objects will cast shadows onto nearby terrain.
- Shadows of atmosphere and clouds: When checked, shadows are cast from the atmosphere elements affected by this Sunlight node onto each other and the terrain. For example, cloud layers will cast shadows onto the terrain as well as other cloud layers, which is important for maintaining overall sky and cloud realism. Disabling this setting is not recommended.
- Do soft shadows: When checked, shadows cast by the sun will be soft rather than hard. Soft shadows tend to be more realistic, but take longer to render. The Soft Shadow effect is controlled by the diameter and samples settings below, which determine the softness or "spread" of the effect and its quality.
- Soft shadow diameter: This setting controls the softness of the shadows, measured in degrees of diameter. Larger numbers mean softer shadows. The diameter will normally correspond with the Angular Diameter of the Visible Disc below as in the real world this would be the reason for soft shadows due to angular dispersion. Note that higher Soft Shadow Diameters will probably require higher Soft Shadow Sample values to maintain quality. You can of course set them to different values to achieve different effects.
- Soft shadow samples: This setting controls the number of samples used to render the soft shadow effect. The higher the number of samples, the higher the quality of the soft shadows, but render time will also increase. Lower sample values tend to create noisier and less precise soft shadows. The default of 9 creates a good balance between quality and render time at the default Soft Shadow Diameter of 0.5. Values above 20 are generally not recommended.
- Jitter samples: This setting controls the randomness of soft shadow sample positions. Lower values will result in less noise, but can create banding and less realistic-looking soft shadows. However, lower values will also result in less noise, so in some cases (animation, for example) the trade-off can be worthwhile, especially where the camera is in motion and the negative effects may not be noticeable. With a jitter value of 0, soft shadow samples can be as low as 4 with the default 0.5 Soft Shadow Diameter, and still be relatively noise-free. The default value is 1 and it's generally recommended to leave it there for most scenes; values above 1 are not supported.
- Glow in atmosphere and clouds: When checked, this light source will create a glow effect in the atmosphere. The glow effect simulates the lighting of particulates in the atmosphere and in normal scenes will enhance realism. This setting is enabled by default.
- Specular highlights: When checked, specular highlights will be rendered on shiny surfaces for this light source. Specular highlights are the bright reflections of a light source on a reflective object and are an important part of the realistic appearance of shiny surfaces. This setting is enabled by default. Note that this controls specular highlights for this light source only.
- Visible disc: When checked, the sun will be rendered as a visible disc or circle in the sky. This setting roughly simulates the visual effect of the sun in the real world, which appears as a "disc" in the sky when obscured by clouds for example. When disabled this light source will only be visible by the light it casts into the scene and will not be visible itself.
- Angular diameter: This sets the size of the visible disc in the sky. The angular diameter describes how much of the sky the sun disc covers. The measurement is in degrees.
A parameter is an individual setting in a node parameter view which controls some aspect of the node.
A single object or device in the node network which generates or modifies data and may accept input data or create output data or both, depending on its function. Nodes usually have their own settings which control the data they create or how they modify data passing through them. Nodes are connected together in a network to perform work in a network-based user interface. In Terragen 2 nodes are connected together to describe a scene.
A sample refers to a value or set of values at a point in time and/or space. The defining point of a sample is that it is a chosen value out of a continuous signal. In Terragen 2 it is usually a mathematical (procedural) function that is being sampled.
