Difference between revisions of "Add Colour"
(Minor edit to first sentence) |
m (Corrected explanation for how Clamp high colour and Clamp low colours work. Not clamped to black and white, but to the values designated in the settings themselves.) |
||
| (2 intermediate revisions by the same user not shown) | |||
| Line 1: | Line 1: | ||
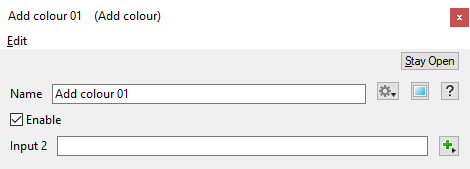
[[File:AddColour_00_GUI.png|none|470px|Add Colour]] | [[File:AddColour_00_GUI.png|none|470px|Add Colour]] | ||
| − | + | <!-- __TOC__ --> | |
| − | __TOC__ | ||
== Overview == | == Overview == | ||
The Add family of nodes allow you to add the colour/scalar/vector coming into the Main Input with the color/scalar/vector coming into Input 2. | The Add family of nodes allow you to add the colour/scalar/vector coming into the Main Input with the color/scalar/vector coming into Input 2. | ||
| + | |||
With Add Colour the addition is component-wise: | With Add Colour the addition is component-wise: | ||
| − | + | <ul> | |
| − | |||
Main Input.red + Input 2.red <br /n> | Main Input.red + Input 2.red <br /n> | ||
Main Input.green + Input 2.green <br /n> | Main Input.green + Input 2.green <br /n> | ||
Main Input.blue + Input 2.blue | Main Input.blue + Input 2.blue | ||
| + | </ul> | ||
| + | |||
| + | |||
| + | In the example below, the Main Input contributes red values, and Input 2 contributes green values. Component-wise, the Main Input colour value is (1,0,0) and Input 2’s colour value is (0,1,0). The output of the Add Colour node is yellow (1,1,0). | ||
| + | <ul> | ||
| + | [[File:AddColour_07_AddColour.jpg|none|800px|The Add Colour node adds the component colour values from the Main Input and Input 2.]] | ||
| + | </ul> | ||
| + | |||
| + | In the image below, the Main Input contributes red values, while Input 2 contributes values ranging from black to green, or component-wise, ranging from (0,0,0) to (0,1,0). The output of the Add Colour node results in red wherever pure black occured in Input 2, because red (1,0,0) plus black (0,0,0) equals red (1,0,0). Wherever a shade of green occurs in Input 2, the result is a shade of yellow, because red (1,0,0) plus green (0,1,0) equals yellow (1,1,0). Shades of yellow exist because the Power Fractal noise pattern produces a range of values between 0 and 1. | ||
| + | <ul> | ||
| + | [[File:AddColour_08_AddColourPF3.jpg|none|800px|The Add Colour node adds the component colour values from the Main Input and Input 2.]] | ||
| + | </ul> | ||
| + | |||
| + | |||
| + | Although it’s possible for a component value to exceed the visual range of colours from pure black (0,0,0) to pure white (1,1,1), this is not recommended. In some shaders, such as the Power Fractal v3 shader, parameters exist to clamp the component values at the values designated in the Apply high colour and Apply low colour settings. In the example below, the Main input contributes red values, and Input 2 contributes values that range from less than zero to greater than 1. The Add Colour node will output values exceeding zero to 1 because the Clamp high colour and Clamp low colour checkboxes in the Power fractal shader are unchecked. The result is that colours on the terrain appear unnaturally dark, almost burnt, where the colour values are below zero. Where they exceed 1, clipping can occur or unnatural shades of colour, such as the magenta areas. | ||
| + | <ul> | ||
| + | [[File:AddColour_09_AddColourExceed.jpg|none|800px|When the evaluated component values (RGB) exceed the 0 to 1 range, the resulting colours can appear clipped or burnt in. ]] | ||
| + | </ul> | ||
| + | |||
All nodes in this family have just one setting, which lets you assign a shader or function nodes to Input 2. | All nodes in this family have just one setting, which lets you assign a shader or function nodes to Input 2. | ||
| Line 28: | Line 46: | ||
| − | == Fun with Add Colour == | + | <!-- == Fun with Add Colour == |
| − | + | Remember that each of the colour component values, the red, green, and blue channel values, from the Main Input and the Input 2 settings are added together to achieve the final result. --> | |
| − | Remember that each of the colour component values, the red, green, and blue channel values, from the Main Input and the Input 2 settings are added together to achieve the final result. | ||
| − | |||
| − | |||
| − | |||
| − | |||
| − | |||
| − | |||
| − | |||
| − | |||
| − | |||
| − | |||
| − | |||
| − | |||
| − | |||
| − | |||
| − | |||
| − | |||
| − | |||
Latest revision as of 20:05, 2 February 2022
Overview[edit]
The Add family of nodes allow you to add the colour/scalar/vector coming into the Main Input with the color/scalar/vector coming into Input 2.
With Add Colour the addition is component-wise:
-
Main Input.red + Input 2.red
Main Input.green + Input 2.green
Main Input.blue + Input 2.blue
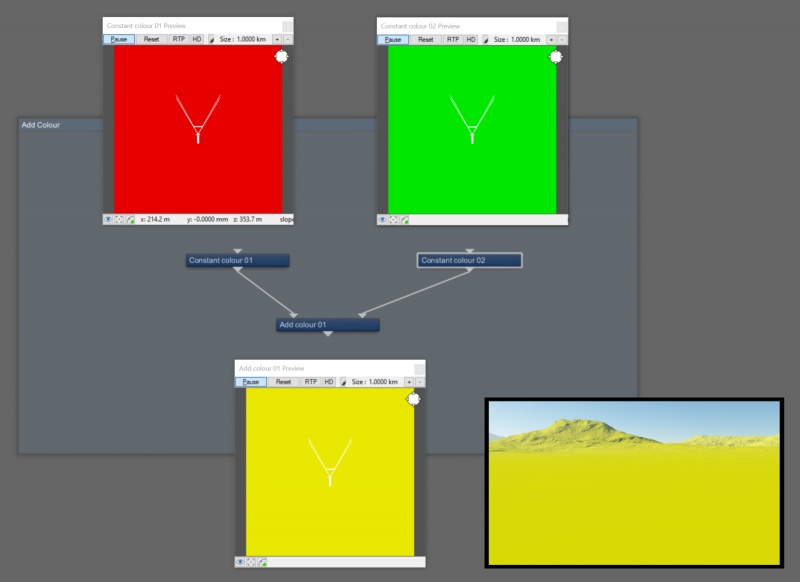
In the example below, the Main Input contributes red values, and Input 2 contributes green values. Component-wise, the Main Input colour value is (1,0,0) and Input 2’s colour value is (0,1,0). The output of the Add Colour node is yellow (1,1,0).
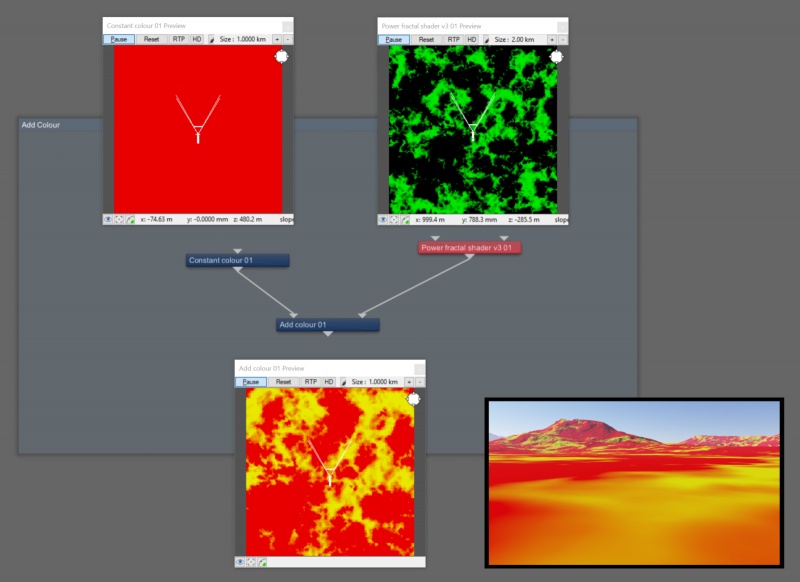
In the image below, the Main Input contributes red values, while Input 2 contributes values ranging from black to green, or component-wise, ranging from (0,0,0) to (0,1,0). The output of the Add Colour node results in red wherever pure black occured in Input 2, because red (1,0,0) plus black (0,0,0) equals red (1,0,0). Wherever a shade of green occurs in Input 2, the result is a shade of yellow, because red (1,0,0) plus green (0,1,0) equals yellow (1,1,0). Shades of yellow exist because the Power Fractal noise pattern produces a range of values between 0 and 1.
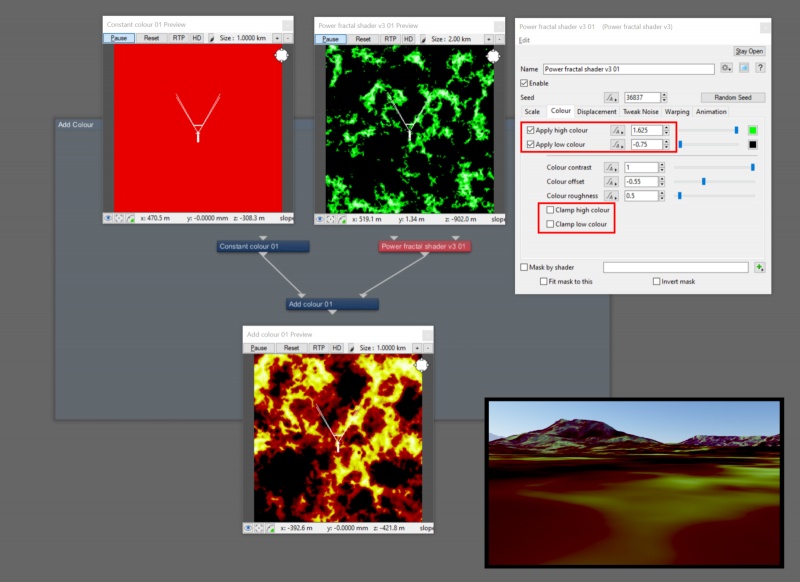
Although it’s possible for a component value to exceed the visual range of colours from pure black (0,0,0) to pure white (1,1,1), this is not recommended. In some shaders, such as the Power Fractal v3 shader, parameters exist to clamp the component values at the values designated in the Apply high colour and Apply low colour settings. In the example below, the Main input contributes red values, and Input 2 contributes values that range from less than zero to greater than 1. The Add Colour node will output values exceeding zero to 1 because the Clamp high colour and Clamp low colour checkboxes in the Power fractal shader are unchecked. The result is that colours on the terrain appear unnaturally dark, almost burnt, where the colour values are below zero. Where they exceed 1, clipping can occur or unnatural shades of colour, such as the magenta areas.
All nodes in this family have just one setting, which lets you assign a shader or function nodes to Input 2.
Settings:
- Name: This setting allows you to apply a descriptive name to the node, which can be helpful when using multiple Add Colour nodes in a project.
- Enable: When checked, the node is active and the Main Input value is added with the Input 2 value. When unchecked, only the Main Input value is passed through the node.
- Input 2: The values from the shader or function nodes assigned to this setting are added to the values of the Main Input.
A scalar is a single number. 1, 200.45, -45, -0.2 are all examples of scalar values.
A vector is a set of three scalars, normally representing X, Y and Z coordinates. It also commonly represents rotation, where the values are pitch, heading and bank.
A shader is a program or set of instructions used in 3D computer graphics to determine the final surface properties of an object or image. This can include arbitrarily complex descriptions of light absorption and diffusion, texture mapping, reflection and refraction, shadowing, surface displacement and post-processing effects. In Terragen 2 shaders are used to construct and modify almost every element of a scene.
A single object or device in the node network which generates or modifies data and may accept input data or create output data or both, depending on its function. Nodes usually have their own settings which control the data they create or how they modify data passing through them. Nodes are connected together in a network to perform work in a network-based user interface. In Terragen 2 nodes are connected together to describe a scene.


