Difference between revisions of "Clamp Colour"
m (Added additional description and example image for use of Clamp colour.) |
|||
| (6 intermediate revisions by 2 users not shown) | |||
| Line 1: | Line 1: | ||
| − | + | <div style="float:right; border-style:solid; padding:20px"><categorytree mode=pages hideroot=off>Clamp</categorytree></div> | |
| − | = | ||
| − | [[ | + | [[File:ClampColour_00_GUI.png|none|470px|Clamp Colour]] |
| − | |||
| − | |||
| − | Input.red is -1<br /> Input.green is 0.5<br /> Input.blue is 2<br /> | + | == Overview == |
| + | The Clamp family of nodes allow you to clamp, or restrict, the values of the colour or scalar coming into the Input between the values specified by the Min input and the Max input. If the value is less than the Min value it's set to the Min value. If the value is greater than the Max value it's set to the Max value. The clamping is done component-wise for colours. Here is an example using a colour, with the following values: | ||
| + | <ul> | ||
| + | Input.red is -1 <br /n> | ||
| + | Input.green is 0.5 <br /n> | ||
| + | Input.blue is 2 <br /n> | ||
| + | Min value is -0.5 <br /n> | ||
| + | Max value is 1.5 <br /n> | ||
| + | </ul> | ||
| + | |||
| + | |||
| + | After clamping the colour will have these values: | ||
| + | <ul> | ||
| + | Input.red becomes -0.5 (-1 was less than the Min value, so it becomes -0.5) <br /n> | ||
| + | Input.green remains 0.5 (0.5 is between the Min and Max values, so it's unchanged) <br /n> | ||
| + | Input.blue becomes 1.5 (2 was greater than the Max value, so it becomes 1.5) <br /n> | ||
| + | </ul> | ||
| − | |||
| − | Input. | + | In the example below, an EXR image containing vector data is assigned to the Main Input of the Clamp Colour node. Visually, the green pixels represent data above a value of 0 in the Y axis, whereas the magenta pixels indicate a blend of positive and negative values lying on the X and Z axis. When enabled, the Clamp Colour node outputs all values below the Min value as the Min value, and all values greater than the Max value as the Max value. |
| + | <ul> | ||
| + | [[File:ClampColour.jpg|none|800px|Clamp Colour off and on. ]] | ||
| + | </ul> | ||
| + | |||
| + | |||
| + | In the following example, the Base colours node first sets the colour values of the terrain to orange and green. The Clamp colour node then modifies each colour component (RGB) value, based on the limits defined by the two Constant colour nodes. In this way the Clamp colour node can be used to completely change the colours from the Main Input. | ||
| + | <ul> | ||
| + | [[File:ClampColour_NodeNetwork.jpg|none|800px|Example illustrating how clamping the colour range can change the colour values.]] | ||
| + | </ul> | ||
| + | |||
| + | |||
| + | '''Settings:''' | ||
| + | |||
| + | *'''Min: '''This is the value used for the minimum clamp value. If the input value is less than this value then the output is set to this value. If there is no node attached to this input then no minimum value clamping is done. | ||
| + | *'''Max:''' This is the value used for the maximum clamp value. If the input value is greater than this value then the output is set to this value. If there is no node attached to this input then no maximum value clamping is done. | ||
| + | |||
| + | |||
| + | <br /n> | ||
| + | |||
| − | |||
| − | |||
| − | + | [[Category: Clamp]] | |
Latest revision as of 22:35, 21 February 2022
Overview[edit]
The Clamp family of nodes allow you to clamp, or restrict, the values of the colour or scalar coming into the Input between the values specified by the Min input and the Max input. If the value is less than the Min value it's set to the Min value. If the value is greater than the Max value it's set to the Max value. The clamping is done component-wise for colours. Here is an example using a colour, with the following values:
-
Input.red is -1
Input.green is 0.5
Input.blue is 2
Min value is -0.5
Max value is 1.5
After clamping the colour will have these values:
-
Input.red becomes -0.5 (-1 was less than the Min value, so it becomes -0.5)
Input.green remains 0.5 (0.5 is between the Min and Max values, so it's unchanged)
Input.blue becomes 1.5 (2 was greater than the Max value, so it becomes 1.5)
In the example below, an EXR image containing vector data is assigned to the Main Input of the Clamp Colour node. Visually, the green pixels represent data above a value of 0 in the Y axis, whereas the magenta pixels indicate a blend of positive and negative values lying on the X and Z axis. When enabled, the Clamp Colour node outputs all values below the Min value as the Min value, and all values greater than the Max value as the Max value.
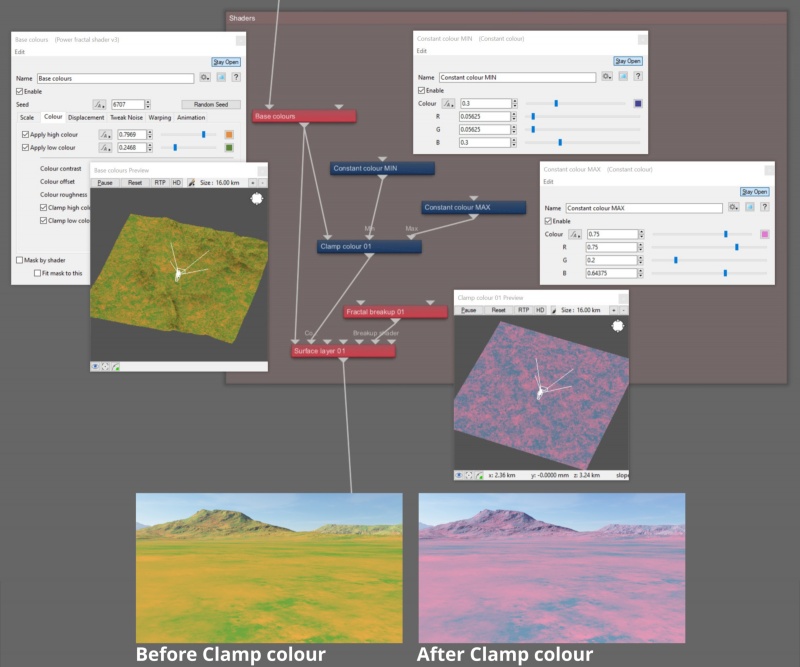
In the following example, the Base colours node first sets the colour values of the terrain to orange and green. The Clamp colour node then modifies each colour component (RGB) value, based on the limits defined by the two Constant colour nodes. In this way the Clamp colour node can be used to completely change the colours from the Main Input.
Settings:
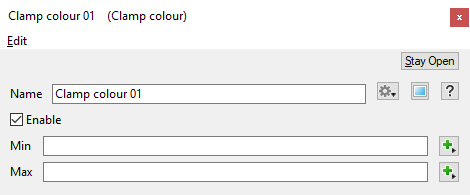
- Min: This is the value used for the minimum clamp value. If the input value is less than this value then the output is set to this value. If there is no node attached to this input then no minimum value clamping is done.
- Max: This is the value used for the maximum clamp value. If the input value is greater than this value then the output is set to this value. If there is no node attached to this input then no maximum value clamping is done.
A scalar is a single number. 1, 200.45, -45, -0.2 are all examples of scalar values.
A vector is a set of three scalars, normally representing X, Y and Z coordinates. It also commonly represents rotation, where the values are pitch, heading and bank.
A single object or device in the node network which generates or modifies data and may accept input data or create output data or both, depending on its function. Nodes usually have their own settings which control the data they create or how they modify data passing through them. Nodes are connected together in a network to perform work in a network-based user interface. In Terragen 2 nodes are connected together to describe a scene.


