Difference between revisions of "Populator v4"
m (Fixed typo on image overlay.) |
(Added description and example images for Editing tab.) |
||
| (4 intermediate revisions by the same user not shown) | |||
| Line 149: | Line 149: | ||
| + | == Scale Tab == | ||
| + | [[File:PopV4_03_ScaleTab.png|none|470px|Scale Tab]] | ||
| − | + | The settings on this tab allow you to control the size variation of the object instances within the population. This provides more variety within the population and looks more naturalistic. | |
| + | The Minimum scale and Maximum scale settings act as multipliers to the default scale of the object, which is taken from the object node specified in the Object maker parameter. When the value of both settings is 1, there is no variation in the instanced object’s size, and all instances are the same size. If you set the Minimum scale to 0.5 then the smallest instances would be half the default size. If the Maximum scale was set to 2 then the largest instances would be twice the default size. As the populator creates the instances it randomly chooses a size between the minimum and maximum. | ||
| − | * [[ | + | *'''Minimum scale:''' This sets the minimum scale multiplier used by the populator. |
| + | *'''Maximum scale:''' This sets the maximum scale multiplier used by the populator. | ||
| + | <ul> | ||
| + | [[File:PopV4_30_MinMaxScale.jpg|None|800px|Minimum scale and Maximum scale values between 0.1 and 2.0]] | ||
| + | </ul> | ||
| − | |||
| − | + | == Rotation Tab == | |
| + | [[File:PopV4_04_RotationTab.png|none|470px|Rotation Tab]] | ||
| − | |||
| − | * [[ | + | The settings on this tab allow you to control the rotation variation of the object instances within the population. This provides more variety within the population and can look more naturalistic. |
| + | |||
| + | By entering values for the minimum and maximum Y rotation settings you control how the populator rotates each instance around its vertical axis in degrees. When the default settings are used, a minimum value of 0 and a maximum value of 360, the populator can rotate each instance to any angle around their Y axis. If you wished to point the instances in a certain direction, for example 45 degrees, you would enter that value in both settings. Likewise, if you wanted the instances to generally be facing 45 degrees you could set the minimum value to 42 and the maximum value to 48 and this would result in the objects being rotated within 3 degrees of 45, providing a bit of variation and irregularity to the population. | ||
| + | |||
| + | |||
| + | *'''Minimum Y rotation:''' This sets the minimum rotation angle in degrees used by the populator. | ||
| + | |||
| + | *'''Maximum Y rotation:''' This sets the minimum rotation angle (in degrees) used by the populator. | ||
| + | <ul> | ||
| + | [[File:PopV4_31_MinMaxYRotation.jpg|none|800px|Minimum and Maximum Y Rotation values between 0 and 360 degrees]] | ||
| + | </ul> | ||
| + | |||
| + | |||
| + | *'''Lean to terrain/object normal:''' When checked, the object instances can lean according to the slope of the underlying terrain normal. When unchecked, object instances are always oriented so that their Y axis points straight up. | ||
| + | <ul> | ||
| + | [[File:PopV4_32_LeanToTerrain.jpg|none|800px|Lean to terrain/object normal off and on]] | ||
| + | </ul> | ||
| + | |||
| + | |||
| + | *'''Lean effect (0..1):''' This setting controls the strength of the lean effect. Recommended values are within the range from 0 to 1. Higher values mean the lean or tilt of the instance more closely matches the terrain or object's normal where it has been instanced. | ||
| + | <ul> | ||
| + | [[File:PopV4_33_LeanEffect.jpg|none|800px|Lean effect values from 0 to 1]] | ||
| + | </ul> | ||
| + | |||
| + | |||
| + | *'''Don’t lean if slope below:''' When the slope falls below this value, the instance will not be tilted. | ||
| + | <ul> | ||
| + | [[File:PopV4_34_DontLeanIfSlopeBelow.jpg|none|800px|The Don’t lean if slope below setting stops the instanced object from leaning below a certain slope angle]] | ||
| + | </ul> | ||
| + | |||
| + | |||
| + | *'''Reduce lean if slope below:''' This setting reduces the amount of tilt when the underlying slope falls below this value. | ||
| + | <ul> | ||
| + | [[File:PopV4_35_ReduceLeanIfSlopeBelow.jpg|none|800px|The amount of tilting is reduced below the specified value.]] | ||
| + | </ul> | ||
| + | |||
| + | |||
| + | == Colour Tab== | ||
| + | [[File:PopV4_05_ColourTab.png|none|470px|Colour Tab]] | ||
| + | |||
| + | The Colour tab lets you control the colour of the populated objects without needing to edit the shaders on the objects themselves. You can use this to tint the overall colour of a population or to add variations in colour per instance using various techniques. | ||
| + | To understand these settings we recommend that you follow this tutorial: [[Population Colour Tinting Techniques | Population Colour Tinting Techniques]] | ||
| + | |||
| + | *'''Tint diffuse colour:''' When checked and a shader or function nodes are assigned to this setting, the colour component (RGB) values of the assigned shader at the location of the instanced object are multiplied with the diffuse colour component values of the instanced object. Generally speaking, this darkens the colour of the object, but you can compensate for this effect with the Diffuse colour multiplier setting below. | ||
| + | <ul> | ||
| + | [[File:PopV4_36_TintDiffuseColour.jpg|none|800px|Tint diffuse colour off and with a Power fractal shader assigned]] | ||
| + | </ul> | ||
| + | |||
| + | |||
| + | *'''Tint luminosity:''' When checked and a shader or function nodes are assigned to this setting, the colour component (RGB) values of the assigned shader at the location of the instanced object are multiplied with the luminosity values of the instanced object. If the 3D object assigned to the population’s Object maker setting has no luminosity value, that is its luminosity setting equals 0, then this setting will have no effect. | ||
| + | <ul> | ||
| + | [[File:PopV4_37_TintLuminosity.jpg|none|800px|Tint luminosity off and with a Power fractal shader assigned]] | ||
| + | </ul> | ||
| + | |||
| + | |||
| + | *'''Diffuse colour multiplier:''' Very often, tinting a population will darken the colour values of the instanced objects. This setting provides a way to adjust those values. Values greater than 1 will brighten the instanced objects and values lower than 1 will further darken them. | ||
| + | <ul> | ||
| + | [[File:PopV4_38_DiffuseColourMulitplier.jpg|none|800px|The Diffuse colour multiplier setting with values ranging from 0.5 to 2.0]] | ||
| + | </ul> | ||
| + | |||
| + | |||
| + | *'''Luminosity multiplier:''' This setting provides a way to adjust the population’s tinted luminosity values. Values greater than 1 will increase the luminosity value, and values lower than 1 will decrease them. For example, a value of 0.5 will lower the tinted luminosity by half, whereas a value of 2.0 will increase the tinted luminosity twice as much. | ||
| + | <ul> | ||
| + | [[File:PopV4_39_LuminosityMulitplier.jpg|none|800px|The Luminosity multiplier setting with values ranging from 0.5 to 2.0]] | ||
| + | </ul> | ||
| + | |||
| + | |||
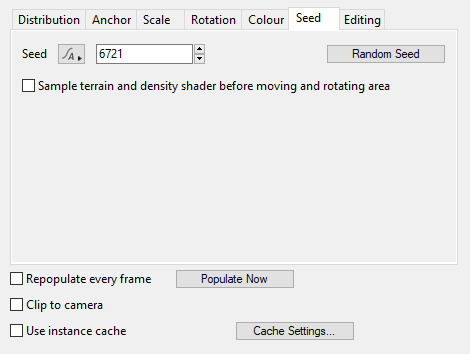
| + | == Seed Tab == | ||
| + | [[File:PopV4_06_SeedTab.png|none|470px|Seed Tab]] | ||
| + | |||
| + | The settings on this tab give you some control over how the populator places object instances. | ||
| + | |||
| + | *'''Seed:''' This value is used by the populator to generate the random aspects of a population, such as instance placement. A new seed value is generated for each new population, which helps to ensure that populations don't coincide with one another. For example, two populators with identical settings and seed values will generate instances in exactly the same place. There may be situations in which you want this to happen, and in that case it’s important that both populations use the same seed value. | ||
| + | <ul> | ||
| + | [[File:PopV4_41_Seed_CartoonTrees.jpg|none|800px|The same seed value can be used for different populations, and will result in the same instance placement.]] | ||
| + | </ul> | ||
| + | |||
| + | |||
| + | *'''Random seed:''' Click this button to generate a new random seed value for the populator. | ||
| + | <ul> | ||
| + | [[File:PopV4_40_Seed.jpg|none|800px|The Seed value is used to generate the random aspects of a population, such as instance placement.]] | ||
| + | </ul> | ||
| + | |||
| + | |||
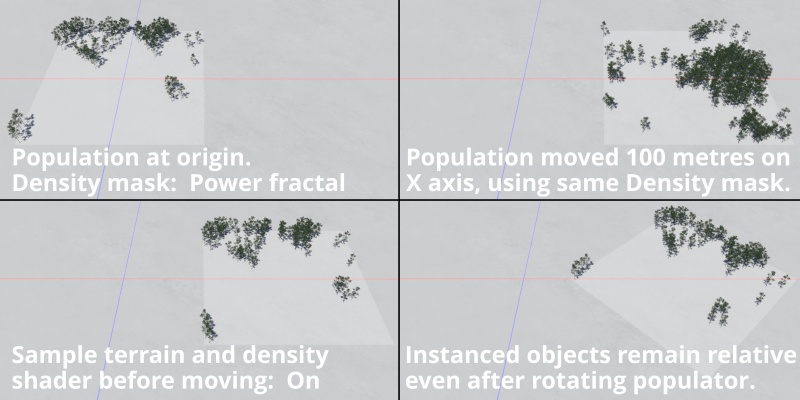
| + | *'''Sample terrain and density shader before moving and rotating area: ''' Normally if you reposition or rotate a populator Terragen will automatically recalculate the population the next time it renders an image, if you haven’t already clicked on the Populate Now button. This ensures that the instanced objects align to the underlying terrain, as illustrated in the upper right image below. When checked, this setting locks the instanced objects to the underlying terrain relative to the populator’s area centre and area rotation at the origin of the project. In other words, as if the populator was still located at the coordinates 0,0,0 and with no rotation values. | ||
| + | <ul> | ||
| + | [[File:PopV4_42_SampleTerrainAndDensity.jpg|none|800px|When checked, the instanced objects remain relative to the populator’s area centre and area rotation at the origin of the project.]] | ||
| + | </ul> | ||
| + | |||
| + | |||
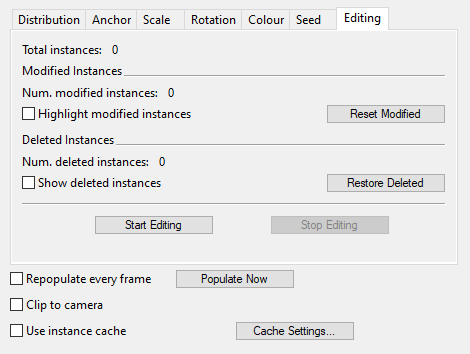
| + | == Editing Tab == | ||
| + | [[File:PopV4_07_EditingTab.png|none|470px|Editing Tab]] | ||
| + | |||
| + | The settings on this tab allow you to edit the population instances. | ||
| + | You can find out more about the process of editing population instances [[Population Instance Editing |here]]. | ||
| + | |||
| + | |||
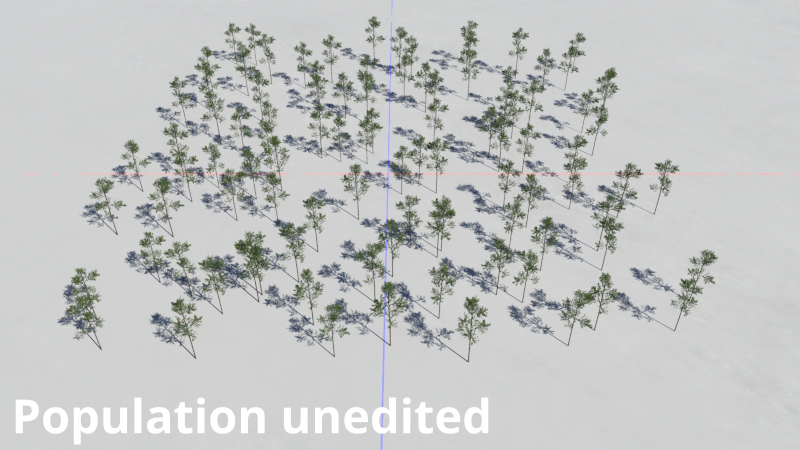
| + | *'''Total instances:''' This read only display shows the total number of instances in the population. | ||
| + | <ul> | ||
| + | [[File:PopV4_43_PopUnedited.jpg|none|800px|Unedited population]] | ||
| + | </ul> | ||
| + | |||
| + | |||
| + | *'''Num. modified instances:''' This read only display shows the number of modified instances in the population. | ||
| + | |||
| + | |||
| + | *'''Highlight modified instance:''' When checked, the modified instances are displayed in the 3D Preview with a green bounding box. | ||
| + | <ul> | ||
| + | {| | ||
| + | |- | ||
| + | | [[File:PopV4_47_HighlightModifiedInstances.jpg|none|800px|Population with modified instances]] | ||
| + | |- | ||
| + | | [[File:PopV4_44_PopModifiedInstances.jpg|none|800px|Population with modified instances]] | ||
| + | |} | ||
| + | </ul> | ||
| + | |||
| + | |||
| + | *'''Reset modified:''' Click this button to reset all the modified instances to their original location. You can reset individual instances by selecting a modified instance in the 3D Preview and pressing shift-R. | ||
| + | |||
| + | |||
| + | *'''Num. deleted instances:''' This read only display shows the number of deleted instances in the population. | ||
| + | |||
| + | |||
| + | *'''Show deleted instances:''' When checked, the deleted instances are displayed in the 3D Preview with a red bounding box. | ||
| + | <ul> | ||
| + | {| | ||
| + | |- | ||
| + | | [[File:PopV4_46_ShowDeletedInstances.jpg|none|800px|Population with deleted instances]] | ||
| + | |- | ||
| + | | [[File:PopV4_45_PopDeletedInstances.jpg|none|800px|Population with deleted instances]] | ||
| + | |} | ||
| + | </ul> | ||
| + | |||
| + | |||
| + | *'''Restore deleted:''' Click this button to reset all the deleted instances of the population. To restore individual instances, first check the Show deleted instances checkbox in order to be able to see and select the deleted instances. Selecting a deleted instance and pressing Shift-delete will restore it. | ||
| + | <ul> | ||
| + | [[File:PopV4_48_ResetModified.jpg|none|800px|Population restored after clicking on the Reset modified button and Restore deleted button]] | ||
| + | </ul> | ||
| + | |||
| + | |||
| + | *'''Start Editing:''' Click this button to start editing the population in the last used 3D Preview. Alternatively, when a population has been selected in the 3D Preview you can right click and select “Start Editing Population Instances” from the context menu. | ||
| + | |||
| + | |||
| + | *'''Stop Editing:''' Click this button to stop editing the population. Alternatively, when a population has been selected in the 3D Preview you can right click and select “Finish Editing Population Instances”. | ||
| + | <br /n> | ||
[[Category:Population Nodes]] | [[Category:Population Nodes]] | ||
Latest revision as of 02:33, 10 September 2021
Contents
Overview[edit]
The Populator is used for creating and distributing many instances of the same object across a customizable rectangle area on the xz-plane. By using the Populator, the user can have the application accurately place instances of objects (instantiated objects) on the terrain surface automatically, so that the object's y coordinate matches the y coordinate of the terrain. The ability to specify a density shader allows users to mask the placement and distribution of objects. If no distribution shader is specified, the Populator places objects randomly across the defined rectangle area. To mimic more variety, the Populator can rotate instantiated objects randomly around the y-axis, and vary the object scale within a Population by user defined parameters.
The Populator v4 was introduced in Terragen 3. It has several important changes and new features:
- Multithreaded population. Population is calculated on multiple cores at the same, making it considerably faster on multicore machines.
- Instance editing. This allows you to edit or delete individual instances within the population. You can find out more about instance editing here.
- Instance caching. Population instances can be saved to a cache file. The cache file is read when the population is loaded, potentially saving time compared with calculating the instances. You can find out more about instance caching here.
- Populator v4 no longer allows instances to appear outside the population area.
The Populator v4 replaces the Populator v3 in Terragen 3. All new populations are created using the Populator v4. However the Populator v3 is still available in TG3 so projects created in TG2 can still be loaded and will render as expected. The only difference is that you can't create new Populator v3 nodes in TG3.
If you would like to convert a population from v3 to v4, simply select it in the Node List on the left, then use the utility button with a Gear Icon below the node list to select "Upgrade Selected Population to v4". Note that you must have the population you want to convert selected in the Node List; node selections in the Node Network will not be detected.
For additional information and example projects for using Populator nodes, please see the Populator Guide.
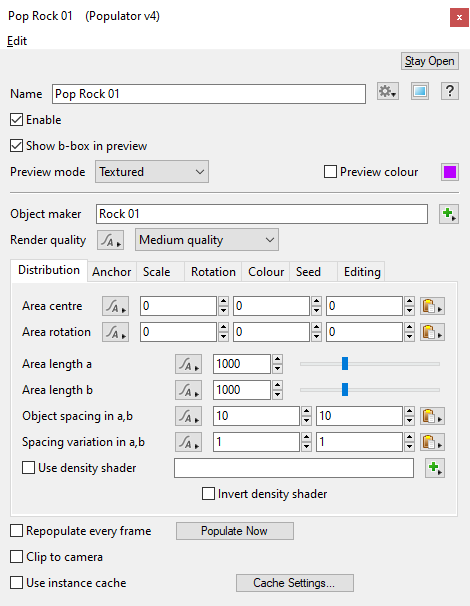
Settings:
- Name: This setting allows you to apply a descriptive name to the node, which can be helpful when using multiple Populator nodes in a project.
- Enable: When checked, the node is active and the settings below will be used for the population. When unchecked, the node is ignored.
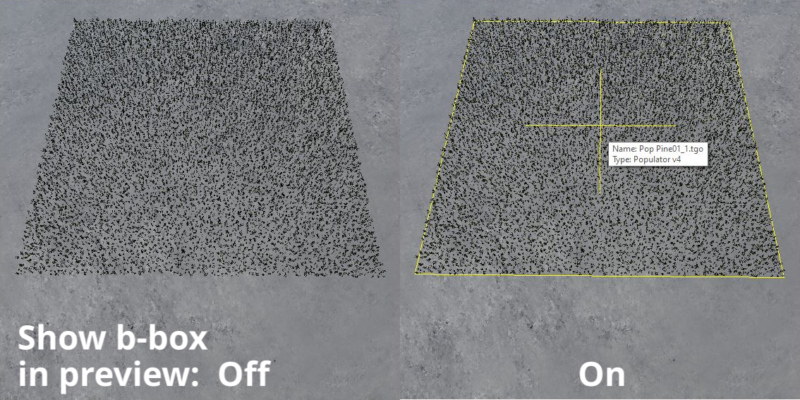
- Show b-box in preview: When checked, a 2D rectangle marking the XZ axis boundaries of the population will appear in the 3D preview.
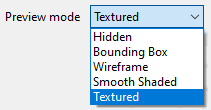
- Preview mode: This popup menu has five options which let you choose the most detailed mode that the object can be displayed in. The Object Display Mode button in the 3D Preview controls the mode for the preview as a whole. For example if you set the Preview mode of the object to Wireframe but the 3D Preview object display mode is set to Show as bounding boxes then the object will only be drawn as a bounding box.
- Preview colour: When checked, the population will draw in the 3D Preview using the specified colour to the right. The preview colour can be seen in bounding box, wireframe and smooth shaded preview modes.
- Object maker: Allows the user to enter or select an object maker that defines the object being populated. These include 3D objects in OBJ (Wavefront OBJ), LWO (Lightwave) and TGO (Terragen) formats, and also Terragen's built-in objects: Card, Grass clump, Poly sphere, and Rock.
- Render quality: Allows for specifying the render quality of populated objects. To reduce render times, level-of-detail reduction is applied to parts of objects that appear very small in the rendered image, with respect to the image resolution and detail settings in the render node. Therefore more detail reduction is applied to objects in the distance or to objects with very small polygons. The Render Quality setting controls how much reduction takes place, but also affects render times. Note: this setting does not have an effect when Raytrace Objects is enabled, which is the default in newer versions of Terragen.
- Repopulate every frame: When checked, this setting forces the populator to recalculate the positions and sizes of the instantiated objects every time a new frame is rendered. This is necessary if you animate your distribution functions, terrain, or object maker. If you don't check this box, the population will still be calculated automatically at the start of a render if any of the Populator's parameters have changed.
- Populate Now button: Clicking this button calculates a population of instanced objects based on the current settings. If you do not click on this button, the population will be calculated automatically the next time you render an image.
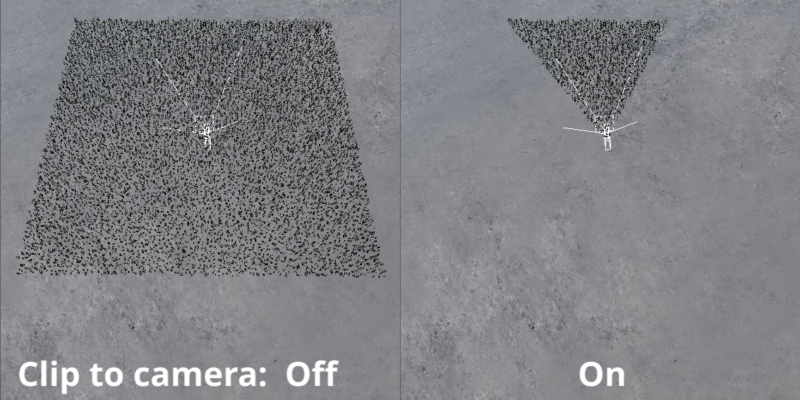
- Clip to camera: When checked, the instanced objects are only populated within the camera’s field of view. This has the added benefit of using less memory.
- Use instance cache: When checked, the population uses the population instance cache selected under the Cache settings button. For more information about instance caches click here.
- Cache settings: Click this button to open the Cache Settings window. You use the Cache Settings window to both save a cache file and specify the cache file to be used.
Distribution Tab[edit]
- Area centre: This setting allows you to enter the 3D coordinates of the rectangle distribution area on the XZ plane; the Y value is used for height. Leave the Y field empty if you want to specify a terrain onto which the objects should be placed.
- Area rotation: This setting allows you to enter rotational values as degrees in order to rotate the rectangle distribution area. Normally you rotate around the Y axis, but you can also enter values in the X and Z fields which can result in a narrowing of the population area as the projection plane changes.
- Area length a: This setting controls the length of the population boundary along the X axis.
- Area length b: This setting controls the length of the population boundary along the Z axis.
- Object spacing in a,b:This setting specifies the average distance from one object instance to the other. The higher the value the more space between objects and fewer objects within the populated area.
- Spacing variation in a,b: This setting controls the randomness of the position of the object instance. A value of 0 results in no random aspect to the placement of the object instances therefore they will align in a grid pattern as defined by the Object spacing in a,b. With the default value of 1 the placement of the object is the most random and the population as a whole looks the least regular.
- Use density shader: When checked, the shader or function nodes assigned to this setting are used as a density mask to provide more control over where instanced objects are placed within the population area. The density shader is read as a mask. Objects are placed more densely where white areas occur and not at all where black areas occur. Grey values result in varying levels of density according to the brightness of the greyscale value.
- Invert density shader: When checked, the density shader mask is inverted.
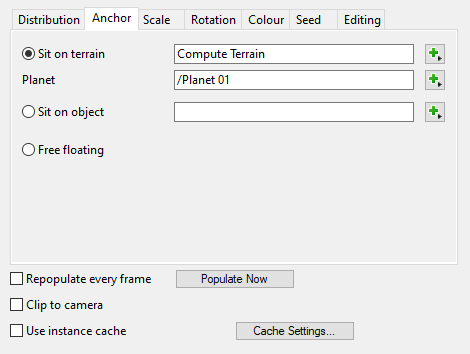
Anchor Tab[edit]
The Anchor tab has settings which let you choose how the instanced objects of the population conform to the terrain, another object, or nothing at all.
- Sit on terrain: When checked, and shader or function nodes are assigned to the Sit on Terrain and Planet settings, the instantiated objects will be placed on the surface and conform to its shape. If nothing is assigned to the Sit on Terrain setting, the instantiated objects are placed within the population’s position and rotation coordinates but the Y axis is ignored, that is, the population will be created at a Y axis value of 0. Furthermore, if nothing is assigned to the Planet setting the populator will take into account the Y axis value when it generates the population.
- Planet: This field lets you choose the Planet node the populator is associated with. https://planetside.co.uk/wiki/index.php?title=Planet
- Sit on object: When checked and an object is assigned to this setting, the instantiated objects will be placed on the surface of the object and conform to its shape. Instances are placed only on the surface of the object assigned to this setting. This can be any object in the project, even ones that are disabled for rendering. Positions are calculated by casting rays "downwards" from the population's area until they hit the surface of the object. By rotating the population area you can change the "downwards" direction in order to cast instances on different sides of the object. After initial instance positions are calculated using the ray casting method, displacement shaders on the object will displace them into final instance positions.
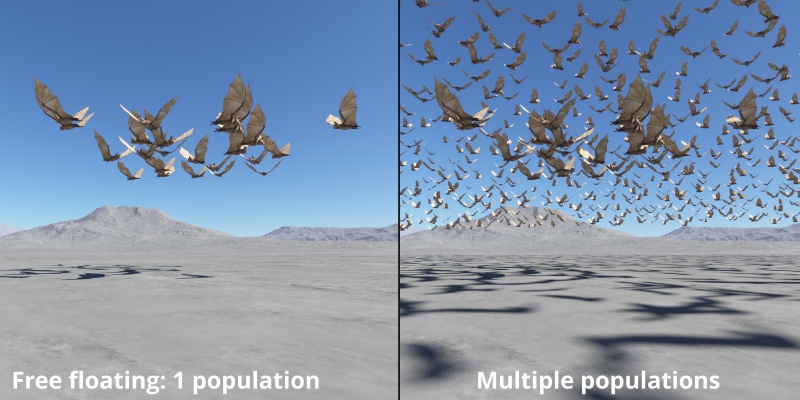
- Free floating:: When checked, the instantiated objects are not based on the terrain or an object, but rather within the area defined by the Populator’s centre, rotation and length settings. For example, you could create a population in the sky of birds, bats and bugs, or even rain, snow or hail.
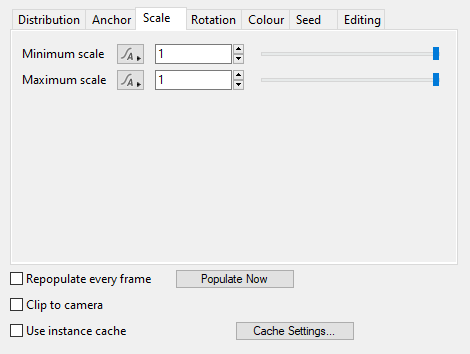
Scale Tab[edit]
The settings on this tab allow you to control the size variation of the object instances within the population. This provides more variety within the population and looks more naturalistic. The Minimum scale and Maximum scale settings act as multipliers to the default scale of the object, which is taken from the object node specified in the Object maker parameter. When the value of both settings is 1, there is no variation in the instanced object’s size, and all instances are the same size. If you set the Minimum scale to 0.5 then the smallest instances would be half the default size. If the Maximum scale was set to 2 then the largest instances would be twice the default size. As the populator creates the instances it randomly chooses a size between the minimum and maximum.
- Minimum scale: This sets the minimum scale multiplier used by the populator.
- Maximum scale: This sets the maximum scale multiplier used by the populator.
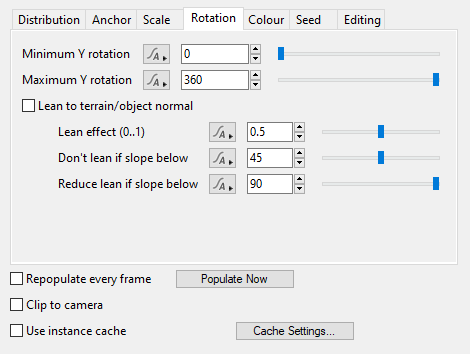
Rotation Tab[edit]
The settings on this tab allow you to control the rotation variation of the object instances within the population. This provides more variety within the population and can look more naturalistic.
By entering values for the minimum and maximum Y rotation settings you control how the populator rotates each instance around its vertical axis in degrees. When the default settings are used, a minimum value of 0 and a maximum value of 360, the populator can rotate each instance to any angle around their Y axis. If you wished to point the instances in a certain direction, for example 45 degrees, you would enter that value in both settings. Likewise, if you wanted the instances to generally be facing 45 degrees you could set the minimum value to 42 and the maximum value to 48 and this would result in the objects being rotated within 3 degrees of 45, providing a bit of variation and irregularity to the population.
- Minimum Y rotation: This sets the minimum rotation angle in degrees used by the populator.
- Maximum Y rotation: This sets the minimum rotation angle (in degrees) used by the populator.
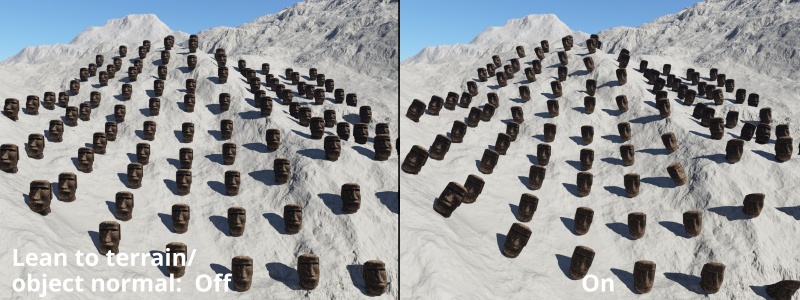
- Lean to terrain/object normal: When checked, the object instances can lean according to the slope of the underlying terrain normal. When unchecked, object instances are always oriented so that their Y axis points straight up.
- Lean effect (0..1): This setting controls the strength of the lean effect. Recommended values are within the range from 0 to 1. Higher values mean the lean or tilt of the instance more closely matches the terrain or object's normal where it has been instanced.
- Don’t lean if slope below: When the slope falls below this value, the instance will not be tilted.
- Reduce lean if slope below: This setting reduces the amount of tilt when the underlying slope falls below this value.
Colour Tab[edit]
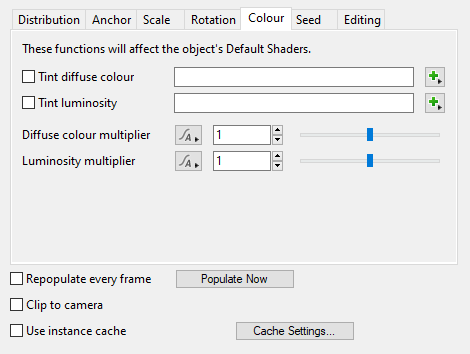
The Colour tab lets you control the colour of the populated objects without needing to edit the shaders on the objects themselves. You can use this to tint the overall colour of a population or to add variations in colour per instance using various techniques. To understand these settings we recommend that you follow this tutorial: Population Colour Tinting Techniques
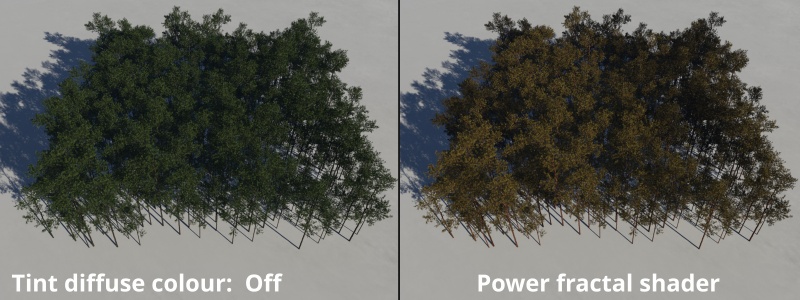
- Tint diffuse colour: When checked and a shader or function nodes are assigned to this setting, the colour component (RGB) values of the assigned shader at the location of the instanced object are multiplied with the diffuse colour component values of the instanced object. Generally speaking, this darkens the colour of the object, but you can compensate for this effect with the Diffuse colour multiplier setting below.
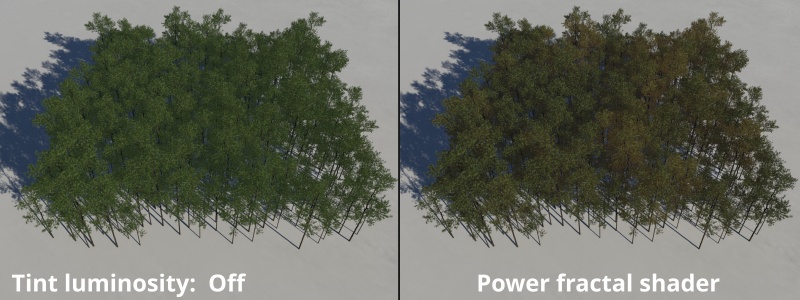
- Tint luminosity: When checked and a shader or function nodes are assigned to this setting, the colour component (RGB) values of the assigned shader at the location of the instanced object are multiplied with the luminosity values of the instanced object. If the 3D object assigned to the population’s Object maker setting has no luminosity value, that is its luminosity setting equals 0, then this setting will have no effect.
- Diffuse colour multiplier: Very often, tinting a population will darken the colour values of the instanced objects. This setting provides a way to adjust those values. Values greater than 1 will brighten the instanced objects and values lower than 1 will further darken them.
- Luminosity multiplier: This setting provides a way to adjust the population’s tinted luminosity values. Values greater than 1 will increase the luminosity value, and values lower than 1 will decrease them. For example, a value of 0.5 will lower the tinted luminosity by half, whereas a value of 2.0 will increase the tinted luminosity twice as much.
Seed Tab[edit]
The settings on this tab give you some control over how the populator places object instances.
- Seed: This value is used by the populator to generate the random aspects of a population, such as instance placement. A new seed value is generated for each new population, which helps to ensure that populations don't coincide with one another. For example, two populators with identical settings and seed values will generate instances in exactly the same place. There may be situations in which you want this to happen, and in that case it’s important that both populations use the same seed value.
- Random seed: Click this button to generate a new random seed value for the populator.
- Sample terrain and density shader before moving and rotating area: Normally if you reposition or rotate a populator Terragen will automatically recalculate the population the next time it renders an image, if you haven’t already clicked on the Populate Now button. This ensures that the instanced objects align to the underlying terrain, as illustrated in the upper right image below. When checked, this setting locks the instanced objects to the underlying terrain relative to the populator’s area centre and area rotation at the origin of the project. In other words, as if the populator was still located at the coordinates 0,0,0 and with no rotation values.
Editing Tab[edit]
The settings on this tab allow you to edit the population instances. You can find out more about the process of editing population instances here.
- Total instances: This read only display shows the total number of instances in the population.
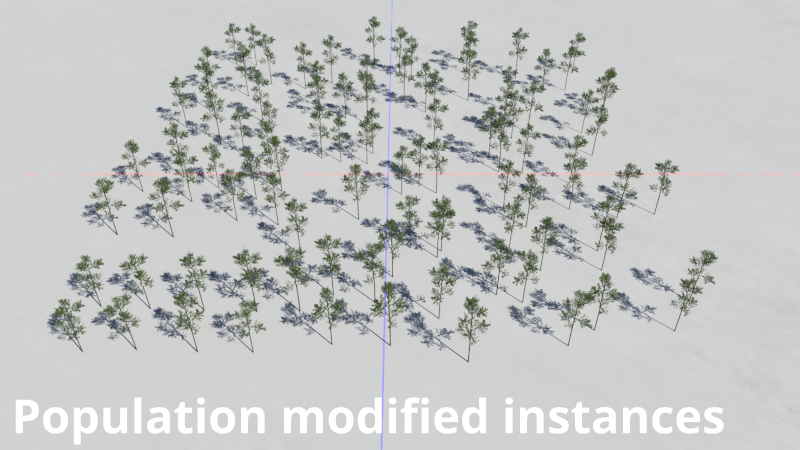
- Num. modified instances: This read only display shows the number of modified instances in the population.
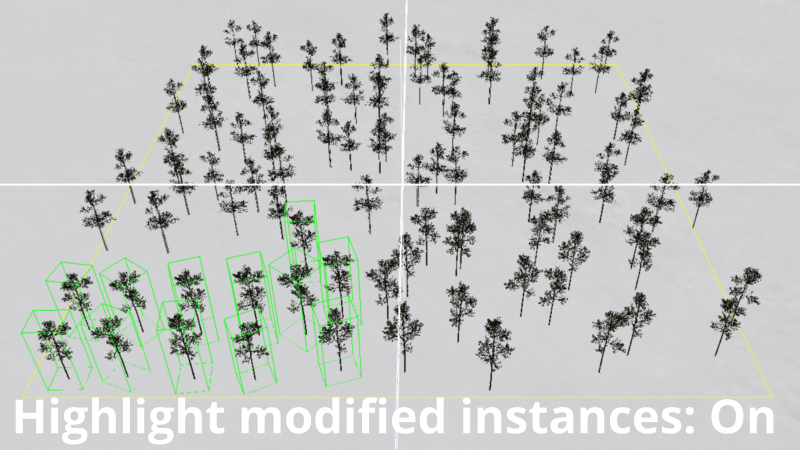
- Highlight modified instance: When checked, the modified instances are displayed in the 3D Preview with a green bounding box.
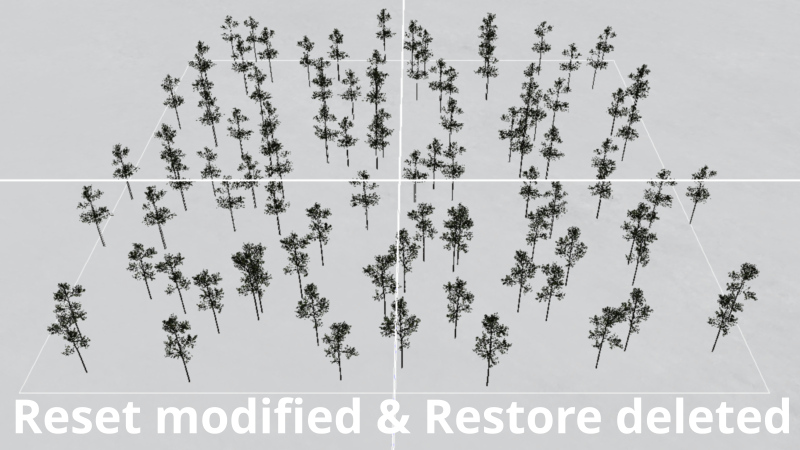
- Reset modified: Click this button to reset all the modified instances to their original location. You can reset individual instances by selecting a modified instance in the 3D Preview and pressing shift-R.
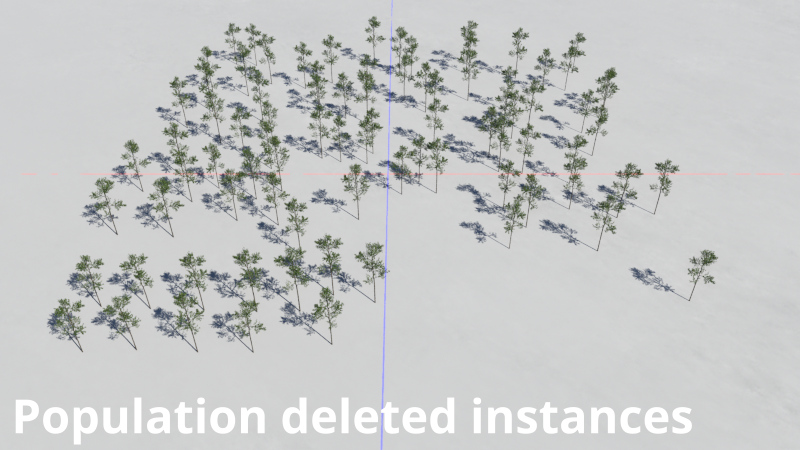
- Num. deleted instances: This read only display shows the number of deleted instances in the population.
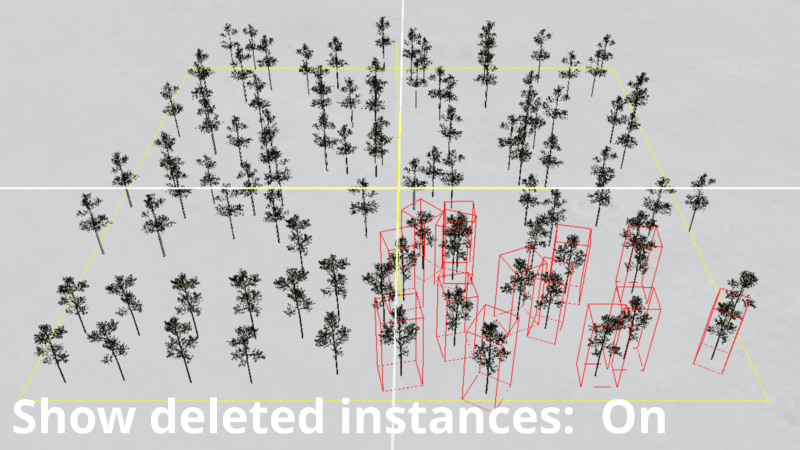
- Show deleted instances: When checked, the deleted instances are displayed in the 3D Preview with a red bounding box.
- Restore deleted: Click this button to reset all the deleted instances of the population. To restore individual instances, first check the Show deleted instances checkbox in order to be able to see and select the deleted instances. Selecting a deleted instance and pressing Shift-delete will restore it.
- Start Editing: Click this button to start editing the population in the last used 3D Preview. Alternatively, when a population has been selected in the 3D Preview you can right click and select “Start Editing Population Instances” from the context menu.
- Stop Editing: Click this button to stop editing the population. Alternatively, when a population has been selected in the 3D Preview you can right click and select “Finish Editing Population Instances”.
A shader is a program or set of instructions used in 3D computer graphics to determine the final surface properties of an object or image. This can include arbitrarily complex descriptions of light absorption and diffusion, texture mapping, reflection and refraction, shadowing, surface displacement and post-processing effects. In Terragen 2 shaders are used to construct and modify almost every element of a scene.
The Node List is a part of the Terragen interface that shows a list of nodes along the left side of the application window. The Node List generally shows only those nodes that are relevant to the current Layout (e.g. Terrain, Atmosphere). It sometimes includes buttons or other controls that are specific to a particular Layout as well. The Node List is hierarchical and each level is collapsible.
A single object or device in the node network which generates or modifies data and may accept input data or create output data or both, depending on its function. Nodes usually have their own settings which control the data they create or how they modify data passing through them. Nodes are connected together in a network to perform work in a network-based user interface. In Terragen 2 nodes are connected together to describe a scene.
The bounding box is a box which surrounds (or bounds) an object or shader. This box shows the maximum extents of the item inside it. Sometimes abbreviated as "b-box".
Literally, to change the position of something. In graphics terminology to displace a surface is to modify its geometric (3D) structure using reference data of some kind. For example, a grayscale image might be taken as input, with black areas indicating no displacement of the surface, and white indicating maximum displacement. In Terragen 2 displacement is used to create all terrain by taking heightfield or procedural data as input and using it to displace the normally flat sphere of the planet.
Literally, to change the position of something. In graphics terminology to displace a surface is to modify its geometric (3D) structure using reference data of some kind. For example, a grayscale image might be taken as input, with black areas indicating no displacement of the surface, and white indicating maximum displacement. In Terragen 2 displacement is used to create all terrain by taking heightfield or procedural data as input and using it to displace the normally flat sphere of the planet.
A parameter is an individual setting in a node parameter view which controls some aspect of the node.
