It’s time for another entry in our Support Diaries series, again drawn straight from an in-depth support case discussion.
This time we take a look at how to use Terragen’s realistic atmosphere shading model to replicate the atmosphere and lighting in a reference photo.
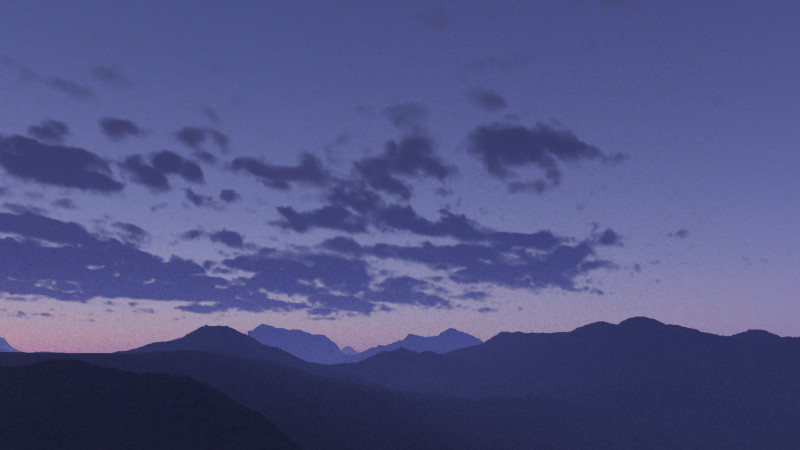
…The best way to achieve your result is to think about what is happening in your reference photo – what time of day it was taken at, what angle (toward or away from the sun), how high the clouds might be, etc.
In this specific case I would guess it is either dusk or dawn, before the sun has risen or after it has set. And there is actually very little color on the clouds. So the first thing I tried is just setting the sun to -5 Elevation. That makes it quite dark, but in fact your photo reference probably shows an image with a longer exposure to increase the brightness, so I adjust the exposure in Terragen to compensate. That got me pretty close to the basic look.
Then I adjusted haze amount (increased to 2), Bluesky Horizon Colour (slightly more purple and a little more saturation), and then Redsky Decar Colour (just trying to match what is seen in the reference photo). I didn’t nail it, but this is just a quick attempt to get a similar look.
Finally I added some clouds to roughly mimic the basic composition and look in the reference image, but certainly the clouds could be brought a lot closer to the photo with some more tweaking.
The resulting image is below and you can download the TGD by clicking here (right-click and Save As).
Again the lesson here is that Terragen is generally set up to give you output that matches the real-world for similar conditions. So if you can guess how, when, and where a reference photo was taken (or better yet you took it yourself so you know all those details), it will help a lot in duplicating the look. Yes, you can use extreme settings like 64 Bluesky Density, but this is really not a good way to get a real-world result because it’s a very high value and will not respond in expected, realistic ways.
One thing I see a lot in reference photos is that the exposure, focal length, and post processing are totally unknown to the person trying to emulate them, and without this information it’s very hard to know how and where to start. You need to make educated guesses and get good at analyzing images. Often the colors have been adjusted (I would not be surprised if that is the case in your reference for example), or the shadows lifted, or it is taken with a wide angle lens or telephoto, or even a long exposure in near-total darkness that looks like daylight, and people don’t think to try to emulate the same approach in TG. But that is exactly what you want to try to do in most cases.
Take a look at this image for example: http://www.steves-digicams.com/knowledge-center/kcenter/exposure2.jpg
That’s a long-exposure, which you can primarily discern from the smoothness of the water. In reality that dock in the foreground was probably quite dark to the photographer’s eyes, but with a long exposure you gather more light on that foreground object while also smoothing out the water and getting some blurring and apparent motion in the clouds (plus more color and light in the sky). In Terragen there is no “exposure time” (though there is a “blur length”, which only works for camera motion), so you don’t get blurring of e.g. water and other moving elements, but the exposure brightness effect works exactly the same way and should be used as such (in the Camera settings). I doubt most people even use exposure, it’s frequently overlooked! But it’s very important just as in the real world.The Atmosphere controls in Terragen aren’t strictly correlated to atmospheric phenomena (e.g. you do not directly control Rayleigh Scattering behavior or anything), but the way that the atmosphere behaves and renders is generally quite realistic. You can also achieve very unrealistic results with unusual or extreme settings though. Keep in mind that the defaults are intended to represent “Earth-like normal realism”. In the case of the Atmosphere Shader, the sliders have a lot of range in them, but realistic values would really only be within probably 1.0 or at most 2.0 of the default, in other words Haze Density from 0 to 2 or 3 (Default is 1), or Bluesky density from 0.5 to 4.5, at most. Even some of those are extreme values (like Haze of 0, Bluesky of 4.5), so my advice with the atmosphere would be to adjust settings slowly and carefully. Small changes can have big effects, especially with the interdependent Bluesky and Redsky Decay values and colors.
Also note that the values shown in the example images in the Wiki are for illustration purposes, they are not necessarily intended as “recommended” values. I do see in the example for Bluesky of 64 that it gives you a look similar to what you were hoping for, but the important point there is that the sun is in view and even if it may look superficially like your goal, it is such an extreme value that it will ultimately not be an easier or flexible way to achieve a realistic result.
Conclusion: if you are using a real-world photo as a reference and trying to recreate it in Terragen, think carefully about the conditions of the photo, both in the real world, and in the settings of the camera – f-stop (aperture), ISO, shutter speed/exposure length, etc. Many of the best landscape photos use longer exposures to increase light or smooth out rough elements like flowing water.
Many professional landscape photos are also subject to in-camera adjustment like graduated neutral density filters (typically making the top of the image proportionally darker than the bottom), as well as post processing such as “dodge and burn” techniques. Any of these techniques and more can affect one area of the image more than other parts and thus create effects that are difficult or impossible to achieve in a single unaltered photo or render. So decide what you can create in the native render and what might be better adjusted in post processing.
Finally, when working with atmosphere settings in Terragen, try to stick close to the default values and avoid exceeding the slider range. This is a suggested realistic, real-world range and while it’s possible to use more extreme settings, it generally won’t achieve a realistic result but rather a fantastical one. That may be your aim in some cases, of course, but be aware that for realism you want to use more moderate settings and if you’re unable to match a reference, consider what else might have been done in the reference shot that you are not emulating in Terragen. Since Terragen works similarly to the real world, you should be able to avoid unusual settings for most photo reference images that are not heavily post processed.