In the course of our support activities, we often get user scenes that we are able to significantly optimize, improving render time and/or quality and increasing overall productivity for the artist. Although general optimization guides can be very helpful, we thought it might also be useful to see how these techniques and concepts can be specifically applied to example user scenes. This is the first of what we hope will be several different real-world cases we examine.
Our scene today comes from user “RichTwo” on our community forums, a skilled Terragen artist with a lengthy history and a distinctive style, often depicting desert or barren alien worlds. Rich had been experimenting with Path Tracing (new in Terragen 4.4) and was experiencing longer render times than he was comfortable dealing with. Rather than abandon experimentation with this promising new feature, we offered to help him optimize, with dramatic positive results! Read on for details on how we brought render times down to just 1/5th of what they were at the start (all text that follows was directly addressed to Rich in a reply in the original support thread).
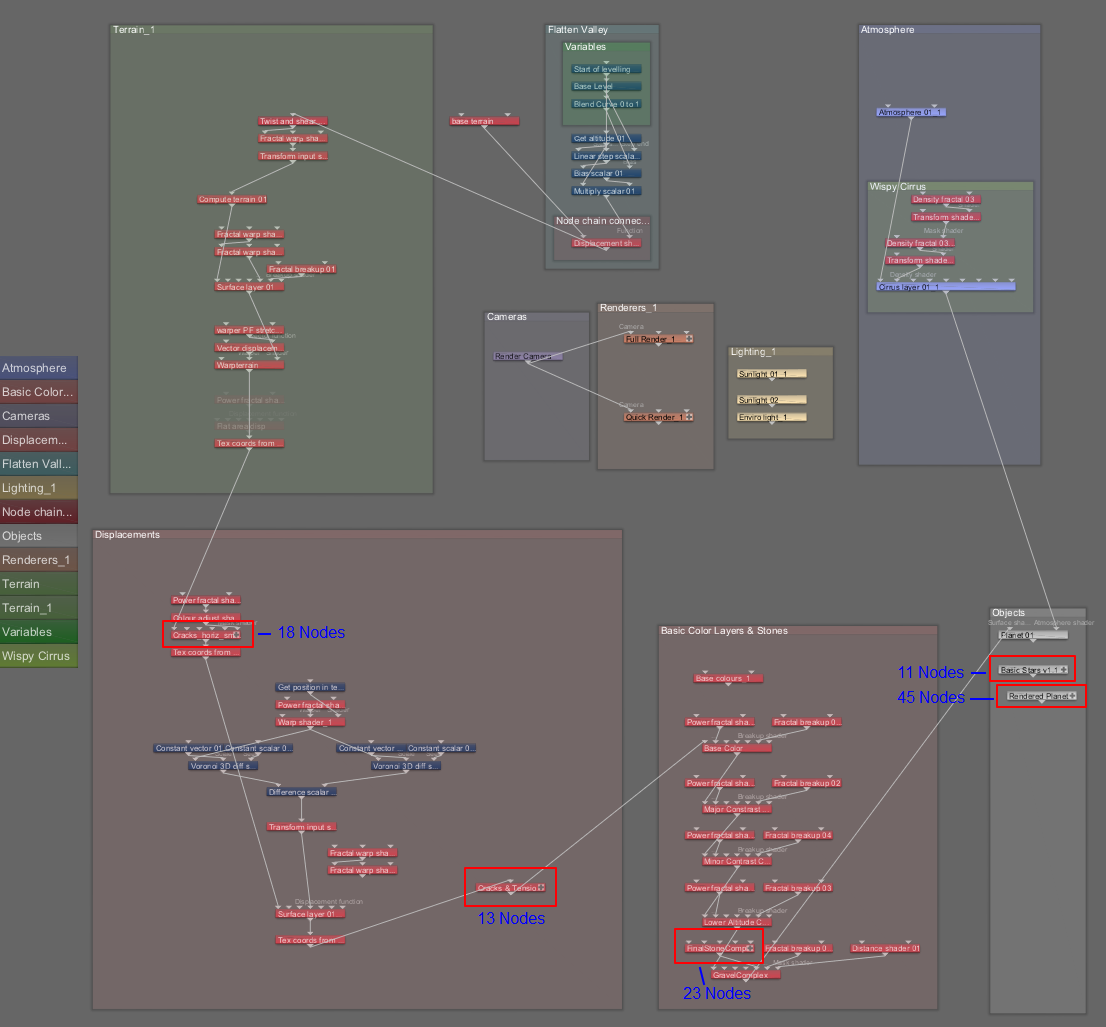
We begin with a very extensive node network, certainly more complex than the average. In the image below, note that there are also multiple nodes with extensive sub-networks as well. Over 100 nodes in total! This in itself can be a primary target for optimization efforts, but let’s see what we can do without getting too deep into the shader configuration.
Atmosphere Optimization
I’m starting here because this applies to both the Standard renderer and Path Tracing. So these adjustments are worth doing even if you don’t end up using Path Tracing (PT) on the scene.
One of the bigger impacts on render time even in Standard rendering here comes from the cloud layer. It doesn’t really benefit from being at a quality of 2. I found a quality of 1 to be fine, and even 0.5 may work well as gao_jian11 has said, although even if it is not noisy, you do sometimes visibly lose detail below a Quality level of 1.0. That being said for thin clouds like these (below 100 meters of depth), generally relatively lower Quality levels work fine. I also found that enabling Conservative Acceleration didn’t negatively affect the render quality, and saved some time. Higher levels of Acceleration, even “Optimal”, can occasionally cause render artifacts. So I’d set cloud quality to 1, and enable conservative acceleration. And generally those are safe values to aim for in other scenes too, especially with “v2” clouds.
Another thing I would recommend is to enable Defer Atmo, even for Standard renders. When Path Tracing is enabled, Defer All will be automatically enabled, and this will “defer” rendering of the atmosphere anyway. Defer Atmo will generally give you higher quality atmosphere rendering for equivalent render time, especially when adaptive anti-aliasing is used. And it makes sense to optimize for Defer Atmo/Defer All rendering if you are considering using the Path Tracer as well. Note that simply turning on Defer Atmo without changing other settings will likely result in higher quality results, but possibly longer render time. You would need to adjust things like First Sampling Level or the Pixel Noise Threshold, and potentially use the Robust Adaptive Sampler, to get a better balance of quality and render time. But again it is generally worth making these changes and then using them consistently moving forward.
One interesting thing to note is that while these optimizations are beneficial, when Defer Atmo or Defer All are enabled, the Robust Adaptive Sampler is in use, and the AA adaptivity is increased (see below), the high cloud quality has a lower impact on rendering time, relatively speaking. This is probably because the Robust Adaptive Sampling system can make better decisions about where to put samples and thus avoid unneeded render time in the non-noisy parts of the cloud that are easily rendered with fewer samples.
Optimizing for Path Tracing (and Defer All)
I’m pleased to say you can take a look at some in-progress render optimization documentation I’ve started to add to the wiki. It is initially focusing on Defer All and Path Tracing, and I used your scene to help inform and test some of the recommendations in there. So it’s good timing!  This document will eventually contain a lot more info including on atmospheres, etc., but the PT/Defer All parts are already there: https://planetside.co.uk/wiki/index.php?title=Rendering_Optimization_Guide
Using that info can help you cut the PT render time in particular by quite a bit. Using Robust Adaptive Sampling will especially help with both Defer All and PT. I will note, however, that in your scene due to the complex and rough displacement, reducing Micropoly Detail (MPD) does have a negative effect, so I would not change that here. This kind of obvious geometry change from relatively small adjustments to MPD is often of an indicator of “folded” or overlapping displacement which can be problematic in general, so that may be something to look at improving (and is probably related to some of the terrain shader complexity issues others have mentioned and which I touch on below). But if you just want to render the scene as-is, MPD should stay at 0.6.
Another thing to note is that using higher adaptivity as discussed in the docs will sometimes tend to lower the intensity of very fine, pinpoint bright and/or “noisy” areas. There are relatively few rendering situations where those kinds of pinpoint bright spots are actually desirable (similar rendering artifacts in many renderers are actually called “fireflies” and many techniques exist to try to remove them). But in the case of the procedural star shader in your scene, the bright points *are* desired and they get significantly minimized at 1/256 and even 1/64 First Samples. There are a few solutions to this.
First, you can reduce the Adaptivity, but then you lose some of the speed-up in your rendering, especially when Path Tracing. I will say that the higher levels of adaptivity – 1/256 and 1/1024 – did not significantly speed up your scene, so I went with 1/64, which seemed like the “sweet spot” in this case, but I often use 1/256 in my own PT scenes. The stars are more visible at 1/64, but still fewer compared with Max Samples. At 1/16 *still* not all stars are visible, which really suggests that the underlying procedural stars shader should be adjusted, or an alternative solution used, as otherwise you are effectively having to disable significant rendering optimizations just to preserve 1 small feature of the scene. Adjusting the procedural star shader itself to be more intense or have slightly bigger bright points would make them easier for the adaptive sampling to handle. A 3rd option is to use a starfield Image Map, which should work better, and may also even render a bit faster, though duplicating this exact look may be challenging.
In the end I took Path Tracing down from about 2.5hrs on my machine with your original settings to about 30 minutes. Quite a time savings. But the Defer All render was just under 7 minutes after optimization, so now after optimization PT adds a fair bit of render time percentage-wise, whereas before it was less dramatic of a difference. Defer All with your original settings was 1.5hrs vs. 2.5hrs with PT, so it’s an interesting shift, perhaps due to some efficiency issues under the original settings. I would say that the amount of time PT is now adding is more what I would expect in terms of the time increase over just Defer All.
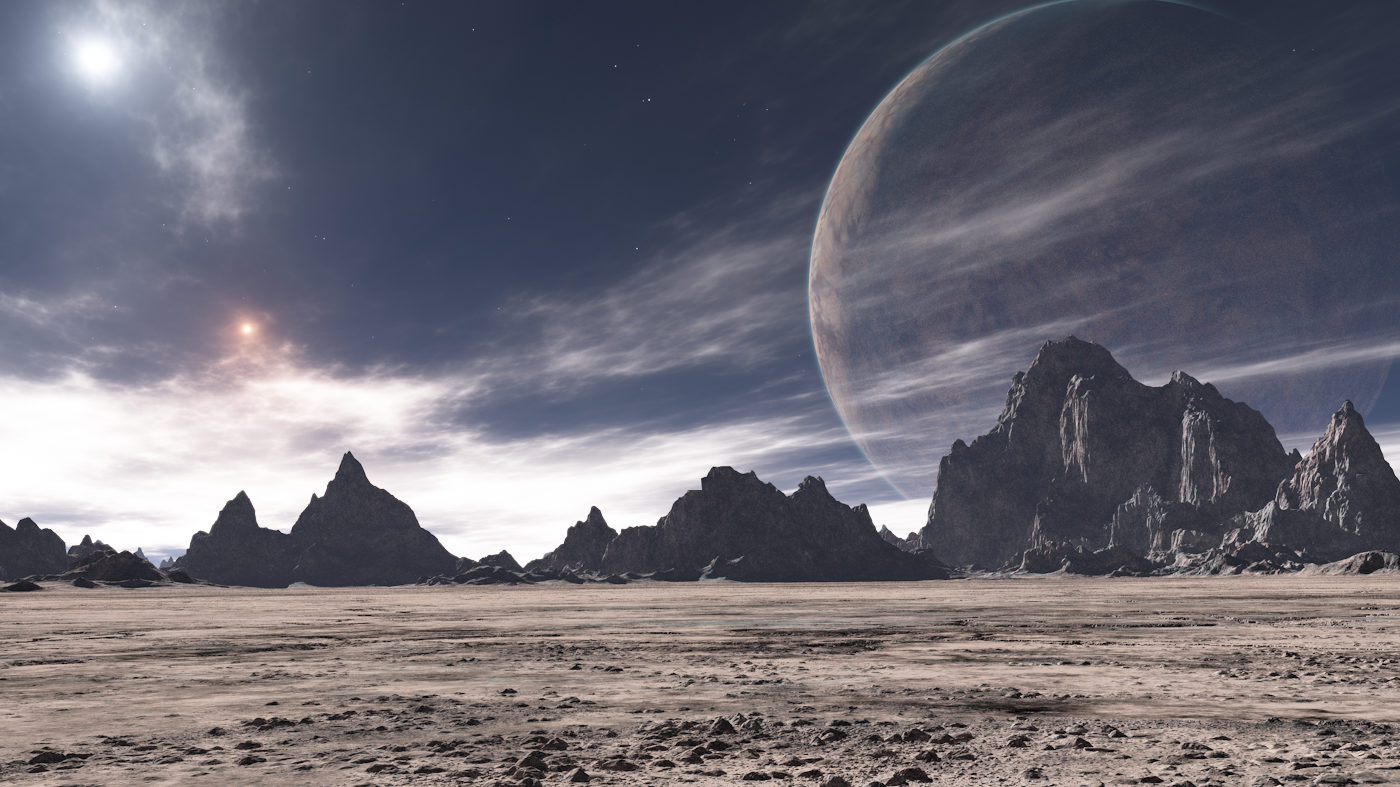
This is the Path Traced result with your original settings, 2.5hrs:
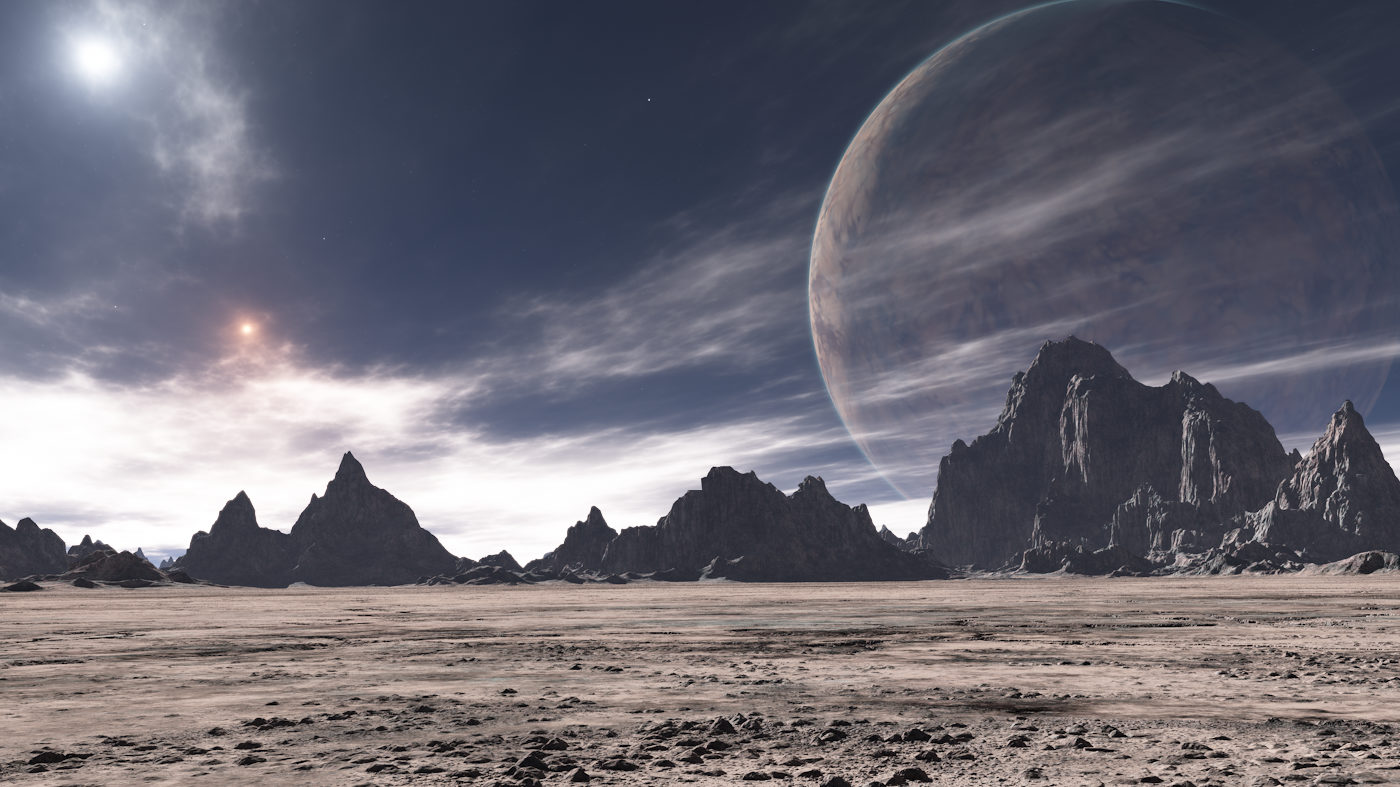
And this is the optimized version, 27 minutes:

Note of course the decreased visibility of the stars. But otherwise the two are very, very close, at 1/5th the render time for the optimized version.
Comparing Path Tracing to Standard Render and Defer All
When you’re seeing such an increase in render time for Path Tracing (even after optimizing), I imagine you want to decide whether it’s worth using. To do that you are best off comparing “apples to apples”. That means using GI in the Standard and Defer All renders, and using GISD, and being aware of any other limitations in the comparison, like the fact that the Enviro Light settings for terrain are not taken into account with Path Tracing.
In your scene there were several issues that limited the ability to make a good comparison. The first is that GI Sample Quality was at 0, which technically still calculates GI, but is such a low value in terms of accuracy that the lighting results can vary dramatically between successive renders. Even if you just render the exact same scene twice in a row the lighting could be noticeably different, especially in shadow areas. So you want to use at least a value of 2 there, which will not dramatically impact render time. Ideally you actually want to use a GI Cache File for a *really* direct comparison (because this ensures that your PT and non-PT renders use the same GI cache), but it’s not strictly necessary and is a little more work to setup.
The second thing is that GISD was disabled. While GISD is an approximation, it is a quick one, it does add to apparent realism, and it can add dramatically to the lighting detail and quality in shadowed areas in particular. And if you are interested in PT for the greater detail it can bring to shadowed areas, you should probably be using GISD too, it provides similar (though less accurate) benefits. That being said, interestingly enough in your particular scene GISD did add some detail in shadows, but it actually ends up looking a bit different in those areas vs. PT, and the non-PT version without GISD could probably be adjusted to match the PT more easily for this reason. GISD is so fast that it’s usually worth just leaving enabled, and I would guess that in this case the reason it looks different is the extreme displacement and potential tearing or overlapping geometry here.
Finally, the Enviro Light Strength on Surfaces is set to 0.85 rather than the default of 1. This is not a problem in the Standard renderer, but since the Path Tracer will ignore that and effectively use a value of 1 (equivalent), it makes the shadowed areas lighter overall in the PT render, not as a direct result of PT being more accurate, but simply because the Standard render is biased to be less bright by this setting while the PT render ignores that setting. So for a truly direct comparison you’d want to reset the Enviro Light Strength on Surfaces to 1.
Having corrected all this in my test scene I then found the difference in lighting to be less dramatic between PT and Standard or Defer All rendering. Any notable differences seem like they could probably be reproduced with some simple post processing, increasing the brightness and contrast in shadows for example (most image editors have tools to do something like this). For this reason my personal view is that the results of path tracing are not significant enough to justify the render time in this case, especially given the effect on the stars when the optimizations are in place to make PT faster. Of course, as noted, that could probably be fixed by using an image map instead of procedural stars, or by adjusting the procedural star setup. And of course ultimately it is up to you whether you prefer the PT result enough to make it worth your render time.
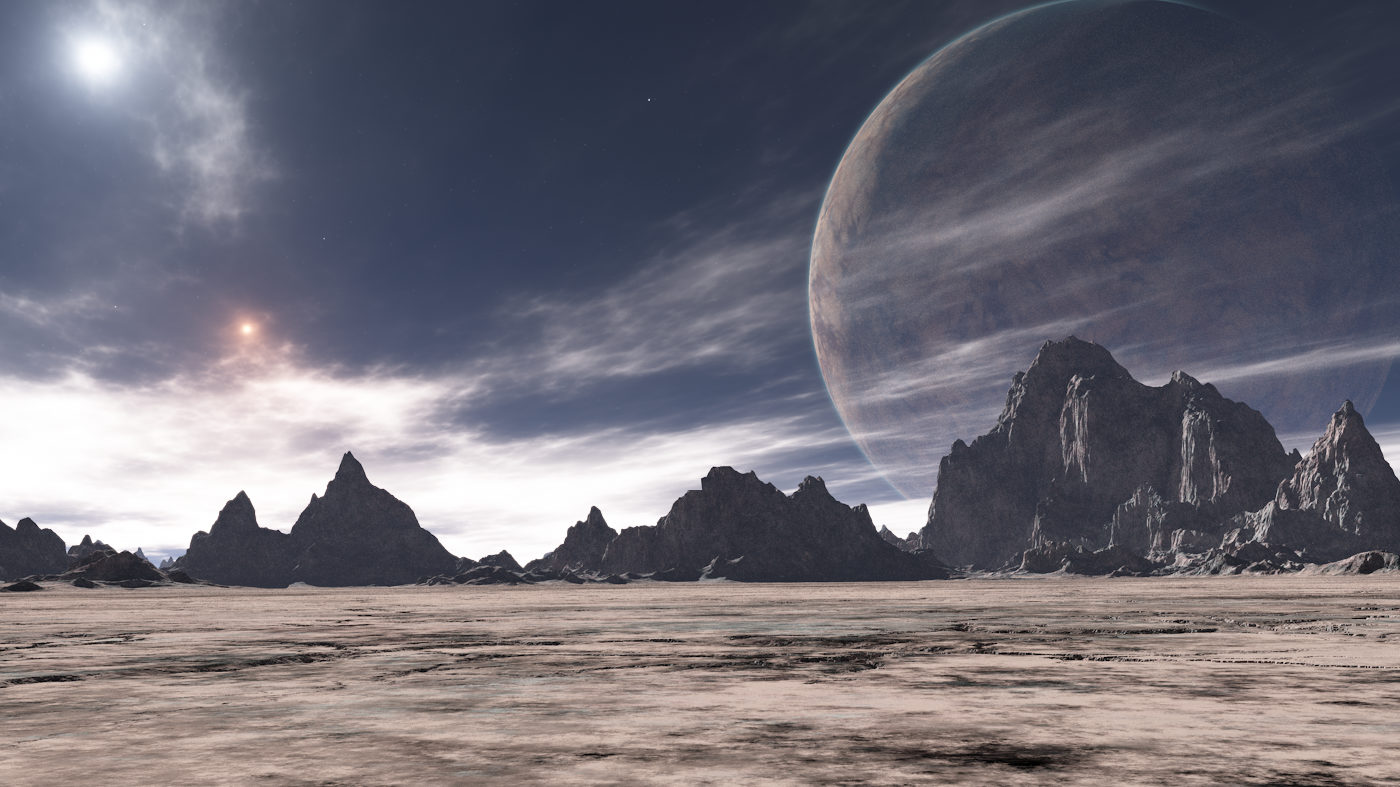
Here’s the Defer All result, without Path Tracing but with GISD:
The Impact of Complex Terrain Shaders
Once I lowered the cloud quality and enabled the Robust Adaptive Sampler, the sky actually rendered pretty quickly, but the terrain was still fairly slow. So I did a few test renders disabling parts of the terrain displacement network just to see how much of the render time they are responsible for. Interestingly, although there are some strong displacements that cause some geometry discontinuities, the larger-scale terrain displacement, folds, etc. is not the greatest contributor to terrain rendering time here. It’s actually the “Base Color and Stones” group, in particular the “FinalStoneComplex_4”. Looking inside that network it’s a very involved setup of numerous Fake Stones shaders and displacement-creating Power Fractals, almost all of which are at tiny sizes. While this network may have worked well for the situation it was created for, it seems like in this scene a lot of the smaller detail is getting lost, but still notably impacting render time. On my machine here a 27 minute render goes down to 23 minutes just by disabling that group of stones. That may not seem like much in absolute terms, but it’s adding something like 15% to overall render time, and on a slower machine the absolute time difference would be greater. And I would guess that perhaps 3-4 layers of Fake Stones and a non-displacing Power Fractal or two would probably duplicate the majority of the result. This is what it looks like with those stones disabled:
There are also a couple of other shader networks of fair complexity that seem to have a lesser impact on the final image than you might want or expect given their complexity. They don’t seem to be adding as much to render time, but I do think they’re contributing to the overlapping displacement geometry I mentioned earlier, which can be problematic for various reasons. I think several of these setups are probably just drop-in shared networks or based on such, and that’s a great way to learn and to more easily and quickly add complexity (in visual outcome) to your scenes. But it should, I think, be balanced against efficiency and how big a contribution these complex networks actually make to the final work. I understand you don’t feel like this is a complex network, relatively speaking, but whether that’s the case or not, I think the more important thing to consider is whether the complexity of the shader setup corresponds pretty clearly to the complexity or specificity of the result. Sometimes it’s easy to use a lot of nodes to achieve what might be do-able with just a few, and you often end up with longer render time in the bargain. So complexity is not inherently bad, but it should ideally be balanced against efficiency.
So this is just something to be aware of as you build. It pays to aim for efficiency and try to accomplish your goals with fewer nodes when possible. That gives you more time for iteration and refinement since you spend less time rendering!
Deeper Optimization
Converting to Heightfield
Your terrain doesn’t appear to have any notable overhangs, though it is quite steep. Still I think the basic major shapes could probably be created and saved out as a Heightfield, allowing you to just do those baseline calculations (such as the valley and major rock shapes) just once, then apply additional displacement for detail, but saving some calculation time on any successive render. The basic process is to attach the output of your terrain shader network to the Shader input of a Heightfield Generate, then scale and position the Heightfield Generate so that it covers your area of view/interest for the terrain, give it enough points for sufficient detail (2000 x 2000 or 4000 x 4000 for example), then Generate the terrain, right-click to Save As and save a heightfield. Then add a Heightfield Load node and load the heightfield in, and finally connect it to the input for the rest of your shading network, after you split it off from the terrain generating part that you fed into the Heightfield Generate. It probably sounds a bit harder than it is, once you do it, it’s pretty simple. It’s not something I would do all the time, but if I start to see that large-scale terrain shapes are taking a lot of time to calculate I just might. That way you can focus on the finer terrain details such as cracks, etc. and it’ll all render faster. Just keep in mind the limitations of heightfields, no overhangs, finite details, etc… Something to perhaps experiment with.
Second Planet Displacement
There are a bunch of nodes inside the second planet that are adding displacement to it. But the overall effect in the final render appears to just be roughly equivalent to displacing the surface of the planet down by a large amount such that it is visible from this distance. The actual *shapes* on the planet don’t change, it literally just looks like the radius of the planet shrank, while the atmosphere stayed the same. The planet doesn’t take up a lot of room in your image but it does render slower than it needs to. If you simply disable the displacement nodes (but not the color-providing nodes) you can see the difference is quite minor. But if you do what the effect of essentially a taller atmosphere, you should be able to achieve that by adjusting the atmosphere heights and ceiling/floor (on the Height control tab). Alternatively you can work out how to displace the planet downward in a much simpler way.
Other Misc. Things
A few other minor notes.
I noticed that you have Ray Trace Objects disabled in the scene. Now that we have per-object controls to render displacement on objects (using Standard render and not ray tracing the object), there is pretty much no reason I’m aware of to disable Ray Trace Objects globally. Unless you’re just displacing a ton of objects and don’t want to bother setting it for each one. While this setting is not a problem here because there are no objects being rendered (aside from the planets and background sphere, which are handled differently), it is a good policy to just always leave it enabled. If this is a render node based on settings you commonly used, this is especially important so you don’t end up with sub-optimal render results from a setting you’ve forgotten.
I also found that there were a lot of nodes that did little (that I could see) or nothing, or were disconnected, for example a Warp Shader with no warper input, just a shader input (inside the second planet). This is common when developing a scene (for me too!), so it’s not a criticism, but it does make troubleshooting and optimizing a bit slower (for you in the future is more what I mean). So, while I struggle with this too, I would suggest working to clean up things you don’t need anymore as you go. It’ll help you keep render times down and have a better understanding of exactly what is doing what in your scenes.