In the previous two posts, Hello RPC! – Part 1 and Hello RPC! – Part 2 we wrote a simple program in the Python programming language to modify an open Terragen project via the Remote Procedure Call (RPC) feature in Terragen 4 Professional.

In this post, we’ll build upon those foundational ideas to create a program that can modify the colour of a light based upon a table of Kelvin temperature values, and along the way, we’ll explore these coding techniques:
- Adding images and sliders to the graphic user interface.
- Creating and accessing data from a Python dictionary.
- Creating and displaying messages via Tkinter’s messagebox() function.
Before starting, make sure that you’ve downloaded and installed the following programs and packages. Installation information can be found in this blog.
- Terragen Professional 4.6.31 or later
- terragen_rpc
- Python programing language
- Pillow, Python’s imaging library
- Andreas Siess’s “RGB to color temperature” Python table
A Brief Program Overview
Writing a program’s code is a creative and dynamic process, and often involves writing and then rewriting lines of code as testing and inspiration take place. For example, when coding in Python, it wouldn’t be uncommon to add a bunch of widgets to a window, along with functions to the program, and make sure the program “worked” as expected; then go back and make the user interface look good, and perhaps account for error handling.
While this workflow might be aproppo in the real world, it doesn’t translate so well into a blog post. Afterall, we don’t want to present the material in such a way as you have to write and then rewrite the code over and over, just because a new concept is introduced. So whenever possible, we’ll present the concepts and their options upfront, so that the code only needs to be written once.
“Under the hood” so to speak, our program needs to import the necessary Python modules, create an interface which allows the user to select a light and modify its colour, and handle any exceptions (errors) along the way.
Many editors are available to write the code in, so choose your favorite. We’ll be using Visual Studio Code, but you can also use Python’s built-in editor, IDLE, if you wish. We’ll provide code blocks that you can copy and paste into the editor of your choice if you like, and make the final code available on Github at the end of this post.
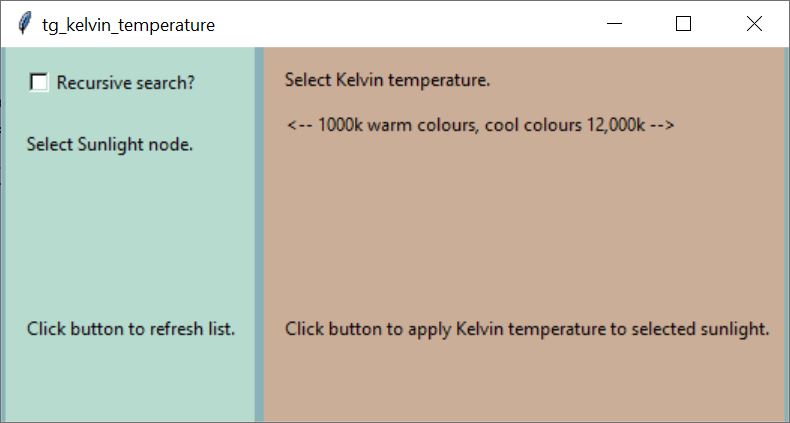
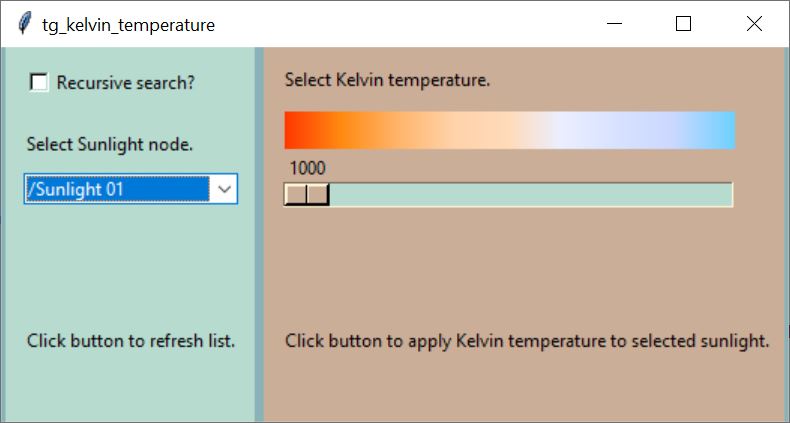
With all this in mind, let’s look at the graphical interface we’ll be creating.
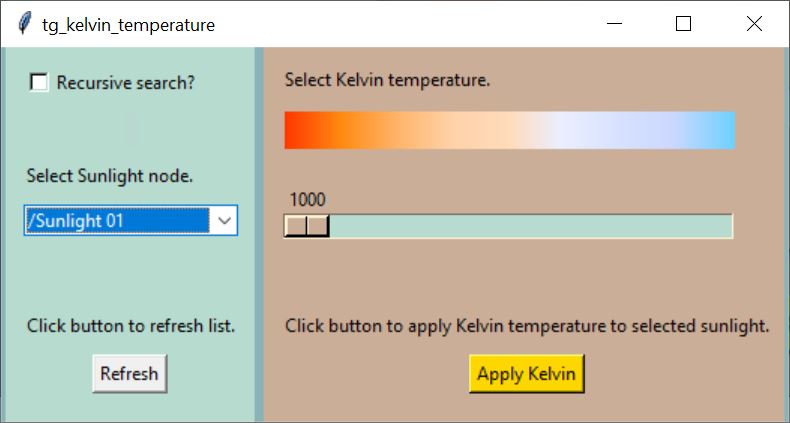
At first glance the interface seems to be divided into two parts, with the left side in green focusing on the lights, and the right side in brown focusing on the Kelvin temperature. Various forms of user input adorn the window, including a checkbox, combobox, slider, labels and buttons.
Importing Python Modules
When writing code in Python, it’s standard procedure to import any required modules that you need at the very start of the program. For this program we’ll need to import a number of modules in order to build the user interface, import bitmap images, query the operating system, and of course communicate with the active Terragen project.
To import the modules we’ll need in our program, use your editor to add the following code block at the top of the program.
from tkinter import *
from tkinter import ttk
from tkinter import messagebox
from PIL import ImageTk, Image
import os
import traceback
import terragen_rpc as tg
Throughout this post we’ll provide a detailed explanation for any new lines of code which haven’t previously been explained in the code block above.
- from tkinter import *
- This line of code imports all the functions and built-in modules from the tkinter package into the program. The asterisk “*” means to import everything. We’ll use the functions from tkinter to design the graphical interface.
- from tkinter import ttk
- This line of code specifically imports the ttk package which is responsible for the style of the widgets (buttons, etc.) within the interface.
- from tkinter import messagebox
- The messagebox module adds the ability to display a pop-up window, and is often used to display messages, warnings and to prompt the user for simple interactions.
- from PIL import ImageTk, Image
- In order to use bitmap images in our interface, we need to import Python’s imaging library, or PIL, for short. The currently maintained version, or “fork”, of PIL is known as PILLOW. This line of code loads two specific modules. The “ImageTK” module creates an image that can be displayed in a tkinter widget, like a Label or Canvas widget. The “Image” module handles the opening of the image file and manipulating it, such as resizing it, prior to it being displayed via a widget.
- import os
- The “os” module provides a way to interact with the operating system, such as performing tasks related to files and directories.
- import traceback
- This module can be of assistance in diagnosing and debugging errors, such as the sequence of function calls that led to an exception.
- import terragen_rpc as tg
- This line imports the Terragen RPC module so we can communicate with the active Terragen project. We use the alias “tg” because it’s easier to type “tg” than “terragen_rpc” all the time.
Creating the GUI
When the program is run, we want a graphical interface window to open. The following lines of code will create the basic window and keep it open until the user closes the window. It’s important that the last line of code remains at the bottom of the program. Enter these lines of code into the program just below the import section.
Two of these lines of code begin with the hash ‘#” symbol, which is used to indicate a comment in the code. Comments are lines of text that are ignored by the Python interpreter when the code is executed. We’ll make use of the hash symbol throughout the program to leave remarks, and to organize the code into meaningful sections.
gui = Tk()
gui.title("tg_kelvin_temperature")
gui.geometry("525x250")
gui.config(bg="#89B2B9")

# The rest of the code will go here

# Keep the following line at the very end of the program
gui.mainloop()- gui = Tk()
- This line of code calls the tkinter “Tk()” function to create a window. The variable “gui” is the name of the window, and will be used throughout the program when the window needs to be configured, modified, or something needs to be placed into the window.
- gui.title(“tg_kelvin_temperature”)
- This line of code calls the tkinter “title()” function, accepting a string of text as an argument between its parentheses. The text, “tg_kelvin_temperature”, is displayed at the top of the window. Typically, this is the name of the program. Note how “dot” syntax is used in this and the following lines of code after the variable’s name, to call a function, or method, to perform a specific task.
- gui.geometry(“525×250”)
- This line of codes calls the tkinter “geometry()” function, which sets the width and height dimensions for the window according to the argument passed between its parentheses.
- gui.config(bg=”#89B2B9”)
- This line of code calls the tkinter “config()” function, passing a hexidecimal colour code to the “bg” or background option of the function. This sets the background colour of the window, in this case to a dark blue-green.
- gui.mainloop()
- This line of code, which should always remain at the bottom of the program, creates an event loop which listens for the user’s input such as button clicks, mouse movements, etc.
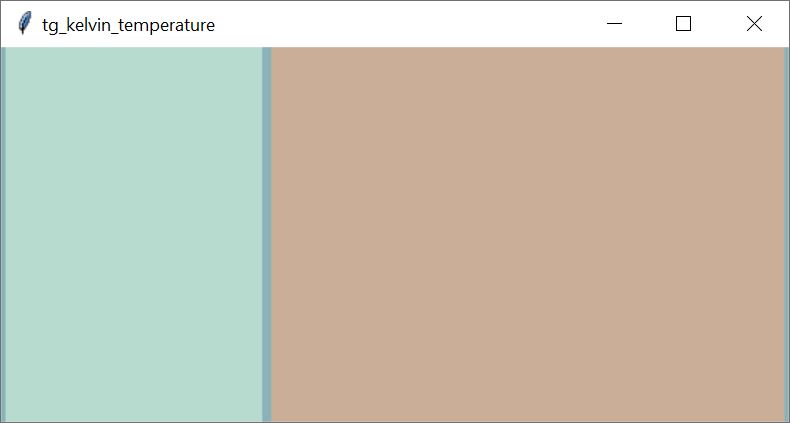
If you save and run the program, the graphical interface should open and look like this.
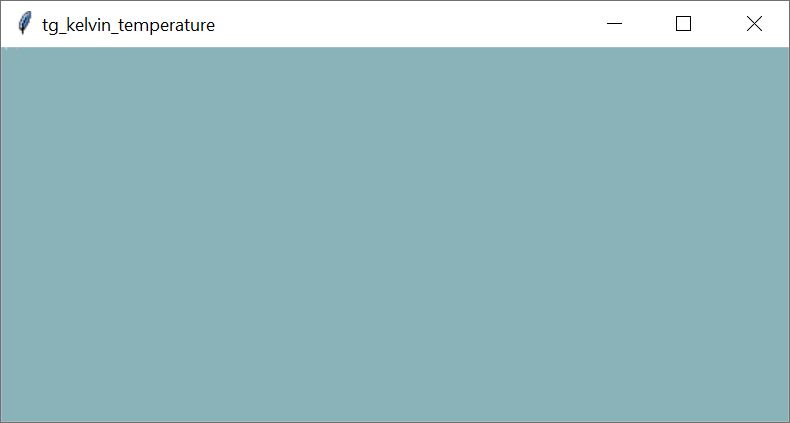
Click the “X” at the top right of the window to close the window and exit the program.
Adding Frames to the GUI
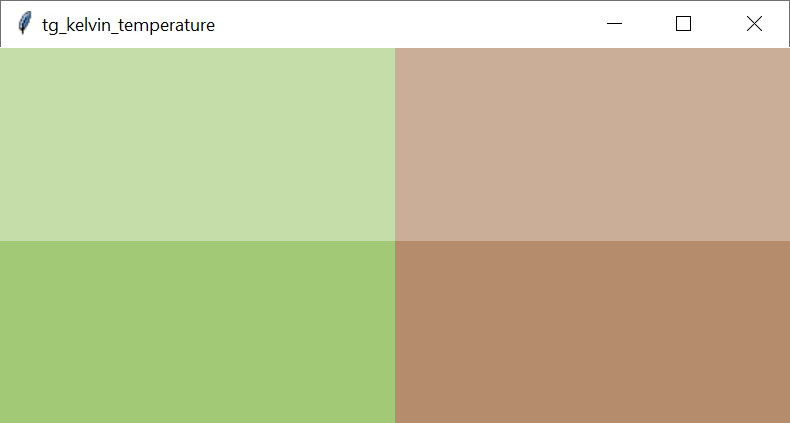
With tkinter we can divide our window into sections or “frames” using the LabelFrame widget, which acts as a container for other widgets, such as buttons or checkboxes. In the example image below, we’ve divided the GUI into four sections by colour, each one representing a potential frame. We could put the widgets dealing with the Sunlight nodes in the green frames, and the widgets dealing with the Kelvin temperature in the brown frames.
Using frames allow us to manipulate larger sections of the window, without always having to manipulate an individual widget. For example, we could arrange the frames more like this, if it fits our widgets better.
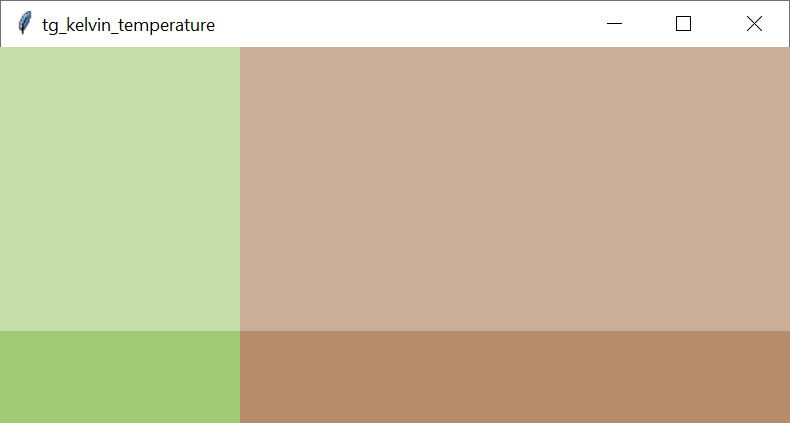
Our goal, more or less, is to align the widgets horizontally, allowing space for the Combobox to open fully when the user is selecting a Sunlight node. In case you’re wondering why we’re using four frames instead of two, it’s in order to be able to place the button widgets at the bottom of the window and have them align with each other.
We’ll make use of the tkinter LabelFrame widget to divide up the window. The widget accepts a number of options between its parentheses. The first option is used for the name of the window that the widget will be placed in. Other options set the style and background colour of the frame.
To divide our current window, “gui”, into four frames, insert the following code to our program, just above the section of code “# the rest of the code goes here”.
frame0 = LabelFrame(gui,relief=FLAT,bg="#B8DBD0")
frame1 = LabelFrame(gui,relief=FLAT,bg="#CBAE98")
frame2 = LabelFrame(gui,relief=FLAT,bg="#B8DBD0")
frame3 = LabelFrame(gui,relief=FLAT,bg="#CBAE98")
- frame0 = LabelFrame(gui,relief=FLAT,bg=”#BBDBD0”)
- frame0
- This is the name of the frame.
- LabelFrame()
- This is the tkinter LabelFrame widget function. Options can be passed to the function within its parentheses.
- gui
- The first option is the name of the window in which to place the frame.
- relief = FLAT
- This argument is optional and sets the look of the frame. When the option is assigned the “FLAT” style, no border lines are drawn surrounding the frame. Other styles for this option are RAISED, SUNKEN, GROOVE, and RIDGE.
- bg = “#B8DBD0”)
- This option sets the background colour for the frame, just like the previous example set the background colour for the window. The hexidecimal code “#BADBD” is the light green colour, and the “#CBAE98” code is the light brown colour.
- frame0
To position the frames in the window we’ll pass the window’s row and column values to the “grid()” function. Row and column numbering are zero-based, meaning that the first row is “row 0”, and the second is “row 1”, and so on.
Add the following code block to the program, just below what was previously added.
frame0.grid(row=0,column=0,sticky="WENS",padx=3)
frame1.grid(row=0,column=1,sticky="WENS",padx=3)
frame2.grid(row=1,column=0,sticky="WENS",padx=3)
frame3.grid(row=1,column=1,sticky="WENS",padx=3)
- grid(row=0,column=0,sticky=”WENS”,padx=3)
- grid()
- The “grid()” function positions the frame within the window according to the options passed to it.
- row = 0
- This positions the frame in the first row of the window. Numbering of the rows are zero-based, therefore the number of the first row is zero.
- column = 0
- This positions the frame in the first column of the window. Numbering of the columns are zero-based, therefore the number of the first column is zero.
- sticky = “WENS”
- This option is used to align a widget within a window. It can be set to north, south, east, west, north-west, north-east, south-west, south-east. If not defined the widget will be centered within the row and column. When set to “WENS” the frame is stretched east to west and north to south to fill the window.
- grid()
Finally, to provide us with the ability to adjust the rows and columns within the window, we’ll use the “rowconfigure()” and “columnconfigure()” functions.
Add this code block just after the other lines of code which configure the “gui” window.
gui.rowconfigure(0,weight=2)
gui.rowconfigure(1,weight=1)
gui.columnconfigure(0,weight=1)
gui.columnconfigure(1,weight=2)- gui.rowconfigure(0,weight=2)
- rowconfigure()
- The “rowconfigure()” or “columnconfigure()” functions allow you to set the behavior and properties of a row or column when the grid geometry manager is used. By passing options to the function between its parentheses you can control aspects such as minimum height, or how a row or column proportionally expands and contracts as the window is resized.
- 0
- The first option passed with the parentheses is the row or column number. Row and column numbering start with zero.
- weight = 2
- This option determines how the row or column proportionally expands or contracts as the window is resized. In this example row zero is twice as large as row 1, and column zero is half as small as column 1.
- rowconfigure()
If you run the program you should see this:
Adding Widgets to the GUI
With our basic window in place we can begin to think about the widgets and functions needed for the program. Our first goal is to gather and present all the lights in the project so that the user can easily select the ones they wish to modify. To do this, we’ll make use of three types of widgets found in the tkinter module; a “checkbox”, a “label”, and a “combobox”.
The checkbox widget will provide us a level of control, as to how deep to search the active Terragen project looking for light nodes. For this blog post, we’ll also limit the search to Sunlight nodes only.
The combobox widget will display a list of the Sunlight nodes found in the project, and allow the user to select the ones they wish to modify.
Label widgets will simply display some text to the user, such as instructing them to select a light from the list, or to click a button in order to apply a change.
The Checkbox Widget
Let’s start by adding a checkbox widget to the interface. The checkbox will act as a “flag” to indicate how deep we want to search the Terragen project looking for Sunlight nodes.
Enter the following lines of code just after the line of code “# The rest of the code will go here.”
# checkbox
recursive_checkbox = Checkbutton(frame0,text="Recursive search?",variable=recursive_search,bg="#B8DBD0",padx=10,pady=10)
recursive_checkbox.grid(row=0,column=0,sticky='w')- recursive_checkbox
- This is the variable name for the tkinter Checkbox widget.
- Checkbutton()
- This is the tkinter function for creating a checkbox.
- frame0
- This first option to the “Checkbutton()” function, determines the window or frame the widget is positioned in.
- text = “Recursive search?”
- The text within quotes is assigned to the “text” option and displayed next to the checkbox. You can use single or double quotes.
- variable = recursive_search
- The “variable” option is set to a variable named “recursive_search”. Essentially this variable is the status of the checkbox; either checked or unchecked. We will define the “recursive_search” variable momentarily.
- bg = “#B8DBD0”
- The “bg” option sets the background colour for the checkbox widget. Note, that we’ve set it to the same colour as the frame its placed in.
- padx = 10
- The “padx” option pads the widget horizontally by the number of pixels specified. In this case 5 pixels on the left and 5 pixels to the right of the widget.
- pady = 10
- The “pady” option pads the widget vertically by the number of pixels specified. In this case 5 pixels on top and 5 pixels on the bottom of the widget.
We need to define the variable “recursive_search” in the program, otherwise we would get an error. Insert the assignment statement below, just after the line of code that reads ““# The rest of the code will go here.”
# variables
recursive_search = BooleanVar()- recursive_checkbox
- This defines the variable name, which will contain the status of the checkbox, either checked or unchecked, i.e. True or False. Throughout the program you can retrieve its value using a “get()” function, or set its value with a “set()” function.
- BooleanVar()
- This is a special tkinter variable, whose value is either True or False.
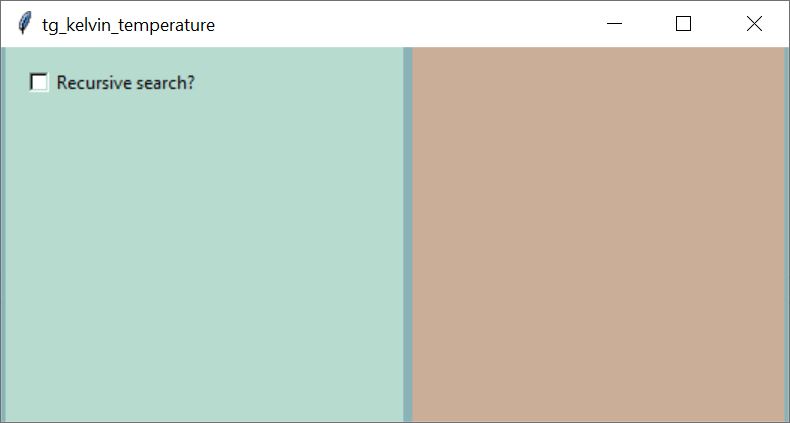
The program should now look like this, and if you run the program you should get the interface below.
The Label Widgets
If you take a look at the example image for the final GUI, you’ll see there are four lines of text that provide instructions to the user ranging from “Select Sunlight Node.” to “Click button to apply Kelvin temperature to selected sunlight.” Tkiniter’s Label widget allows us to enter text, create empty rows, and even display bitmap images in a window.
Let’s add these text instructions to the GUI by adding the code block below, just after the last line in the code block for the checkbox. Notice how the labels are positioned in each frame, according to the frame names assigned as the first option in the “Label()” function.
# text labels
text01 = Label(frame0,text='Select Sunlight node.',relief = FLAT,bg="#B8DBD0",padx=10,pady=10)
text02 = Label(frame2,text="Click button to refresh list.",relief=FLAT,bg="#B8DBD0",padx=10,pady=10)
text03 = Label(frame1,text="Select Kelvin temperature.",bg="#CBAE98",relief=FLAT,padx=10,pady=10)
text04 = Label(frame3,text="Click button to apply Kelvin temperature to selected sunlight.",relief=FLAT,bg="#CBAE98",padx=10,pady=10)
text01.grid(row=2,column=0,sticky='w')
text02.grid(row=0,column=0,sticky="w")
text03.grid(row=0,column=0,sticky="w")
text04.grid(row=0,column=0,sticky="w")
- text01 = Label(frame0,text=’Select Sunlight node.’,relief = FLAT, bg= “#B8DBD0”,padx=10,pady=10)
- text01
- This is the variable name for the label widget.
- Label()
- This is the tkinter Label widget, and can be used to add text or bitmap images to a window.
- text=’Select Sunlight node.’
- The string “Select Sunlight node.” is assigned to the function’s “text” option and is displayed in the window or frame to which it has been assigned.
- text01
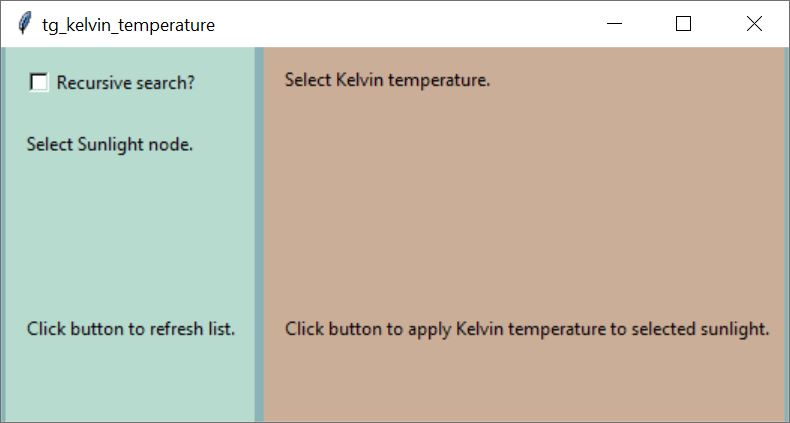
If you run the program, the interface will look like this:
Adding a Bitmap Image
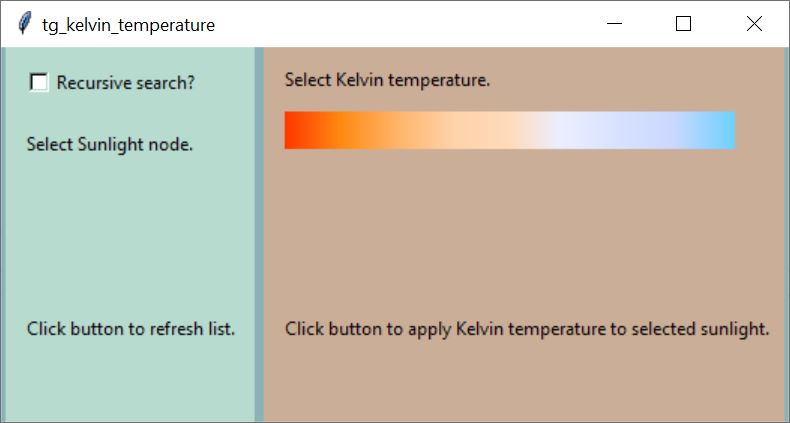
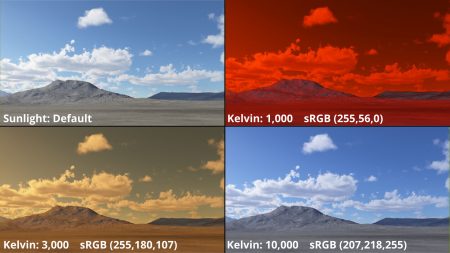
We can create some visual interest in the GUI by also using the Label widget to display a bitmap image which represents the colour range along a Kelvin temperature scale. Lower values on the Kelvin scale, such as 4,000 K, result in reddish warm coloured light, while higher values, such as 12,000 K, result in blueish cool coloured light. Sunlight appears in the 5600 K range.
Here’s the image that we’ll use. You can create a similar image in any paint or compositing program you want. Note that the image is saved in the GIF format.
![]()
![]()
Since the bitmap image is an external file to our program, it’s a good idea to make sure it exists before trying to open it and placing it in the GUI. For demonstration purposes, we’ve put the bitmap image into an “images” folder.
First, let’s define the variable “image_path” which contains the name and path of the external file, relative to the location of the program we’re writing. Then, we’ll create another variable called “image_open” to which is assigned the results of the “load_image()” function. This function will return “None” if the bitmap image can’t be located, or open the file if it does. By testing the value of the “image_open” variable, we can see if the file was successfully found or not.
Just below the code block in the program that defines the frames, enter the following code block.
image_path = "images/tg_kelvin_colours.gif"
image_open = load_image(image_path)
if image_open:
image1 = ImageTk.PhotoImage(image_open)- image_path = “images/tg_kelvin_colours.gif”
- image_path
- This is the variable name, to which the bitmap image name and relative path are assigned.
- images/tg_kelvin_colours.gif
- This is the external bitmap image name and relative file path. Note that it is enclosed within quotes.
- image_path
- image_open = load_image(image_path)
- image_open
- This is the variable name, which is assigned the results from the “load_image()” function.
- load_image(image_path)
- The “load_image()” function will open the file if it is found, or return “None” if not. We pass the relative location of the file we’re looking for via the “image_path” variable.
- image_open
- if image_open
- When this conditional statement evaluates as True, it means that the bitmap image file was successfully opened, and the following indented line of code will be executed. If the statement evaluates as False, it means that the “load_image()” function returned a value of “None”, so the following indented line of code will not be executed.
- image1 = ImageTk.PhotoImage(image_open)
- In this line of code, the opened bitmap image from above is passed to the “PhotoImage()” function of the ImageTk module, so that it can be displayed in the GUI via a Label widget, by assigning the variable “image1” to the widget’s “image” option.
Next, we need to write the custom “load_image()” function which checks to see if a file exists, and if so opens it; otherwise it returns “None”. This function needs to come before the lines of code we just added to the program, because Python needs to have found the function before it can be called.
def load_image(image_path):
    if os.path.exists(image_path):
        return Image.open(image_path)
    else:
return None- def load_image(image_path):
- This defines a function named “load_image” and passes the “image_path” variable to it.
- if os.path.exists(image_path):
- The “os.path.exists()” function returns either True or False, depending on whether or not the file specified by the “image_path” variable exists.
- return Image.open(image_path)
- This line of code is executed only if the file was found. The “open()” function from the imported Image module opens the file specified by the “image_path” variable, and returns it to the calling line of code.
- return None
- This line of code is executed only if the file was not found where specified by the “image_path” variable. It returns “None” to the calling line of code.
Now that the variable “image_open” has received the returned value from the “load_image()” function, we can test to see if the file was opened or not. If the file was successfully opened we’ll be able to pass it along to the other tkinter module, ImageTk, where it can be converted into a format that can be displayed in the GUI.
Label widgets can display a bitmap image via its “image” option. Normally, we would add the Label widget in the same way as we did for the prior Label widgets only replacing the “text” option with an “image” option, but since we have the “image_open” variable available, which tells us if the image was successfully opened or not, we have an opportunity to do something else if the bitmap image wasn’t found and opened. In this case we could display some text in place of the bitmap image in the GUI.
Note how the following code block first tests the “image_open” variable, and if the result is True, adds the bitmap image to the GUI, but if the result is False, a string of text is displayed in its place. Using this technique means that there will always be something displayed in that row of the GUI, and keep the other tkinter widgets from shifting around in the window or frame if the row was empty.
Enter the following lines of code into the program, just following the # text labels section. Note that the “grid()” functions work in the same manner as previously described.
# bitmap image or text
if image_open:
    kelvin_image = Label(frame1,image=image1,background="#CBAE98")
    kelvin_image.grid(row=1,column=0,padx=10)
else:
    kelvin_image = Label(frame1,text="<-- 1000k warm colours, cool colours 12,000k -->",background="#CBAE98")
kelvin_image.grid(row=1,column=0,padx=10)- if image_open:
- When this conditional statement evaluates as True, it means that the bitmap image was successfully opened and may be placed into the GUI, via the following indented lines of code. When the statement evaluates as False, the lines of indented code following the “else:” statement would be executed.
- kelvin_image = Label(frame1, image=image1,background=”#CBAE98”)
- kelvin_image
- This is the name of the label widget.
- Label()
- This is the tkinter Label widget function.
- frame1
- This is the frame that the widget will be displayed in.
- image = image1
- The “image” option is assigned the variable “image1” which is the converted bitmap image formatted to be displayed in the GUI.
- background = “#CBAE98”
- This sets the “background” colour option of the Label widget to the specified colour. In this case the colour is set to light brown to match the frame’s background colour.
- kelvin_image
- else:
- When the “if” statement evaluates as False, the “else” statement is executed. In this case it means that the “image_open” variable is set to “None”, because the bitmap image could not be found using the specified relative path. If this were to happen, we want to display some text in place of the missing image.
- kelvin_image = Label(frame1, text=”<– 1000k warm colours, cool colours 12,000k →”,background=”#CBAE98”)
- text = ”<– 1000k warm colours, cool colours 12,000k →”
- The “text” option is set to a string of text which may be helpful to the user, in light of the missing bitmap image.
- text = ”<– 1000k warm colours, cool colours 12,000k →”
To see what the GUI looks like, run the program. Then temporarily rename the bitmap image and run the program again. Here’s what you should see.
The Slider (Scale) Widget
The bitmap image provides a colourful way to reference a range of Kelvin temperature values, but we also need a way to select a specific Kelvin temperature value. To do this, we can make use of the tkinter Scale widget, also known as a “slider”, and configure it to correspond to the gradient image in the GUI.
Add the following lines of code just below the last line in the # bitmap image or text section of our program.
# slider
kelvin_slider = Scale(frame1,from_ = 1000, to = 12000, variable =kelvin,orient=HORIZONTAL,showvalue =1,resolution=100,length=300,bg="#CBAE98",troughcolor="#B8DBD0",highlightthickness=0,highlightbackground="#CBAE98")
kelvin_slider.grid(row=6,column=0,sticky='w',padx=10)- kelvin_slider
- This variable is the name of the Scale widget.
- Scale()
- This tkinter function creates the Scale widget.
- frame1
- This positions the Scale widget in the frame named “frame1” of the GUI.
- from_ = 1000,
- The “from_” option defines the starting value of the slider range. Note that the option ends in a required underscore “_” character.
- to = 12000,
- The “to” option defines the ending value of the slider range.
- variable = kelvin
- The global variable “kelvin” is assigned to the slider. Its value is set as the user drags the slider left or right. We’ll define the global variable “kelvin” below.
- orient = HORIZONTAL
- This option creates a horizontal slider. You can also create vertical sliders.
- showvalue = 1
- When this option is set to “1”, the value of the “variable” option is displayed above or next to the slider. When it’s set to 0 the variable is not displayed. As the slider is moved, you’ll see the values change accordingly.
- resolution = 100
- This sets the increments of the slider. In this example, with the minimum value at 1000 and the maximum value at 12000 and the resolution value set to 100, the slider will step through the range in increments of 100. For example, 1000, 1100, 1200, 1300 and so on.
- length = 300
- Sets the length of the scale widget in the window.
We’ll need to add a global variable of the Integer class to define the kelvin value selected by the user. Add the following line of code after the last variable defined in the # variables section of our program.
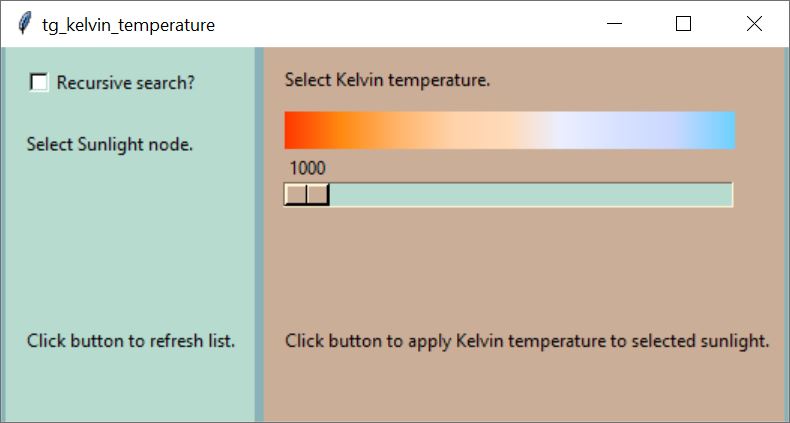
kelvin = IntVar()If we save and run the program we’ll now have a functional slider in the GUI.
The remaining tkinter widgets that we need to add to the GUI, the Combobox and Button widgets, are a bit more complex than the previous widgets, because in order to display them on the GUI we also need to simultaneously define the functions for what they do.
The Combobox Widget
The tkinter Combobox widget provides the user a way in which to select an item from a drop-down list. We’ll use this widget to display the Sunlight nodes in the Terragen project, and subsequently allow the user to select one of the lights to apply a Kelvin temperature value to.
In order to populate the drop-down list with the Sunlight nodes, we first need to query Terragen to see if there are any Sunlight nodes in the project. We also need to consider what to do if no Sunlight nodes can be found. This may be the result of not having a Sunlight node in the project, or it could be due to the results of the search parameters, specifically if the “recursive_checkbox” is unchecked, which will limit the search to only the nodes in the project at root level. So we’re going to need to define some custom functions.
To get started, let’s define a variable in which to assign the Sunlight nodes that can be found by our custom function. Enter the following lines of code, just beneath the # variables section.
# main - get sunlight nodes in the project
sunlight_paths = get_sunlight_nodes_in_project()- sunlight_paths
- This variable is assigned the paths of the Sunlight nodes in the project, which are returned by the function “get_sunlight_nodes_in_project()”. When we want to modify a Sunlight node’s colour later on, we’ll use the path to locate the Sunlight node in the Terragen project. An item’s path is more reliable than its name, because it’s possible for more than one item to have the same name. Using the “sunlight_paths” variable provides a way in which to check if Sunlight nodes are actually present in the project.
- get_sunlight_nodes_in_project()
- When this line of code is executed, the “get_sunlight_nodes_in_project()” function is called. The function will return the paths of the Sunlight nodes in the project if they exist or “None” if there are no Sunlight nodes within the search parameters.
Recursive Functions
When the objective is to retrieve all the Sunlight nodes in the project, we need to determine if each node contains one or more “child” nodes within its internal node network, and if those nodes have child nodes, etc. We also need to know if any of those nodes are Sunlight nodes. This is known as a recursive procedure, and while it will return all the types of nodes we’re looking for, it can take “a lot” of time, depending on how many nodes are in your project.
This is where the “recursive_checkbox” variable comes into play. When it is checked, our program will recursively go through all the nodes in the project and return the paths for all the Sunlight nodes. When it is unchecked, the program only needs to go through the nodes at the root level of the project, which is much faster.
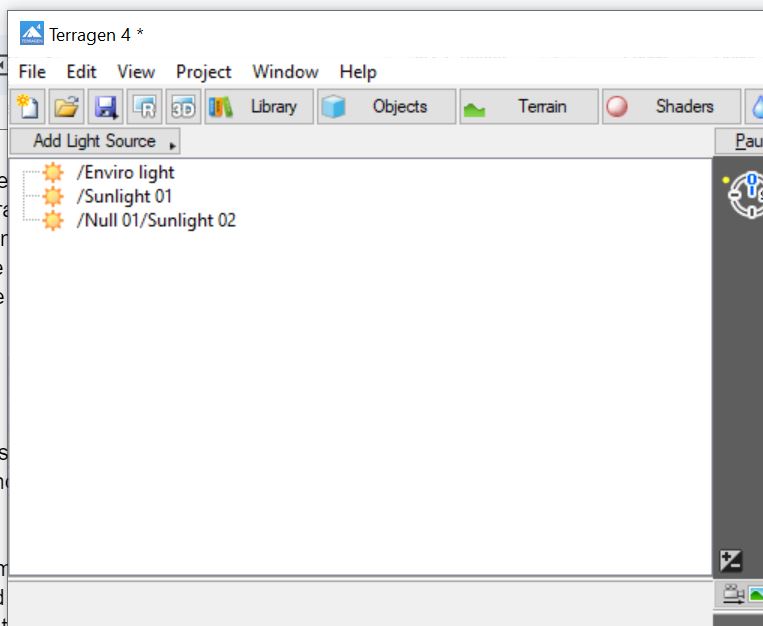
Take a look at the Node List for the Lights layout below, which contains two Sunlight nodes. The first Sunlight node is preceded with a forward slash “/” indicating that it’s located at the root level of the project, which is typical of the default Terragen project. The second Sunlight node is preceded with “/Null 01/” which indicates that it is a child of the Null 01 node in the project.
Ideally, we would like to pass to the function any node in the project, and have it return two things. First, a list of any child nodes within the node’s internal node network, and secondly, the paths of any child nodes that happen to be Sunlight nodes.
Let’s add the following lines of code to define the function just below the line “# The rest of the code will go here.”
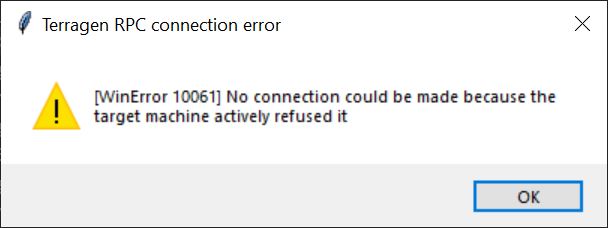
Notice that we’ve included code to handle exceptions, or errors, via the “try” and “except” statements. We covered this concept in detail in the previous blog post, Hello RPC! – Part 2 Error Handling. What’s different here is that we’re making use of Tkinter’s Messagebox module to display error messages in a pop-up window. We’ll add the code for the Messagebox functions below. Also note the indentation to the lines of code which make up the code block after the function is defined.
def get_sunlight_nodes_in_project():
    try:
        project = tg.root()
        return get_sunlight_nodes_in_node(project)
    except ConnectionError as e:
        popup_warning("Terragen RPC connection error",str(e))
        return([])
    except TimeoutError as e:
        popup_warning("Terragen RPC timeout error",str(e))
        return([])
    except tg.ReplyError as e:
        popup_warning("Terragen RPC reply error",str(e))
        return([])
    except tg.ApiError:
        popup_warning("Terragen RPC API error",traceback.format_exc())
return([])- def get_sunlight_nodes_in_project():
- In Python, “def” is the keyword for defining a function. Always start a block of code for a function with this keyword.
- The name of the function is “get_sunlight_nodes_in_project()”. The parentheses help us to recognize that this is a function, and by enclosing an argument between them, provide a way to pass values to the function. In this case we’re not passing any arguments to the function so the space between the parentheses is empty. In Python, a trailing colon, “:”, indicates that the next line of code should be indented and belongs to the block of code above it.
- try:
- The “try” statement is the start of an exception handling code block. If exceptions are found in the following lines of code, they will be handled by the “except” statements.
- project = tg.root()
- The variable “project” is assigned the values returned from the terragen_rpc module’s root() function. Remember that we’re using the alias “tg”, so we can refer to the terragen_rpc module as “tg”. The root() function returns the project’s base node id, which will allow us to search for other nodes and parameters within the project.
- return get_sunlight_nodes_in_node(project)
- The “return” command returns to the line of code which called the “ get_sunlight_nodes_in_project()” function in the first place.
- The “get_sunlight_nodes_in_node()” is a second function which is executed before the “return” command. This function will search for and return the names and paths of the child nodes we’re looking for.
- The variable “project”, which is the project’s base node id, is passed to the second function by placing it between the parenthesis.
- except ConnectionError as e
- The keyword “except” handles the exception. If the type of error is a “ConnectionError” the following indented lines of code are executed.
- “ConnectionError” is the type of exception.
- The “as” statement indicates that the error should be stored to the variable “e”
- “e” is the variable to which the exception is stored, so it can later be printed or displayed.
Notice that we’re calling a second function called “get_sunlight_nodes_in_node()”. This function will search the node it is given, in this case the “project” variable, and look for any child nodes it may have. If the recursive checkbox is unchecked, the function is limited to searching the node for only its immediate child nodes. When checked, the function will search each of the child nodes in turn, looking for their children as well. When the function is complete, it will return the paths of the Sunlight nodes it found. If no Sunlight nodes are found, the function will return “None”.
Enter the following code block just below the last function we added to the program.
def get_sunlight_nodes_in_node(in_node):
    try:
        node_paths = []
        all_children = in_node.children()
        sunlight_children = in_node.children_filtered_by_class("sunlight")
        for child in sunlight_children:
            node_paths.append(child.path())
        if recursive_search.get():
            for child in all_children:
                deeper_paths = get_sunlight_nodes_in_node(child)
                node_paths.extend(deeper_paths)
        return node_paths
    except ConnectionError as e:
        popup_warning("Terragen RPC connection error",str(e))
        return([])
    except TimeoutError as e:
        popup_warning("Terragen RPC timeout error",str(e))
        return([])
    except tg.ReplyError as e:
        popup_warning("Terragen RPC reply error",str(e))
        return([])
    except tg.ApiError:
        popup_warning("Terragen RPC API error",traceback.format_exc())
return([])- def get_sunlight_nodes_in_node(in_node):
- This defines the function’s name and accepts one argument which it refers to as “in_node” within the function.
- node_paths = []
- This defines a local variable to the function named “node_paths”. The two brackets “[]” indicate that the variable is a list. The list is “initialized” or empty, because there are no values specified between the two brackets.
- all_children = in_node.children()
- A local variable named “all_children” is defined and assigned the values returned from the terragen_rpc module’s children() function. The function will return a list of ids for each child node of the “in_node” variable. The list will be empty if no child nodes are found.
- sunlight_children = in_node.children_filtered_by_class(“sunlight”)
- A local variable named “sunlight_children” is defined and assigned the values returned from the terragen_rpc module’s “children_filtered_by_class()” function. The “class” or type of node is enclosed within quotes and passed as an argument to the function. In this case we’re passing the “sunlight” class to the function so that only nodes belonging to the sunlight class are returned.
- for child in sunlight_children:
- This line of code initiates a “for” loop through the list of Sunlight node ids stored in the variable “sunlight_children”. After the last item in the list is reached, the “for” loop ends.
- For each item in the list, designated by the “child” variable, the indented code block below the statement is executed. Therefore, for each Sunlight node id we retrieve its path.
- node_paths.append(path())
- This line of code performs two tasks. First, it returns the path of the child node via the “path()” function. Then it appends the path of the node to the variable “node_paths”.
- if recursive_search.get():
- The “get()” function retrieves the current status of the “recursive_search” checkbox variable. If the checkbox is checked the condition is True, and if unchecked the condition is False. If the condition evaluates as True then the indented lines of code below the statement will be executed. If the condition evaluates to False, those lines are skipped.
- for child in all_children():
- Note that these indented lines of code are only executed when the “if” statement above evaluates as True, which means that the user wishes to recursively search through the entire project in order to find all the sunlight nodes.
- This line of code initiates a “for” loop through the list of child node ids stored in the variable “all_children”. These child nodes may or may not be a Sunlight node. After the last item in the list is reached, the “for” loop ends.
- For each item in the list, designated by the “child” variable, the indented code block below the statement is executed.
- deeper_paths = get_sunlight_nodes_in_node(child)
- First, notice that this line of code calls the same function we’re currently in, the “get_sunlight_nodes_in_node()” function. This is how the recursive search takes place.
- The local variable “deeper_paths” is used to store the paths of the Sunlight nodes as they’re encountered.
- node_paths.extend(deeper_paths)
- This line of code uses the “extend()” function to add the paths of the child Sunlight nodes to the “node_paths” variable.
- return node_paths
- This last line of code in the function returns the focus of the program to the line of code which called the function in the first place. If Sunlight nodes were found within the search parameters the Sunlight node paths are returned. If no Sunlight nodes were found, and empty list is returned.
The Messagebox Function
In Python, an error is known as an “exception”. It’s always a good idea to anticipate where exceptions might occur in order to keep them from becoming a serious problem. The Terragen RPC documentation recommends catching certain types of exceptions as well.
In the function above, we capture certain types of exceptions such as connection errors, timeout errors, and reply errors, with a code blocks similar to this:
except ConnectionError as e:
popup_warning(“Terragen RPC connection error”,str(e))”.
return([])
In this example, when a ConnectionError exception is captured, it will be stored in the variable “e” and then sent to the “popup_warning()” function, along with two arguments. The first argument will be used for the title of the pop-up window, and the second argument is the exception. After the user closes the pop-up window, an empty list is returned to the calling line of code, which is expecting some kind of list to be returned to it.
Add the following code block to the program, just below the other functions.
def popup_warning(message_title,message_description):
    messagebox.showwarning(title = message_title,message = message_description)
- def popup_warning(message_title, message_description)
- def popup_warning()
- This defines the function name “popup_warning()” which accepts two arguments passed to it.
- message_title
- This argument will be for the text that appears in the title of the window.
- message_description
- This argument will be used for the text that appears in the body of the window.
- def popup_warning()
- messagebox.showwarning(title=message_title,message = message_description)
- showwarning()
- The “showwarning()” function of the Messagebox module has options for the window title and message, and includes a warning graphic.
- title = message_title
- The “title” option is set to the first argument passed to the function as the variable “message_title”.
- message = message_description
- The “message” option is set to the second argument passed to the function as the variable “message_description”.
- showwarning()
Populating the Combobox
Now that we’ve obtained a list of the Sunlight nodes in the project, we can add them to the drop-down list of the Combobox. Before populating the drop-down list, we need to make sure that the value assigned to the “sunlight_paths” variable isn’t an empty list, which would indicate that no Sunlight nodes exist in the project according to our search parameters.
To create the tkinter Combobox widget, add the following lines of code, just below the lines of code for the slider widget.
# combobox
sunlight_combobox = ttk.Combobox(frame0,textvariable=selected_sunlight,state="readonly")
sunlight_combobox["values"] = sunlight_paths
if len(sunlight_paths) > 0:
    sunlight_combobox.current(0)
sunlight_combobox.grid(row=3,column=0,padx=10)- sunlight_combobox = ttk.Combobox(frame0,textvariable=selected_sunlight,state=”readonly”)
- sunlight_combobox
- This defines the variable and name for the Combobox widget.
- ttk.Combobox()
- We use the “ttk” module to format the Combobox widget, and enclose any attributes for the Combobox within the parenthesis.
- textvariable = selected_sunlight
- The “textvariable” option is assigned the value of a global variable called “selected_sunlight”, which we’ll define below. In our program, the textvariable will be the Sunlight node chosen by the user from the list in the Combobox.
- state = “readonly”
- By setting the “state” option to “readonly” the user can not change the names of the items that appear in the drop-down list.
- sunlight_combobox
- sunlight_combobox[“values”] = sunlight_paths
- The “values” option of the Combobox widget determines what is displayed in its drop-down list. In this case we’re assigning the paths of the Sunlight nodes in the project. Note that the option is enclosed in quotes within the square brackets.
- if len(sunlight_paths) > 0:
- This is where we check to see if Sunlight nodes exist in the project. The conditional statement checks to see if the length of the “sunlight_paths” variable is greater than 0. If it evaluates as True, then there are Sunlight nodes in the project, and the next indented line of code will be executed and the Combobox drop-down list positioned at the first item in the list. However, if it evaluates as False, then no Sunlight nodes are available, and the following line of code is skipped, avoiding an exception.
- sunlight_combobox.current(0)
- This line of code is only executed if Sunlight nodes were found in the project. The “current()” function positions the drop-down list at the value passed to it between the parenthesis. We pass “0” to the function to position the drop-down list at the first entry in the list.
Before running the program, we need to define the global variable referenced by the “textvariable” option above, otherwise we’ll get an error message because the variable does not yet exist.
Add the following line of code to the # variables section of the program.
selected_sunlight = StringVar()- selected_sunlight
- This defines the global variable’s name
- StringVar()
- This is another tkinter variable, which accepts text as input. Throughout the program you can retrieve its value using a “get()” function, or set its value with a “set()” function.
If we save and run the program the GUI will look like this. The number of Sunlight nodes in the drop-down list may vary, depending on the number of Sunlight nodes in your project.
Refreshing the Combobox
One last thing to consider when dealing with nodes in a project, is that the user may add, delete or rename nodes at any time, so we need a method to refresh the Combobox’s drop-down list to reflect the current state of the project.
We’ll do this by adding a tkinter Button widget to the GUI, which will call a function to refresh the list of Sunlight nodes when we click it. We’ll position the button just below the line of text “Click button to refresh list”.
Add the following lines of code right beneath the # combobox section of code.
# buttons
refresh_button = Button(frame2,text="Refresh",command=refresh)
refresh_button.grid(row=2,column=0)- refresh_button
- This is the name of the button widget.
- Button()
- This is the tkinter Button function.
- frame2
- The button is positioned in the frame named “frame2” of the window.
- text = “Refresh”
- The character string assigned to the “text” option will be displayed on the button.
- command = refresh
- When the button is clicked, the “command” option calls the function assigned to it. In this case the “refresh” function is called.
Let’s define the “refresh()” function by entering the code block below in our program, just below the other functions we’ve defined already. The first few lines of code should look familiar by now. We define the function name, then repeat the original call to the “get_sunlight_nodes_in_project()” function. This will return all the Sunlight node names and paths currently in the project.
We update the Combobox values according to the information returned. If there are no Sunlight nodes currently in the project, the lists of Sunlight node names and paths are cleared, otherwise they’re updated to reflect the current Sunlight nodes in the project. Finally, the Combobox drop-down list is positioned at the first item in the list, with the “current(0)” function.
def refresh():
    global sunlight_paths
    sunlight_paths = get_sunlight_nodes_in_project()
    sunlight_combobox.set('') # clears the selected value
    sunlight_combobox["values"] = sunlight_paths
    if len(sunlight_paths) > 0:
sunlight_combobox.current(0)- def refresh():
- This statement defines the function named “refresh()”.
- global sunlight_paths
- Variables used within a function are local to that function. This means that they’re not available outside the function. By using the “global” command followed by a variable name we can instruct the program to use variables that reside outside of the current function. Within this function, we want to be able to update the global variables for the Sunlight paths, so we use the global command followed by their variable names.
- sunlight_paths = get_sunlight_nodes_in_project()
- The variable “sunlight_paths” is assigned the results from the “get_sunlight_nodes_in_project()” function.
- sunlight_combobox.set(‘’)
- This statement sets the selected value in the combobox to an empty string.
- sunlight_combobox[“values] = sunlight_paths
- This line of code sets the “values” options for the combobox to the items in the variable “sunlight_paths”.
- if len(sunlight_paths) > 0:
- This conditional statement tests the length of the “sunlight_paths” variable. If the statement evaluates as True, it means there are Sunlight nodes in the project, and the indented line of code below it will be executed. If there are no Sunlight nodes in the project, the length would be zero.
- sunlight_combobox.current(0)
- The “current()” function retrieves the index of the currently selected item in the combobox. The index is zero-based, meaning the index of the first item in the list is zero. Note, if no item is selected, the “current()” function returns “-1”.
If you save and run the program, try to add, rename and delete Sunlight nodes from the Terragen project. Then click on the “Refresh” button to see the list of lights updated in the combobox.
The Apply Button
Now that a Sunlight node can be selected in the drop-down list, we need a way to apply the Kelvin temperature value to it. To do that, we’ll add one last button widget to the GUI. When the user clicks on the button, the Sunlight node in Terragen will get updated.
To create the button, add the following code block, just after the “Refresh” button’s code.
apply_button = Button(frame3,text="Apply Kelvin",bg='gold',command=apply_kelvin)
apply_button.grid(row=1,column=0)- apply_button
- This variable is the Button widget’s name.
- frame3
- This positions the Button widget in the frame named “frame3” of the window.
- text = “Apply Kelvin”
- The character string assigned to the “text” option, “Apply Kelvin”, will be displayed on the button.
- bg = ‘gold’
- This sets the background colour of the button. Note, that we’re using the HTML colour name instead of the hexadecimal colour code.
- command = apply_kelvin
- This is what the button actually does when the user clicks it. Specifically, it runs a function called “apply_kelvin”, which we’ll code below.
The Kelvin Dictionary
When the “Apply Kelvin” button is clicked by the user, the “apply_kelvin()” function is called. This function looks up a “key” within a Python data structure known as a dictionary. Accessing data from a dictionary is much faster than using other data structures such as a “list”. We simply query the dictionary with the key, and it returns the value associated with the key. This is known as a “key:value” pair, that is, for each element there is a key identifier and a value. The key identifiers in this dictionary correspond to the Kelvin temperature, and the values correspond to the sRGB colour space of those temperatures. For example, a Kelvin temperature of “2600” has a corresponding sRGB value of (255, 165, 79). The function then passes the sRGB value to another function where it is converted into decimal form, before sending it to Terragen and updating the Sunlight’s colour parameter.
For this program, we’ll borrow Andreas Siess’s “RGB to color temperature” Python table which can be found in his online article “RGB to color temperature”. Please note, the author of this post does not guarantee the sRGB values in the table are guaranteed to be scientifically correct. They do, however, work great!
Copy and paste the table into our program, just below all the functions we’ve created.
As you can see from the partial snippet below, the name of the dictionary is “kelvin_table” and its keys are numerical values in Kelvin units. Just like our slider, the first key in the table starts at “1000” and the last key ends at “12000”. For each key there is a corresponding sRGB value, formatted as a tuple, that is one value for each of the red, green, and blue colour components.
kelvin_table = {
1000: (255, 56, 0),
1100: (255, 71, 0),
1200: (255, 83, 0),
1300: (255, 93, 0),
1400: (255, 101, 0),
11600: (197, 211, 255),
11700: (197, 210, 255),
11800: (196, 210, 255),
11900: (195, 210, 255),
12000: (195, 209, 255)}
With our dictionary of Kelvin temperature and colour values in place, we can add the “apply_kelvin()” function to the program as well. Enter these lines of code, just after the last function in our program.
def apply_kelvin():
    kelvin_as_srgb = kelvin_table[kelvin.get()]
    kelvin_as_decimal = srgb_to_decimal(kelvin_as_srgb)
set_sunlight_node_in_project(kelvin_as_decimal)- kelvin_as_srgb = kelvin_table[kelvin.get()]
- kelvin_as_srgb
- This variable is assigned the sRGB value from the kelvin_table dictionary. The key to this value is what the user has chosen by manipulating the slider in the GUI.
- kelvin_table[]
- This is the name of the Python dictionary to search for the key : value pair.
- kelvin.get()
- The “get()” function allows the current value of the variable “kelvin” to be retrieved. The “kelvin” value is updated each time the slider is manipulated by the user. This value is passed along to the kelvin_table dictionary as the key.
- kelvin_as_srgb
- kelvin_as_decimal = srgb_to_decimal(kelvin_as_srgb)
- kelvin_as_decimal
- This creates a variable named “kelvin_as_decimal” which is ultimately assigned the decimal equivalent of the sRGB value, formatted as a list of values.
- srgb_to_decimal()
- This function, which we’ll write just below, will convert the sRGB values contained in the “kelvin_as_srgb” variable to their decimal equivalent.
- kelvin_as_decimal
- set_sunlight_node_in_project(kelvin_as_decimal)
- The decimal values contained in the variable “kelvin_as_decimal” are passed to this function, which we’ll also write just below. This is where they will be passed to Terragen via the terragen_rpc module.
To convert the sRGB value to its decimal equivalent enter the following code block to create the “srgb_to_decimal()” function, just below the last function we added to the program.
def srgb_to_decimal(sRGB):
    srgb_list = []
    for i in range(len(sRGB)):
        srgb_list.append(pow(sRGB[i]/255,2.2))
    srgb_list_to_tuple = tuple(srgb_list)
return srgb_list_to_tuple- def srgb_to_decimal(sRGB):
- This first line of code defines the function name and accepts an argument, sRGB, which is the value returned from the kelvin_table dictionary as a tuple. A tuple is immutable, which means that the red, green, and blue sRGB values that make up the three elements of the tuple can not be changed.
- srgb_list = []
- This creates and initializes a variable name “srgb_list” as a list. We’ll use this variable to store the decimal values for each element of the tuple.
- for i in range(len(sRGB)):
- for i in range():
- This creates a “for loop” which goes through each component of the sRGB argument passed to the function, one at a time. The “i” variable is used here to indicate the current component being evaluated. Sometimes you’ll see this variable named as “nodes” or “items”. Essentially, it’s going through the red, green and blue colour component values that make up the sRGB variable.
- range()
- The “range()” function takes the length of the sRGB variable in order to know how many times to iterate through the variable.
- len()
- The “len()” or length function, returns the length of a variable. In this case it’s the number of items in the sRGB variable, which is 3.
- for i in range():
- srgb_list.append(pow(sRGB[i]/255,2.2)
- srgb_list.append()
- The “append()” function adds each element to the srgb_list variable.
- pow(sRBG[i]/255,2.2))
- This is the actual math taking place within the function. For each colour component, the original sRBG value is divided by 255, then it’s factored by a power function, i.e. “pow()” which uses 2.2 as its exponent. This accounts for the gamma correction built into the sRGB values in the kelvin_table dictionary. In other words, if you were to compare the sRGB value in the kelvin_table dictionary with the Sunlight node’s Colour parameter in Terragen, they would be the same value.
- srgb_list.append()
- srgb_list_to_tuple = tuple(srgb_list)
- The “srgb_list_to_tuple” is a new variable which contains the decimal values in the format of a tuple.
- The “tuple()” function converts the list of of decimal values into a tuple format.
- return srgb_list_to_tuple
- This statement returns the variable “srgb_list_to_tuple” to the line of code that called the “srgb_to_decimal()” function in the first place.
Now we can write the code for the function that actually tells Terragen to change the colour of the selected sunlight node via RPC. Enter the following block of code, just after the function we just wrote.
def set_sunlight_node_in_project(kelvin_decimal):
    index = sunlight_combobox.current()
    if index < 0:
        popup_warning("TclError","No Sunlight nodes in project. \nAdd Sunlight node and refresh list. \n")
        return
    try:
        node = tg.node_by_path(sunlight_paths[index])
        if node:
            node.set_param('colour',kelvin_decimal)
        else:
            popup_warning("Terragen Warning","Selected Sunlight node no longer in project. \nRefresh list. \n")
    except ConnectionError as e:
        popup_warning("Terragen RPC connection error",str(e))
    except TimeoutError as e:
        popup_warning("Terragen RPC timeout error",str(e))
    except tg.ReplyError as e:
        popup_warning("Terragen RPC reply error",str(e))
    except tg.ApiError:
popup_warning("Terragen RPC API error",traceback.format_exc())- def set_sunlight_node_in_project(kelvin_decimal):
- This first line of code defines the function name and accepts an argument, “kelvin_decimal”, which is the converted sRGB colour value.
- index = sunlight_combobox.current()
- The variable “index” is created and assigned the result from the Combobox widget’s “current()” function, which is the index number of the selected Sunlight in the drop-down list.
- if index < 0:
- Items in the drop-down list of the Combobox are numbered zero to the number of items in the list. Should there be no sunlight nodes in the project, the list would be empty and return “-1” as the value. Therefore, if the condition evaluates as True, then the list is empty and the following lines of code get executed.
- popup_warning()
- This line of code calls the “popup_warning()” function, which opens a pop-up window alerting the user the absence of Sunlight nodes in the project. Two arguments are passed to the function. The first argument “TclError” becomes the title of the pop-up window, and the second argument is displayed as a message in the body of the window. When the user closes the pop-up window, the “return” statement returns to the calling line of code.
- return
- This line of code only executes if there are no Sunlight nodes in the Terragen project. It simply returns to the calling line of code.
- node = tg.node_by_path(sunlight_paths[index])
- node
- The variable “node” is created and assigned the result of the “node_by_path()” function.
- tg.node_by_path()
- This function of the terragen_rpc module returns the object node id containing the chosen sunlight node so that its parameters may be modified.
- sunlight_paths[index]
- Using the “index” variable for the selected Sunlight node in the Combobox, we can retrieve the corresponding path from the “sunlight_paths” variable, and pass it to the RPC “node_by_path()” function.
- node
- if node:
- If this conditional statement evaluates as True, the following indented line of code is executed and the Sunlight’s colour value is modified. If the conditional statement evaluates as False, it means the Sunlight node could not be found in the current Terragen project, and notifies the user via a pop-up message window.
- node.set_param(‘colour’,kelvin_decimal)
- This is the actual line of code that makes the modification to the sunlight node’s colour parameter in Terragen. Two arguments are passed, the parameter name in lower case, which is “colour”, and the new colour value for the parameter which is contained in the “kelvin_decimal” variable.
- else:
- This statement only executes if the “if node:” conditional statement above evaluates as False, indicating that the selected Sunlight node is no longer in the current Terragen project.
- popup_warning(“Terragen Warning”,”Selected Sunlight node no longer in project. \nRefresh list. \n”)
- This statement displays a popup window with a warning to the user that the Sunlight node is no longer in the project and to refresh the drop-down list of Sunlight nodes.
GUI Aesthetics
We can add a bit of visual breathing room between the GUI components by inserting an empty row between the widgets. To do this, we’ll add two more Label widgets to the program, but their “text” options will be assigned an empty string of characters, so effectively nothing will be displayed in the row.
Add these line of codes just below the # buttons section of code.
# empty space
empty_row1 = Label(frame0,text=" ",bg="#B8D8D0")
empty_row2 = Label(frame1,text=" ",bg="#CBAE98")
empty_row1.grid(row=1)
empty_row2.grid(row=2)
If you save and run the program, this is what you should see:
There you have it! The ability to selectively change a Sunlight node’s colour value based on Kelvin temperature! What other things might you do to expand this simple program?
- How about being able to modify Spotlight and Light Source nodes as well?
- How about selecting multiple lights at once?
- What about adding controls to manipulate the light’s strength parameter?
- Or even enable or disable a light entirely?
In Conclusion
We hope you’re beginning to see the power of Terragen’s RPC feature. The ability to manipulate the active Terragen project is not limited to writing a program with Python. If you’re familiar with other scripting languages that are native to other 3D applications, such as MEL scripting in Maya, you can communicate with Terragen via the RPC system.
Keep on coding!
Further Resources
Terragen RPC documentation
Github repository for tg_kelvin_temperature.py